
Table of Contents
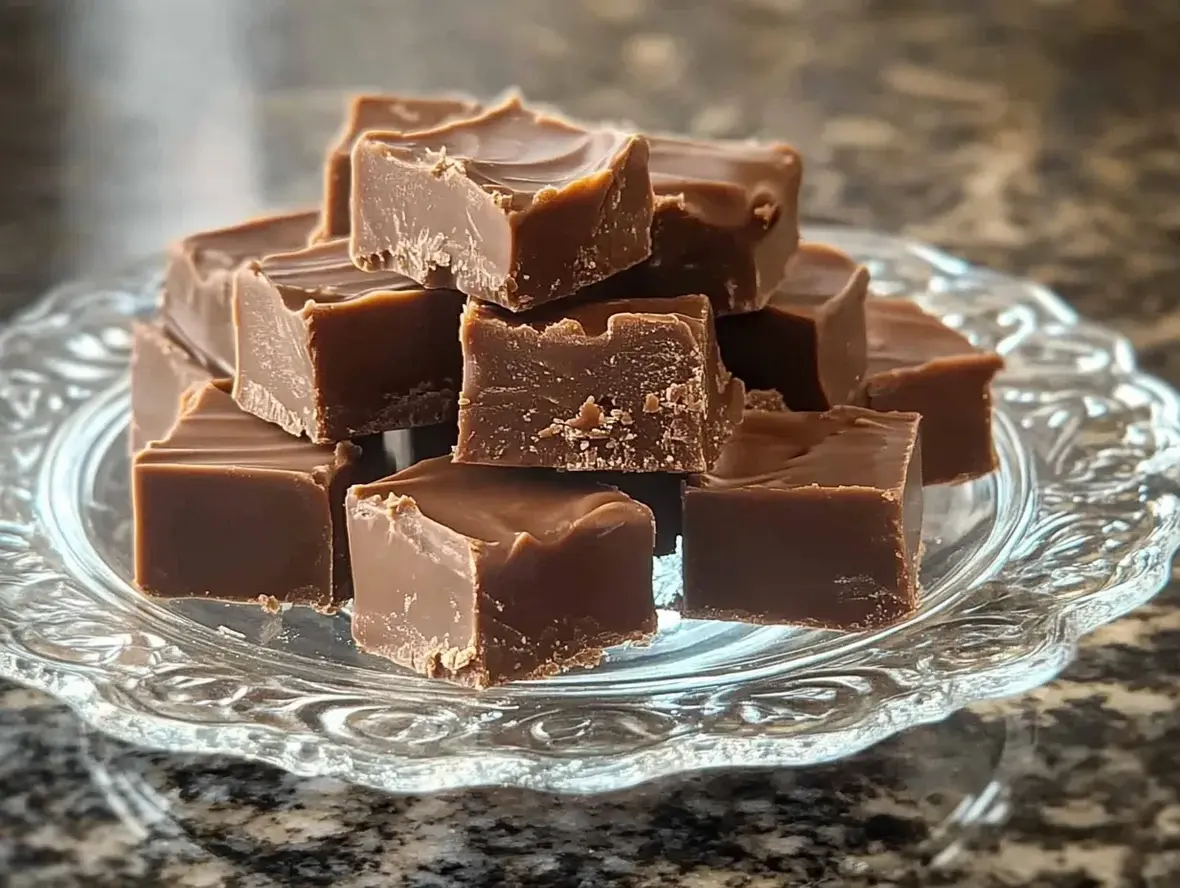
Old Fashioned Fudge Recipe – Timeless and Delicious
Old Fashioned Fudge Recipe: Is Yours as Rich and Creamy as This Classic Treat?
In a world of instant gratification and modern twists, the craving for something truly timeless often beckons. For many, that craving leads directly to the comforting, nostalgic taste of old-fashioned fudge. Have you ever wondered what makes that perfectly smooth, intensely chocolatey confection so irresistible? The secret lies in a simple, traditional recipe that, when executed with care, delivers unparalleled richness and a melt-in-your-mouth texture. This isn’t just a holiday treat; it’s an anytime indulgence that brings a smile to faces young and old. Prepare to dive into the decadent depths of a classic that never goes out of style.
The Heart of the Matter: Ingredients for Truly Old Fashioned Fudge
The beauty of old-fashioned fudge lies in its straightforward ingredient list. High-quality components are key to achieving that luxurious flavor and texture. Here’s what you’ll need to create this magical treat:
- Granulated Sugar: 3 cups. The fine crystals dissolve to create a smooth texture. Don’t skimp here; it’s the backbone of our fudge.
- Butter: 1 cup (2 sticks), unsalted. Adds richness and a creamy mouthfeel. Use good quality butter for the best flavor.
- Evaporated Milk: 1 can (12 ounces). This concentrated milk provides a lower water content than regular milk, helping to prevent crystallization and achieve a dense, smooth fudge.
- Semi-sweet Chocolate Chips: 1 cup (about 6 ounces). While traditional recipes might use unsweetened chocolate, chips offer convenience and a balanced sweetness. For a deeper chocolate flavor, use a mix of semi-sweet and dark chocolate chips.
- Marshmallow Cream: 1 jar (7 ounces). This is the key to that incredibly smooth, no-fail texture. It helps stabilize the fudge and prevents graininess.
- Vanilla Extract: 1 teaspoon. Enhances the chocolate flavor and adds a warm aroma. Use pure vanilla extract for the best results.
- Chopped Nuts (Optional): 1 cup. Walnuts or pecans are classic choices. They add a delightful crunch and nutty depth.
Substitutions & Sensory Notes: If you don’t have evaporated milk, you can technically use regular whole milk, but you’ll need to be extra cautious about preventing crystallization and the texture might be slightly softer. For a dairy-free version, experiment with full-fat coconut milk and dairy-free chocolate chips. The unsweetened chocolate (about 4 ounces, cut into pieces) can be used instead of chocolate chips for a more intense, less sweet chocolate flavor, but ensure it’s of high quality. The aroma of melting chocolate and vanilla is intoxicating – a true sign you’re on your way to deliciousness!
Timing is Everything for Perfect Fudge
Making fudge is a process that requires patience, especially during the cooling phase. Unlike quick microwave fudge, this old-fashioned method is worth the wait!
Compared to average recipes: Many quick fudge recipes can be made in under 30 minutes total. However, this traditional method involves cooking to a specific temperature and allowing for proper cooling and setting, which significantly enhances texture and flavor, making the extended time a worthwhile trade-off for superior results.
Crafting Your Classic Fudge: A Step-by-Step Guide
Follow these steps carefully, and you’ll be rewarded with incredibly delicious, homemade fudge.
Step 1: Prepare Your Pan
Grab an 8×8 or 9×9 inch baking pan. Line it with parchment paper, leaving an overhang on the sides. This makes lifting the fudge out so much easier later. Lightly grease the parchment paper as well, just for good measure. You want your beautiful fudge to release perfectly!
Step 2: Combine Ingredients
In a heavy-bottomed saucepan, combine the granulated sugar, butter, and evaporated milk. Stir gently over medium heat until the butter is melted and the sugar is mostly dissolved. Don’t rush this; a gentle start prevents scorching.
Step 3: Boil the Mixture
Once the butter is melted and sugar is dissolved, increase the heat to medium-high. Bring the mixture to a rolling boil. Here’s the crucial part: once boiling, stop stirring! Let it boil undisturbed for exactly 4-5 minutes. Why? Stirring can cause sugar crystals to form, leading to grainy fudge. A candy thermometer clipped to the side of the pan is your best friend here; you’re aiming for 234°F (112°C), which is the soft-ball stage. This temperature is critical for achieving the right texture.
Step 4: Cool the Fudge
Once the mixture reaches 234°F (112°C), immediately remove the saucepan from the heat. Let the mixture cool in the pan, undisturbed, until it reaches 110°F (43°C). This cooling period is almost as important as the boiling. It allows the sugar syrup to reach the correct consistency before the beating stage. It should feel lukewarm to the touch. This can take anywhere from 30 minutes to an hour, depending on your kitchen’s temperature.
Step 5: Beat the Fudge
This is where the magic happens! Add the semi-sweet chocolate chips, marshmallow cream, vanilla extract, and optional nuts to the slightly cooled mixture. Now, start beating! You can use a wooden spoon, a sturdy whisk, or an electric mixer on low speed. Beat the mixture continuously until it begins to lose its gloss and starts to thicken. You’ll see it transform from a liquid into a rich, creamy, spreadable consistency. This process incorporates air and helps create that smooth, velvety texture we’re after.
Step 6: Pour and Set
Once the fudge has reached the desired consistency and is thick but still pourable, quickly pour it into your prepared pan. Spread it evenly using a spatula. Let the fudge set completely at room temperature for at least 2-4 hours. Resist the temptation to refrigerate it, as this can sometimes make it too hard or affect its texture. Patience will be rewarded!
A Glimpse at the Goodness (Approximate per serving)
Fudge is a treat, and like many indulgent sweets, it’s best enjoyed in moderation. Here’s an estimated breakdown of its nutritional content:
- Calories: Approximately 200-250 kcal
- Fat: 10-15g
- Saturated Fat: 6-9g
- Carbohydrates: 25-30g
- Sugar: 20-25g
- Protein: 2-3g
- Cholesterol: 25-30mg
Note: These are approximations and can vary based on the exact ingredients and portion size. For precise data, you would need to use a nutritional calculator with your specific ingredient brands.
Making Fudge a Little Lighter (Without Sacrificing Flavor)
While this is an old-fashioned, indulgent recipe, if you’re looking to make it a bit more health-conscious, here are some swaps to consider:
- Reduce Sugar: While challenging without affecting texture, you could experiment with reducing the granulated sugar slightly and supplementing with a sugar substitute like erythritol or a blend, though this may alter the set.
- Darker Chocolate: Opt for dark chocolate chips (70% cacao or higher). They offer more antioxidants and less sugar, delivering a richer, more intense chocolate flavor that can satisfy with smaller portions.
- Add Fiber: Incorporate finely ground flaxseed or chia seeds (about 1-2 tablespoons) into the mixture. They can add a nutritional boost and a slight chewiness.
- Portion Control: The simplest and often most effective “healthier alternative” is mindful portioning. Cut your fudge into smaller, bite-sized pieces. A small square can be incredibly satisfying!
How to Serve Your Delicious Fudge
Once your fudge has set, lift it out of the pan using the parchment paper overhang. Place it on a cutting board and cut it into squares. The size is up to you – bite-sized is great for parties, while slightly larger squares are perfect for a personal treat.
- Serve alongside a glass of cold milk, a cup of hot coffee, or as a decadent dessert after a meal.
- Package it beautifully in tins or boxes for homemade gifts during the holidays or for special occasions.
- Offer it as part of a cookie or dessert platter. A rich fudge complements lighter bakes perfectly.
Avoiding Fudge Fails: Common Mistakes to Steer Clear Of
Even with a simple recipe, a few missteps can lead to disappointing fudge. Here’s what to watch out for:
- Over-stirring during boiling: This is the number one culprit for grainy fudge. Let it boil undisturbed!
- Not using a thermometer: Relying on visual cues alone is risky. The precise temperature is crucial for the right texture.
- Not cooling properly: Not letting the mixture cool down enough before beating can result in a gummy or oily texture.
- Incorrect cooling: Refrigerating fudge before it’s fully set can make it brittle or affect its creamy texture. Let it set at room temperature.
- Humidity: High humidity can affect candy making, potentially preventing fudge from setting firm. Try making it on a drier day if possible.
Keeping Your Fudge Fresh and Delicious
Store your fudge properly to maintain its delightful texture and flavor:
- At Room Temperature: Once completely set, cut the fudge into squares and store it in an airtight container. Layer squares with parchment paper to prevent sticking. It will keep well at room temperature for about 1-2 weeks, provided it’s not too warm.
- In the Refrigerator: For longer storage (up to 3-4 weeks), you can refrigerate the fudge, again in an airtight container. Let it come to room temperature before serving for the best texture.
- Freezing: Fudge freezes remarkably well. Wrap individual pieces tightly in plastic wrap, then place them in a freezer-safe bag or container for up to 3 months. Thaw slowly in the refrigerator.
The Sweet Reward of Old-Fashioned Fudge
There’s something incredibly satisfying about creating this classic treat from scratch. This old-fashioned fudge recipe, with its simple ingredients and time-honored method, promises a rich, creamy, and utterly delicious result that will transport you to a place of pure comfort and joy. Whether you’re a seasoned baker or trying fudge for the first time, this recipe is your ticket to creating a truly memorable confection. Grab your apron, your favorite chocolate, and get ready to make some kitchen stories worth sharing!
Did you make this Old Fashioned Fudge recipe? We’d love to hear about your experience! Share your thoughts, tips, or any variations you tried in the comments below. And don’t forget to share your delicious creations on social media and tag us!
Frequently Asked Questions
***Why is my fudge grainy?***
Grainy fudge is usually caused by sugar crystals forming. This can happen if you stir the mixture while it’s boiling, or if the sugar wasn’t completely dissolved before boiling. Ensuring you use a candy thermometer for the correct temperature and avoiding stirring during the boil are key.
***Can I use different types of chocolate?***
Absolutely! You can adjust the chocolate to your preference. Using darker chocolate (70% cacao or higher) will result in a less sweet, more intense chocolate flavor. Milk chocolate will make it sweeter. You can also combine different types. Just ensure you’re using good quality chocolate for the best melt and flavor.
***My fudge seems too soft/hard. What went wrong?***
This almost always comes down to temperature. If the mixture boiled to too high a temperature, it will be too hard. If it didn’t reach the proper soft-ball stage (234°F/112°C), it will be too soft and may not set properly. Using a reliable candy thermometer is crucial.
***Can I add nuts or other mix-ins?***
Yes, nuts are a classic addition! Add them in Step 5, when you add the chocolate and marshmallow cream. Other additions like dried fruit, mini marshmallows, or sprinkles can also be incorporated at this stage.
***How long does fudge typically last?***
Properly stored at room temperature in an airtight container, old-fashioned fudge can last for 1-2 weeks. In the refrigerator, it can last for 3-4 weeks. Freezer storage extends its life for a few months.
Old-Fashioned Chocolate Fudge
This rich andcreamy chocolate fudgeis a timeless treat. Perfect for holidays, gift-giving, or satisfying your sweet tooth, it’s made with simple ingredients and a whole lot of love!
Ingredients
- 1 cupWhole Milk1 tspVanilla Extract4 tbspUnsalted Butter, softened and sliced2 cupsGranulated White Sugar½ cupUnsweetened Cocoa Powder
- 1 tspVanilla Extract4 tbspUnsalted Butter, softened and sliced2 cupsGranulated White Sugar½ cupUnsweetened Cocoa Powder
- 4 tbspUnsalted Butter, softened and sliced2 cupsGranulated White Sugar½ cupUnsweetened Cocoa Powder
- 2 cupsGranulated White Sugar½ cupUnsweetened Cocoa Powder
- ½ cupUnsweetened Cocoa Powder
Instructions
- 1️⃣Gather your ingredients:Assemble all ingredients to ensure a smooth cooking process.2️⃣Prepare the pan:Liberally grease an 8-inch square baking dish to prevent sticking. Set aside.3️⃣Mix the base:In a medium saucepan, combine the granulated sugar and cocoa powder. Stir in the milk until the mixture is smooth and uniform.4️⃣Heat the mixture:Heat the mixture over medium-high heat, stirring constantly, until it comes to a rolling boil.5️⃣Simmer and monitor:Reduce the heat to a gentle simmer. Insert a candy thermometer and let the mixture cook undisturbed until it reaches 238°F (114°C), about 10 minutes.No thermometer?Perform the water test: drop a small amount of the mixture into cold water. If it forms a soft ball that flattens when pressed, it’s ready.6️⃣Cool the mixture:Remove the saucepan from heat and let it cool to 110°F (43°C). This will take about 50-70 minutes. Do not stir during this cooling phase.7️⃣Incorporate butter and vanilla:Once cooled, add the softened butter and vanilla extract. Beat the mixture vigorously with a wooden spoon until it thickens and loses its glossy shine.8️⃣Pour and shape:Transfer the fudge mixture into the greased pan. Spread it evenly using a spatula or your hands.9️⃣Cool and cut:Let the fudge cool completely at room temperature or in the fridge. Once set, cut into 1-inch squares.
- Assemble all ingredients to ensure a smooth cooking process.
- 2️⃣Prepare the pan:Liberally grease an 8-inch square baking dish to prevent sticking. Set aside.3️⃣Mix the base:In a medium saucepan, combine the granulated sugar and cocoa powder. Stir in the milk until the mixture is smooth and uniform.4️⃣Heat the mixture:Heat the mixture over medium-high heat, stirring constantly, until it comes to a rolling boil.5️⃣Simmer and monitor:Reduce the heat to a gentle simmer. Insert a candy thermometer and let the mixture cook undisturbed until it reaches 238°F (114°C), about 10 minutes.No thermometer?Perform the water test: drop a small amount of the mixture into cold water. If it forms a soft ball that flattens when pressed, it’s ready.6️⃣Cool the mixture:Remove the saucepan from heat and let it cool to 110°F (43°C). This will take about 50-70 minutes. Do not stir during this cooling phase.7️⃣Incorporate butter and vanilla:Once cooled, add the softened butter and vanilla extract. Beat the mixture vigorously with a wooden spoon until it thickens and loses its glossy shine.8️⃣Pour and shape:Transfer the fudge mixture into the greased pan. Spread it evenly using a spatula or your hands.9️⃣Cool and cut:Let the fudge cool completely at room temperature or in the fridge. Once set, cut into 1-inch squares.
- Liberally grease an 8-inch square baking dish to prevent sticking. Set aside.3️⃣Mix the base:In a medium saucepan, combine the granulated sugar and cocoa powder. Stir in the milk until the mixture is smooth and uniform.4️⃣Heat the mixture:Heat the mixture over medium-high heat, stirring constantly, until it comes to a rolling boil.5️⃣Simmer and monitor:Reduce the heat to a gentle simmer. Insert a candy thermometer and let the mixture cook undisturbed until it reaches 238°F (114°C), about 10 minutes.No thermometer?Perform the water test: drop a small amount of the mixture into cold water. If it forms a soft ball that flattens when pressed, it’s ready.6️⃣Cool the mixture:Remove the saucepan from heat and let it cool to 110°F (43°C). This will take about 50-70 minutes. Do not stir during this cooling phase.7️⃣Incorporate butter and vanilla:Once cooled, add the softened butter and vanilla extract. Beat the mixture vigorously with a wooden spoon until it thickens and loses its glossy shine.8️⃣Pour and shape:Transfer the fudge mixture into the greased pan. Spread it evenly using a spatula or your hands.9️⃣Cool and cut:Let the fudge cool completely at room temperature or in the fridge. Once set, cut into 1-inch squares.
- 3️⃣Mix the base:
- In a medium saucepan, combine the granulated sugar and cocoa powder. Stir in the milk until the mixture is smooth and uniform.4️⃣Heat the mixture:Heat the mixture over medium-high heat, stirring constantly, until it comes to a rolling boil.5️⃣Simmer and monitor:Reduce the heat to a gentle simmer. Insert a candy thermometer and let the mixture cook undisturbed until it reaches 238°F (114°C), about 10 minutes.No thermometer?Perform the water test: drop a small amount of the mixture into cold water. If it forms a soft ball that flattens when pressed, it’s ready.6️⃣Cool the mixture:Remove the saucepan from heat and let it cool to 110°F (43°C). This will take about 50-70 minutes. Do not stir during this cooling phase.7️⃣Incorporate butter and vanilla:Once cooled, add the softened butter and vanilla extract. Beat the mixture vigorously with a wooden spoon until it thickens and loses its glossy shine.8️⃣Pour and shape:Transfer the fudge mixture into the greased pan. Spread it evenly using a spatula or your hands.9️⃣Cool and cut:Let the fudge cool completely at room temperature or in the fridge. Once set, cut into 1-inch squares.
- 4️⃣Heat the mixture:Heat the mixture over medium-high heat, stirring constantly, until it comes to a rolling boil.5️⃣Simmer and monitor:Reduce the heat to a gentle simmer. Insert a candy thermometer and let the mixture cook undisturbed until it reaches 238°F (114°C), about 10 minutes.No thermometer?Perform the water test: drop a small amount of the mixture into cold water. If it forms a soft ball that flattens when pressed, it’s ready.6️⃣Cool the mixture:Remove the saucepan from heat and let it cool to 110°F (43°C). This will take about 50-70 minutes. Do not stir during this cooling phase.7️⃣Incorporate butter and vanilla:Once cooled, add the softened butter and vanilla extract. Beat the mixture vigorously with a wooden spoon until it thickens and loses its glossy shine.8️⃣Pour and shape:Transfer the fudge mixture into the greased pan. Spread it evenly using a spatula or your hands.9️⃣Cool and cut:Let the fudge cool completely at room temperature or in the fridge. Once set, cut into 1-inch squares.
- Heat the mixture over medium-high heat, stirring constantly, until it comes to a rolling boil.
- 5️⃣Simmer and monitor:Reduce the heat to a gentle simmer. Insert a candy thermometer and let the mixture cook undisturbed until it reaches 238°F (114°C), about 10 minutes.No thermometer?Perform the water test: drop a small amount of the mixture into cold water. If it forms a soft ball that flattens when pressed, it’s ready.6️⃣Cool the mixture:Remove the saucepan from heat and let it cool to 110°F (43°C). This will take about 50-70 minutes. Do not stir during this cooling phase.7️⃣Incorporate butter and vanilla:Once cooled, add the softened butter and vanilla extract. Beat the mixture vigorously with a wooden spoon until it thickens and loses its glossy shine.8️⃣Pour and shape:Transfer the fudge mixture into the greased pan. Spread it evenly using a spatula or your hands.9️⃣Cool and cut:Let the fudge cool completely at room temperature or in the fridge. Once set, cut into 1-inch squares.
- Reduce the heat to a gentle simmer. Insert a candy thermometer and let the mixture cook undisturbed until it reaches 238°F (114°C), about 10 minutes.No thermometer?Perform the water test: drop a small amount of the mixture into cold water. If it forms a soft ball that flattens when pressed, it’s ready.6️⃣Cool the mixture:Remove the saucepan from heat and let it cool to 110°F (43°C). This will take about 50-70 minutes. Do not stir during this cooling phase.7️⃣Incorporate butter and vanilla:Once cooled, add the softened butter and vanilla extract. Beat the mixture vigorously with a wooden spoon until it thickens and loses its glossy shine.8️⃣Pour and shape:Transfer the fudge mixture into the greased pan. Spread it evenly using a spatula or your hands.9️⃣Cool and cut:Let the fudge cool completely at room temperature or in the fridge. Once set, cut into 1-inch squares.
- No thermometer?Perform the water test: drop a small amount of the mixture into cold water. If it forms a soft ball that flattens when pressed, it’s ready.
- 6️⃣Cool the mixture:Remove the saucepan from heat and let it cool to 110°F (43°C). This will take about 50-70 minutes. Do not stir during this cooling phase.7️⃣Incorporate butter and vanilla:Once cooled, add the softened butter and vanilla extract. Beat the mixture vigorously with a wooden spoon until it thickens and loses its glossy shine.8️⃣Pour and shape:Transfer the fudge mixture into the greased pan. Spread it evenly using a spatula or your hands.9️⃣Cool and cut:Let the fudge cool completely at room temperature or in the fridge. Once set, cut into 1-inch squares.
- Remove the saucepan from heat and let it cool to 110°F (43°C). This will take about 50-70 minutes. Do not stir during this cooling phase.7️⃣Incorporate butter and vanilla:Once cooled, add the softened butter and vanilla extract. Beat the mixture vigorously with a wooden spoon until it thickens and loses its glossy shine.8️⃣Pour and shape:Transfer the fudge mixture into the greased pan. Spread it evenly using a spatula or your hands.9️⃣Cool and cut:Let the fudge cool completely at room temperature or in the fridge. Once set, cut into 1-inch squares.
- 7️⃣Incorporate butter and vanilla:
- Once cooled, add the softened butter and vanilla extract. Beat the mixture vigorously with a wooden spoon until it thickens and loses its glossy shine.8️⃣Pour and shape:Transfer the fudge mixture into the greased pan. Spread it evenly using a spatula or your hands.9️⃣Cool and cut:Let the fudge cool completely at room temperature or in the fridge. Once set, cut into 1-inch squares.
- 8️⃣Pour and shape:Transfer the fudge mixture into the greased pan. Spread it evenly using a spatula or your hands.9️⃣Cool and cut:Let the fudge cool completely at room temperature or in the fridge. Once set, cut into 1-inch squares.
- Transfer the fudge mixture into the greased pan. Spread it evenly using a spatula or your hands.
- 9️⃣Cool and cut:Let the fudge cool completely at room temperature or in the fridge. Once set, cut into 1-inch squares.
- Let the fudge cool completely at room temperature or in the fridge. Once set, cut into 1-inch squares.
Notes
For extra flavor, mix in chopped nuts or mini marshmallows before pouring the fudge into the pan.Store fudge in an airtight container at room temperature for up to a week, or refrigerate for longer freshness.Be patient while beating—this step is crucial for achieving the perfect texture!
Store fudge in an airtight container at room temperature for up to a week, or refrigerate for longer freshness.Be patient while beating—this step is crucial for achieving the perfect texture!
Be patient while beating—this step is crucial for achieving the perfect texture!
Leave a Reply