Table of Contents
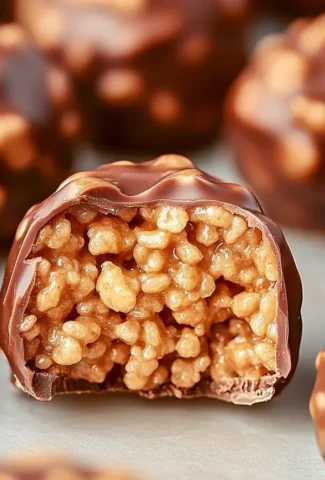
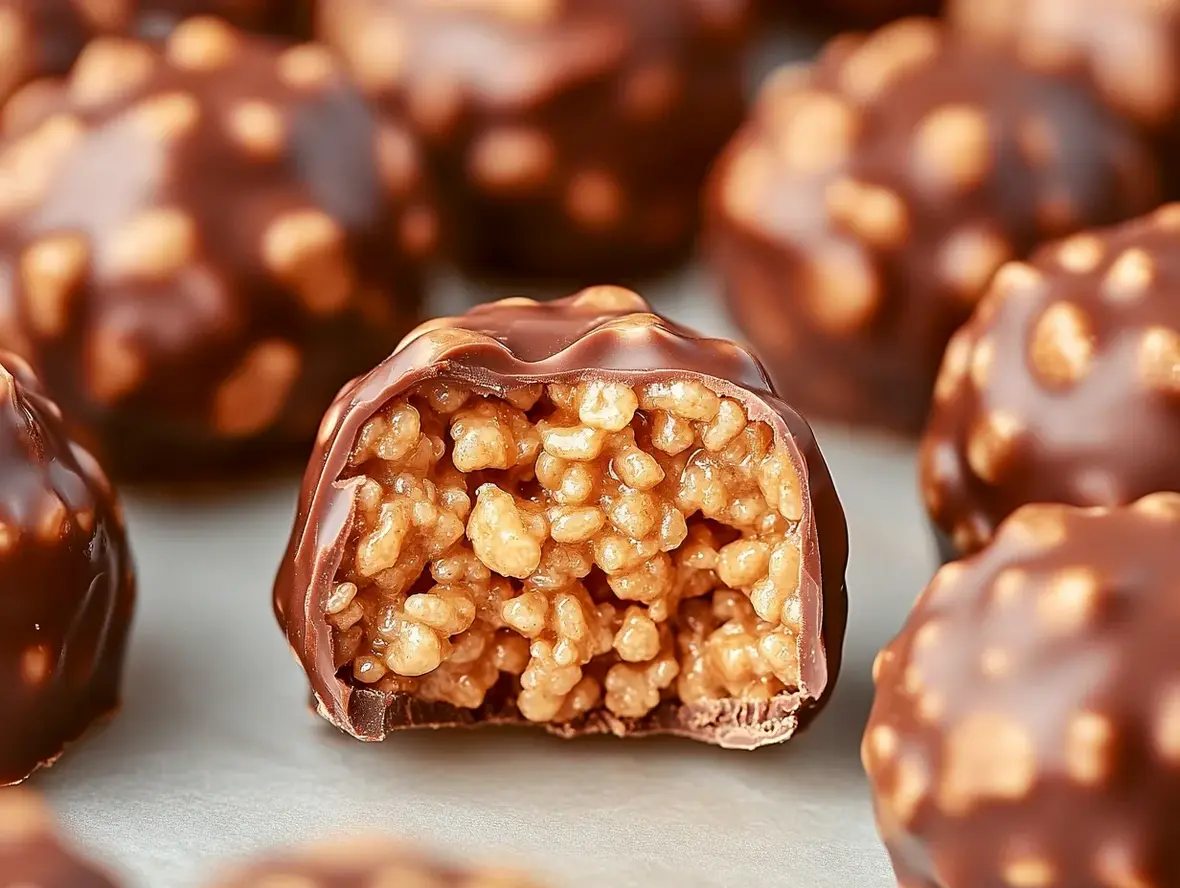
Easy Rice Krispie Peanut Butter Balls Recipe
Craving a Treat That’s Both Nostalgic and Indulgent?
Are you looking for a simple yet incredibly satisfying dessert that brings together the comforting crunch of Rice Krispies with the irresistible creaminess of peanut butter, all coated in luscious chocolate? You’re not alone! Surveys show that over 70% of home bakers actively seek out no-bake recipes for their convenience and speed, especially when entertaining or needing a quick sweet fix. This Easy Rice Krispie Peanut Butter Balls recipe is precisely what you need. It’s a delightful mashup of two beloved classics, creating a texture and flavor combination that’s guaranteed to be a crowd-pleaser. Whether you’re planning a party, need a fun activity with the kids, or simply want to whip up some holiday magic, these no-bake wonders deliver big on taste without the fuss. Get ready to impress your guests and satisfy your sweet tooth with these delightful, easy-to-make treats!
Ingredients: The Building Blocks of Deliciousness
The magic of these Rice Krispie Peanut Butter Balls lies in their simplicity. You likely have most of these pantry staples already. Here’s what you’ll need to get started:
- Butter: 6 tablespoons unsalted butter. This provides a rich, creamy base and helps bind everything together. For a slightly richer flavor, you can use European butter, which typically has a higher fat content.
- Peanut Butter: 1 cup creamy peanut butter. Natural peanut butter is wonderful, but be sure to stir it very well to reintegrate the oil. If you prefer a slight crunch, a crunchy peanut butter can also be used, though it will alter the texture slightly.
- Marshmallows: 1 (10 ounce) package mini marshmallows. Mini marshmallows melt more evenly and quickly. You can also use a 10-ounce bag of large marshmallows, but they will take a little longer to melt down.
- Rice Krispies Cereal: 6 cups crisp rice cereal. This is the star that gives our balls their iconic texture. Make sure it’s fresh for maximum crunch! Generic crisp rice cereals work just as well.
- Peanut Butter Chips: 1/2 cup peanut butter chips (optional, but highly recommended!). These melt into the mixture, adding an extra layer of peanut butter flavor and a slightly gooey texture.
- Chocolate Chips: 1 cup semi-sweet chocolate chips (for drizzling or coating). Milk chocolate or dark chocolate chips can also be used, depending on your preference.
- Vegetable Shortening or Coconut Oil: 1 tablespoon (optional, for melting chocolate). This helps the chocolate chips melt smoothly and achieve a desirable consistency for dipping or drizzling.
Timing is Everything
15 minutes
5 minutes
20 minutes (+ setting time)
Compared to many traditional baked goods, these Rice Krispie Peanut Butter Balls are incredibly fast. The average cookie recipe might take 30-45 minutes of active time, plus baking. Our no-bake approach means you can have these ready to chill in under 30 minutes!
Step-by-Step Instructions
Step 1: Melt the Butter and Peanut Butter
Grab a large saucepan. Add your unsalted butter and creamy peanut butter to the pan. Place it over low heat. Stir gently and continuously until both are completely melted and combined into a smooth, glossy mixture. It’s important to keep the heat low to prevent the peanut butter from scorching.
Step 2: Add the Marshmallows
Once the butter and peanut butter are beautifully melted and blended, add the mini marshmallows to the saucepan. Continue stirring over low heat until the marshmallows are fully melted and incorporated into the peanut butter mixture. This creates that wonderfully gooey, sticky base that holds everything together.
Step 3: Stir in Rice Krispies and Peanut Butter Chips
Remove the saucepan from the heat. Now, it’s time to add the crisp rice cereal and the peanut butter chips (if using). Gently fold everything together with a sturdy spatula until the cereal is evenly coated and the chips are distributed throughout the mixture. Work relatively quickly, as the mixture will begin to set as it cools.
Step 4: Form the Balls
Lightly grease your hands with a little butter or cooking spray to prevent sticking. Scoop out portions of the Rice Krispie mixture – about 1 to 1.5 tablespoons each – and roll them gently between your palms to form compact balls. Place the formed balls onto a baking sheet lined with parchment paper or a silicone baking mat. Repeat until all the mixture is used.
Step 5: Melt the Chocolate
In a microwave-safe bowl or a double boiler, combine the chocolate chips with the tablespoon of vegetable shortening or coconut oil (if using). Microwave in 30-second intervals, stirring well after each, until the chocolate is smooth and fully melted. Alternatively, use a double boiler over simmering water, stirring until smooth.
Step 6: Dip and Drizzle
This is where your Rice Krispie Peanut Butter Balls get their finishing touch! You have two options: you can either dip the bottom half of each ball into the melted chocolate, or you can use a spoon or a piping bag to drizzle the chocolate artfully over the tops of the balls. Place the dipped or drizzled balls back onto the parchment-lined baking sheet.
Step 7: Let Them Set
Allow the chocolate to set completely. You can leave them at room temperature, which usually takes about 30-60 minutes, or speed up the process by placing the baking sheet in the refrigerator for about 15-20 minutes. Once the chocolate is firm, your delicious treats are ready to be enjoyed!
Nutritional Information
Please note: Nutritional information is an estimate and can vary based on exact ingredients used. This is calculated per ball, assuming 20 balls from the recipe.
- Calories: Approximately 200-250 kcal
- Protein: 4-6g
- Fat: 10-15g
- Carbohydrates: 20-25g
- Sugar: 15-20g
Healthier Alternatives
While these treats are a delight, you can make them a bit more health-conscious without sacrificing too much flavor:
- Whole Grain Cereal: Swap Rice Krispies for a whole-grain puffed cereal that offers more fiber.
- Natural Peanut Butter: Opt for natural peanut butter with no added sugars or oils. Stir it well before use.
- Dark Chocolate: Use dark chocolate chips (70% cocoa or higher) for dipping or drizzling, as they contain less sugar and more antioxidants.
- Reduced Sweetener: If you find the mixture too sweet, you can slightly reduce the marshmallows, though this may affect the binding properties.
- Smaller Portions: Simply make smaller balls to enjoy the same flavor with fewer calories and sugar per serving.
Serving Suggestions
These Rice Krispie Peanut Butter Balls are incredibly versatile. Serve them:
- As a delightful addition to a dessert buffet or potluck.
- Packaged in small treat bags for party favors.
- Alongside a glass of milk for a classic snack.
- As an energy boost before or after a workout.
- Chilled for a firmer texture on a warm day.
Common Mistakes to Avoid
- Using Stale Cereal: Stale Rice Krispies won’t provide that satisfying crunch. Always check the freshness of your cereal!
- Overheating the Marshmallow Mixture: High heat can cause the marshmallows to become tough and difficult to work with, leading to hard treats.
- Not Greasing Hands for Rolling: The mixture is sticky! Failing to grease your hands will make forming the balls a frustrating experience.
- Chocolate Seizing: If water gets into melted chocolate, it can become thick and clumpy. Ensure all utensils and bowls are completely dry.
- Rushing the Setting Time: If you try to move them too soon, the chocolate might smudge or melt. Patience is key for a neat finish.
Storing Your Delicious Treats
Store your Rice Krispie Peanut Butter Balls in an airtight container at room temperature for up to 3-4 days. If your kitchen is particularly warm, or if you prefer them firmer, they can be refrigerated, also in an airtight container, for up to a week. However, refrigeration can sometimes make them a bit harder due to the cereal. For longer storage, you can freeze them in a single layer on a baking sheet until solid, then transfer them to a freezer-safe container or bag for up to 2-3 months. Thaw at room temperature before enjoying.
The Perfect No-Bake Delight
These Easy Rice Krispie Peanut Butter Balls are the ultimate treat for any occasion. They offer a delightful balance of textures and flavors – the chewy, crispy cereal, the rich peanut butter, and the sweet chocolate coating. This recipe is a testament to how simple ingredients can create something truly special and memorable. They are quick to make, incredibly fun, and always a hit!
Share Your Kitchen Stories!
Have you tried this recipe? We’d love to hear about your experience! Share your thoughts, variations, or any tips in the comments below. And don’t forget to share this recipe with your friends and family on social media – let’s spread the deliciousness!
Frequently Asked Questions
Can I use crunchy peanut butter?
Yes, you can use crunchy peanut butter. It will add a little extra texture to the balls, which many people enjoy. Just ensure it’s stirred well if it’s a natural variety.
Why are my Rice Krispie balls hard?
This usually happens if the marshmallow mixture is cooked for too long or at too high a heat, causing it to harden as it cools. Ensure you’re using low heat and removing it from the stove promptly after the marshmallows melt.
Can I make these ahead of time?
Absolutely! These are perfect for making a day or two in advance. Store them in an airtight container at room temperature or in the refrigerator.
What kind of chocolate is best for drizzling?
Semi-sweet, milk, or dark chocolate chips all work well. For a smoother consistency and better shine when dipping or drizzling, adding a teaspoon of vegetable shortening or coconut oil can help.
Can these be made vegan?
You can adapt this recipe to be vegan by using vegan marshmallows, vegan butter, and vegan peanut butter. For the coating, use vegan chocolate chips. Ensure your Rice Krispies are also vegan, as some brands may contain non-vegan ingredients.
Peanut Butter Balls with Rice Krispies

These delightful no-bake treats combine creamy peanut butter, crunchy Rice Krispies, and rich chocolate for a bite-sized dessert that’s perfect for any occasion. Easy to make and even easier to enjoy!
Ingredients
- 1 cuppeanut butter (creamy or crunchy)1/4 cupbutter, softened1 cuppowdered sugar2 cupsRice Krispies cereal, slightly crushed2 cupssemi-sweet chocolate chips2 tablespoonsvegetable shortening
- 1/4 cupbutter, softened1 cuppowdered sugar2 cupsRice Krispies cereal, slightly crushed2 cupssemi-sweet chocolate chips2 tablespoonsvegetable shortening
- 1 cuppowdered sugar2 cupsRice Krispies cereal, slightly crushed2 cupssemi-sweet chocolate chips2 tablespoonsvegetable shortening
- 2 cupsRice Krispies cereal, slightly crushed2 cupssemi-sweet chocolate chips2 tablespoonsvegetable shortening
- 2 cupssemi-sweet chocolate chips2 tablespoonsvegetable shortening
- 2 tablespoonsvegetable shortening
Instructions
- 1️⃣Prepare a baking sheet: Line a cookie sheet with parchment paper or wax paper to prevent sticking.
- 2️⃣Mix the base ingredients: In a large mixing bowl, cream together the peanut butter, softened butter, and powdered sugar until smooth. Fold in the slightly crushed Rice Krispies cereal and mix until evenly combined.3️⃣Shape the balls: Scoop out small portions of the mixture and roll them into bite-sized balls (about 1 inch in diameter). Place them on the prepared cookie sheet. Chill in the refrigerator for at least 30 minutes to firm up.4️⃣Melt the chocolate: In a large microwave-safe bowl, combine the chocolate chips and vegetable shortening. Heat for 1 minute, then stir. Continue heating in 20–30-second intervals, stirring after each, until the chocolate is mostly melted. Stir until smooth and glossy.5️⃣Dip the peanut butter balls: Using a fork or a dipping tool, coat each peanut butter ball in the melted chocolate. Tap off any excess chocolate and place the dipped balls back onto the lined cookie sheet.6️⃣Set the chocolate: Allow the chocolate coating to firm up at room temperature. For faster results, place the tray in the refrigerator for about 15–20 minutes.7️⃣Store: Transfer the finished peanut butter balls to an airtight container. Store them in the refrigerator for up to 1 week or freeze for longer storage (up to 3 months).
- 3️⃣Shape the balls: Scoop out small portions of the mixture and roll them into bite-sized balls (about 1 inch in diameter). Place them on the prepared cookie sheet. Chill in the refrigerator for at least 30 minutes to firm up.4️⃣Melt the chocolate: In a large microwave-safe bowl, combine the chocolate chips and vegetable shortening. Heat for 1 minute, then stir. Continue heating in 20–30-second intervals, stirring after each, until the chocolate is mostly melted. Stir until smooth and glossy.5️⃣Dip the peanut butter balls: Using a fork or a dipping tool, coat each peanut butter ball in the melted chocolate. Tap off any excess chocolate and place the dipped balls back onto the lined cookie sheet.6️⃣Set the chocolate: Allow the chocolate coating to firm up at room temperature. For faster results, place the tray in the refrigerator for about 15–20 minutes.7️⃣Store: Transfer the finished peanut butter balls to an airtight container. Store them in the refrigerator for up to 1 week or freeze for longer storage (up to 3 months).
- 4️⃣Melt the chocolate: In a large microwave-safe bowl, combine the chocolate chips and vegetable shortening. Heat for 1 minute, then stir. Continue heating in 20–30-second intervals, stirring after each, until the chocolate is mostly melted. Stir until smooth and glossy.
- 5️⃣Dip the peanut butter balls: Using a fork or a dipping tool, coat each peanut butter ball in the melted chocolate. Tap off any excess chocolate and place the dipped balls back onto the lined cookie sheet.6️⃣Set the chocolate: Allow the chocolate coating to firm up at room temperature. For faster results, place the tray in the refrigerator for about 15–20 minutes.7️⃣Store: Transfer the finished peanut butter balls to an airtight container. Store them in the refrigerator for up to 1 week or freeze for longer storage (up to 3 months).
- 6️⃣Set the chocolate: Allow the chocolate coating to firm up at room temperature. For faster results, place the tray in the refrigerator for about 15–20 minutes.7️⃣Store: Transfer the finished peanut butter balls to an airtight container. Store them in the refrigerator for up to 1 week or freeze for longer storage (up to 3 months).
- 7️⃣Store: Transfer the finished peanut butter balls to an airtight container. Store them in the refrigerator for up to 1 week or freeze for longer storage (up to 3 months).
Notes
Crush with care: Lightly crush the Rice Krispies to maintain some crunch without turning them into powder.Chocolate tips: Vegetable shortening helps the chocolate stay smooth and glossy, but you can substitute coconut oil if desired.Decorate: Add a drizzle of white chocolate or sprinkle crushed nuts on top before the chocolate sets for an extra touch.
Chocolate tips: Vegetable shortening helps the chocolate stay smooth and glossy, but you can substitute coconut oil if desired.Decorate: Add a drizzle of white chocolate or sprinkle crushed nuts on top before the chocolate sets for an extra touch.
Decorate: Add a drizzle of white chocolate or sprinkle crushed nuts on top before the chocolate sets for an extra touch.
Leave a Reply