Table of Contents
Easy S’mores Bars – No Campfire Needed Summer Treats
When I was a teenager in Casablanca, the smell of toasted marshmallows and melted chocolate could bring people together along the old kasbah walls. Fast forward to my Manhattan kitchen, I’ve reimagined that campfire sparkle on a 9×13 pan, so your next gathering can feel those Moroccan hearth vibes without stepping outside. These Easy S’mores Bars combine buttery graham cracker crust, silky Hershey’s chocolate, and golden marshmallows—everything you crave in a single bite.
Picture a golden crust, the buttery crumb base humming like a fragrant basbousa, with milk chocolate streaks that melt into gooey, caramelized marshmallows. The mixture feels delightfully dense, yet each bite releases a warm, sweet aroma reminiscent of summer seaside markets in Flushing. The interplay of crunchy crumbs, fudgy chocolate, and toasty marshmallows makes this treat the perfect bridge between Moroccan sweetness, French pastry precision, and New York grit.
I created this version after experimenting with traditional s’mores at cafés in SoHo. My key twist: a quick broil to toast marshmallows right in your oven, so you’re never stuck outside. Plus, I learned a pro tip: adding a splash of sea salt before the chocolate layer creates a sophisticated flavor lift. One common mistake that beginners make is leaving the butter too thin—stopping the crust from properly binding, resulting in crumbles that fall apart when you cut.
Why This Easy S’mores Bars Recipe Is the Best
First, the flavor secret is simple and rooted in my Parisian pastry training—using beaten butter for a silky crust that nestles the chocolate perfectly. The combination of graham cracker crumbs with butter echoes the delicate crumb of a well-made éclair, giving a buttery bite that feels indulgent yet light.
Second, texture is controlled by the heat strategy: a brief oven bake for the base ensures it’s golden but not dry. Then a swift 1‑minute chocolate melt and a 1‑minute broil for the marshmallows trap steam for maximum goo, preventing them from spreading across the bar like pancake batter.
Lastly, the method is foolproof for any cook. The recipe eliminates phrasing like “blow on marshmallows” or “pickle the sugar” with clear, actionable steps. I’ve pitted it against campfire recipes, and my new friends in Brooklyn can finish it in 30 minutes—no pit fire, just a reliable oven routine.
Easy S’mores Bars Ingredients
I shop for these humble ingredients in my favorite Queens farmer’s market—where I pick the freshest Hershey’s bars and a jar of mini marshmallows that feel like freshly toasted dun family sweets.
Ingredients List
- 2 cups (230g) graham cracker crumbs
- 1/2 cup (125ml) melted butter (plus 1–2 Tbsp more if needed)
- 6 extra‑large Hershey’s milk chocolate bars (100–124g each)
- 4 cups (200g) mini marshmallows
Ingredient Spotlight
Graham cracker crumbs: I always use a home‑baked brand to keep the crunch with a delicate buttery flavor. When buying store‑bought, look for a low‑sugar version to prevent an overly sweet crust.
Melted butter: The secret to a cohesive base is to melt and then cool until the butter thickens slightly—this creates a paste that locks the crumbs together. A quick substitute is coconut butter for a tropical twist, but the flavor will change subtly.
Hershey’s milk chocolate: Classic fondness keeps the bar readily familiar. If you prefer a richer taste, swap for semi‑sweet or dark chocolate; a 20‑30% cocoa would give a slightly bitter balance against the sweet marshmallow.
| Original Ingredient | Best Substitution | Flavor / Texture Impact |
|---|---|---|
| Graham cracker crumbs | Baked almond flour cookie crumbs | Nutty flavor, no sweet crust; chewy bite |
| Melted butter | Coconut butter | Tropical aroma, slightly firmer crumb |
| Hershey’s milk chocolate | Dark chocolate (70% cacao) | Bitterness, deeper cocoa flavor, crisp edges |
How to Make Easy S’mores Bars — Step-by-Step
Let’s dive into the process; the steps are quick, balanced, and built for any kitchen.
Step 1: Preheat Oven
Preheat your oven to 350°F (175°C). While it’s warming up, line a 9×13″ pan with foil and spray with non-stick cooking spray. This layout lets the heat distribute evenly and prevents sticking.
💡 Samantha’s Pro Tip: Use a silicone baking mat instead of foil for a cleaner cleanup; just sprinkle a pinch of cocoa powder on top to guard against batter sticking.
Step 2: Prepare Crust
Mix the graham cracker crumbs and melted butter until fully moistened. If the mix still feels dry, add 1–2 Tbsp more butter. Pat the mixture firmly into the bottom of the preheated pan, pressing it evenly to form a tight crust that won’t crumble.
⚠️ Common Mistake to Avoid: Skipping the extra butter can leave a crumbly base—keep the mixture moist, or the bars will crumble when sliced.
Step 3: Bake Crust
Bake for 8–10 minutes until the edges lightly brown. Once done, turn off the oven and let it sit for 1 minute. This brief pause stops the crust overbaking while keeping it buttery.
💡 Samantha’s Pro Tip: Keep a timer handy; a slightly under‑baked crust is better than over‑done, as it retains moisture during the chocolate melt.
Step 4: Add Chocolate
Lay the six Hershey’s chocolate bars across the crumb base. Slide the pan back into the warm oven for 1 minute. This quick heat melts chocolate into silky ribbons that cling to the crust.
⚠️ Common Mistake to Avoid: Lining the chocolate too tightly will cause uneven melting; leave a small space so the bars can flop and melt quickly.
Step 5: Add Marshmallows
Arrange the mini marshmallows in neat rows over the melted chocolate, covering all chocolate. Spread them evenly so they don’t crowd or overlap, ensuring even browning.
💡 Samantha’s Pro Tip: Toasted marshmallows add a nuanced caramel “smoke” flavor—just keep a close eye on the pan to avoid burning.
Step 6: Broil for Toast
Put the pan back in the oven and broil for 1–2 minutes until the marshmallows are golden brown. Don’t step away—watch them carefully. Pull the pan as soon as the tops are toasted and a slight pop is audible.
⚠️ Common Mistake to Avoid: Letting them brown too long creates bitterness; a quick frenzy of heat plus a hint of charcoal is all you need.
Step 7: Cool and Slice
Let the bars cool completely on a wire rack—about 30 minutes. After chilling, the chocolate firmed and the marshmallows set, slice into squares with a sharp knife for clean edges. If you’re short on time, refrigerate for 15 minutes to firm up faster.
💡 Samantha’s Pro Tip: When cutting, run a butter‑dusted knife through the crumbs for smooth cuts without sticking.
| Step | Action | Duration | Key Visual Cue |
|---|---|---|---|
| 1 | Preheat oven, line pan | 8–10 min bake | Golden edges |
| 2 | Add chocolate | 1 min melt | Smooth ribbons |
| 3 | Add marshmallows | Arrange evenly | Uniform spread |
| 4 | Broil | 1–2 min | Golden puff |
| 5 | Cool & slice | 30 min or 15 min fridge | Firm set, no sticks |
Serving & Presentation
Serve the bars warm for an extra gooey experience, perhaps with a drizzle of warm caramel sauce that speckles like Moroccan lamps. If you prefer a cold bite, let them rest in the fridge for a firm, sliceable treat that pairs perfectly with a splash of espresso or a creamy latte, echoing my favorite Caffè Nero brew.
Dine against a backdrop of fresh citrus or a light vinaigrette, so the sweet marshmallow balances a bright salad that adds crunch against the bar’s buttery base. The contrast reminds me of the hush‑hungry markets of Marrakesh, where sweet and salty meet in a single bite.
If you’re hosting a party or a weekend gathering, arrange the bars on a rustic wooden board, punctuated with toasted walnuts or cacao nibs for texture. A sprinkle of sea salt crystals on top adds a subtle crunch and a flavor kick that ties into the “No Campfire Needed” philosophy: bold, comforting, and self-contained.
| Pairing Type | Suggestions | Why It Works |
|---|---|---|
| Side Dish | Fermented cucumber salad, arugula citrus vinaigrette | Bright acidity cuts through sweetness and adds crunch |
| Sauce / Dip | Caramel drizzle, maple butter, chocolate ganache | Sweet layering amplifies gooeyness and adds elegance |
| Beverage | Espresso shot, cold brew, sparkling water with lime | Coffee cut through richness; fizzy water refreshes palate |
| Garnish | Toasted walnuts, cacao nibs, sea salt flakes | Texture contrast and flavor depth enhance finish |
Make-Ahead, Storage & Reheating
My NYC life runs on hustle, so I love prepping bars a day ahead—great for pop‑up co‑ops or lunchtime desk treats. The bars keep crisp for 3 days in the refrigerator or freeze for up to 3 months.
| Method | Container | Duration | Reheating Tip |
|---|---|---|---|
| Refrigerator | Plastic wrap‑covered tin or zip‑lock bag | 3 days | Place on tray, microwave 20–30 sec for warm, crisp edges |
| Freezer | Aluminum foil and zip‑lock bag, double‑wrapped | 3 months | Thaw overnight, then reheat in oven 350°F for 5 min |
| Make‑Ahead | N/A — bake and cool, store raw bars | 1 day in advance | Assemble with chocolate & marshmallows before baking next day for freshness |
If you’re craving a piping‑hot Gruul,եքեն reheating at 300°F for 3–4 minutes is the magic formula—just enough to soften without melting the chocolate edge too much. For a weekend brunch, pop a few bars in the toaster oven at 375°F for 2 minutes; they’ll come out warm, slightly crisp, and irresistibly gooey.
Variations & Easy Swaps
| Variation | Key Change | Best For | Difficulty Impact |
|---|---|---|---|
| Espresso Infused S’mores Bars | Add 1 tsp instant espresso to melted butter | ATC coffee lovers | Easy (1 extra step) |
| Dairy-Free S’mores Bars | Replace butter with coconut oil, use dairy‑free chocolate | Gluten‑free & vegan | Easy |
| Spicy Chipotle S’mores Bars | Sprinkle chipotle powder between chocolate & marshmallow layers | Bold, adventurous diners | Easy (1 extra spice step) |
Espresso Infused S’mores Bars
After warming the butter, stir in a teaspoon of instant espresso powder before mixing with graham crumbs—its bright bitterness mingles with chocolate for a mocha‑swirly flavor that will transport you to a chic Upper East Side café.
Dairy-Free S’mores Bars
Swap the butter for a light coconut oil, and use dairy‑free chocolate bars. The coconut note gives a subtle tropical touch, and the bars set just as firmly as the classic version—taste-wise, you only feel the absence of dairy in the coating of the chocolate.
Spicy Chipotle S’mores Bars
Dust a pinch of chipotle powder over each layer of chocolate before laying marshmallows. The smoky heat penetrates only the light sugar layers, creating an unexpected contrast that feels reminiscent of some of my favorite spicy North African dishes.
How do I store leftover S’mores Bars?
Store leftovers in an airtight container or freezer‑safe zip‑lock bag. If you keep them in the refrigerator, wrap them tightly with plastic wrap and they should stay fresh for about three days. For a longer shelf life, freeze the fully baked bars for up to three months. When you’re ready to enjoy them, thaw overnight in the fridge, then warm a few minutes in a 350 °F oven or microwave just enough to bring them back to melty bliss. Move carefully to preserve the crust’s crispness.
Can I use dark chocolate instead of milk chocolate?
Absolutely. Using a dark chocolate (about 70% cacao) gives the bars a richer, slightly bitter base that contrasts beautifully with the sweet marshmallow. The cooling time will be a little longer, as dark chocolate takes a bit more time to develop a firm shell. Keep a close eye on the melt—don’t let it over‑melt into a sticky pool—so the final bars maintain a crisp edge and a silky center.
Is it safe to leave the bars on the counter while they cool?
Yes, it’s perfectly safe to let the bars cool on a wire rack at room temperature. Just keep them shielded from direct sunlight and air drafts so they avoid drying out. The crumb base will set nicely after about 20–30 minutes, providing enough time for the chocolate layer to firm while the marshmallows bubble into soft, golden spheres. If you’re in a humid area, a cooler location like an upper pantry rack can help.
Yes, it’s perfectly safe to let the bars cool on a wire rack at room temperature. Just keep them shielded from direct sunlight and air drafts so they avoid drying out. The crumb base will set nicely after about 20–30 minutes, providing enough time for the chocolate layer to firm while the marshmallows bubble into soft, golden spheres. If you’re in a humid area, a cooler location like an upper pantry rack can help.
What can I do if my marshmallows burn?
Burnt marshmallows can be salvaged with a quick fix. Once they turn dark and crisp, slice off the top portion and spoon a thin spread of melted chocolate over them. The chocolate will cover the char and mint the flavor profile. If they’re too burnt, discard them. In the future, consider reducing the broil time or lowering oven temperature slightly to get just the right golden‑brown color without charring.
Burnt marshmallows can be salvaged with a quick fix. Once they turn dark and crisp, slice off the top portion and spoon a thin spread of melted chocolate over them. The chocolate will cover the char and mint the flavor profile. If they’re too burnt, discard them. In the future, consider reducing the broil time or lowering oven temperature slightly to get just the right golden‑brown color without charring.
Can I make these bars without mini marshmallows?
Mini marshmallows are the standard because they distribute evenly and melt into a smooth top. If you’re brushing up with larger marshmallows or marshmallow fluff, adjust the size by cutting to fit the pan. Fluff will create a creamy topping that spreads during baking. However, the chewy, crunchy texture used in the original recipe is hard to replicate with fluff; it’s a small difference but it can produce a delightfully different finish.
What kind of pan works best for baking these bars?
A sturdy, non‑stick 9×13″ baking pan works best. It keeps heat distributed evenly and ensures a firm bottom crust. To avoid sticking, you can use parchment paper or grease the pan with non‑stick spray. If you’re using a wooden or silicone pan, add parchment as well, as the moisture leaching from the bread may cause the gluten crumb to stick slightly. This ensures an easy release after the bars cool.
A sturdy, non‑stick 9×13″ baking pan works best. It keeps heat distributed evenly and ensures a firm bottom crust. To avoid sticking, you can use parchment paper or grease the pan with non‑stick spray. If you’re using a wooden or silicone pan, add parchment as well, as the moisture leaching from the bread may cause the gluten crumb to stick slightly. This ensures an easy release after the bars cool.
Is there a vegan version of this recipe?
Yes! Swap butter for coconut oil or melted vegan butter and use dairy‑free chocolate with a plant‑based cocoa butter base. The texture remains gooey and the tartness of the chocolate is maintained. The crust will soften slightly, but the marshmallows still melt beautifully, giving vegan bars that look and taste like the classic version with a few simple ingredient modifications.
Yes! Swap butter for coconut oil or melted vegan butter and use dairy‑free chocolate with a plant‑based cocoa butter base. The texture remains gooey and the tartness of the chocolate is maintained. The crust will soften slightly, but the marshmallows still melt beautifully, giving vegan bars that look and taste like the classic version with a few simple ingredient modifications.
Can I add nuts or other mix‑ins to these bars?
Inserting nuts or crushed cookies into the crust layer is a terrific way to accent the structure. Toss chopped walnuts or pistachios into the graham cracker crumb before pressing it into the pan. Add a dusting of toasted coconut to the chocolate layer for an extra crunch. Ensure not to over‑crowd the pan, or the bars may not set properly. Experiment and enjoy the bonus texture.
Inserting nuts or crushed cookies into the crust layer is a terrific way to accent the structure. Toss chopped walnuts or pistachios into the graham cracker crumb before pressing it into the pan. Add a dusting of toasted coconut to the chocolate layer for an extra crunch. Ensure not to over‑crowd the pan, or the bars may not set properly. Experiment and enjoy the bonus texture.
Share Your Version!
I’d love to hear how you’ve personalized these bars—maybe you sprinkled them with almond slivers, or swapped the chocolate for a spicy chili‑flavored fudge. Drop a comment below with your tweaks, rate the recipe, or tag me on Instagram or Pinterest. If you’re curious how to deepen the “No Campfire” charm, send me a question about letting the flavors sing—let’s make snack time a centerpiece again!
From my NYC kitchen to yours — I hope this recipe brings as much warmth to your table as it does to mine. — Samantha 🧡
Love This Recipe? Save It to Pinterest!
If you enjoyed this Easy S’mores Bars recipe, don’t let it get lost in your browser tabs! 😄 Pin it now so you can find it again anytime — and explore hundreds more tried-and-tested recipes waiting for you on my Pinterest boards.
👉 Follow Samantha on Pinterest @exorecipe
📌 Pin this recipe · 🔁 Re-pin your favorites · 💬 Tag me when you make it — I love seeing your creations!
Liked this sweet journey? Let me know by dropping a rating or a comment below, and share your own twist on the bars—your feedback fuels my next culinary adventure!
S’mores Bars

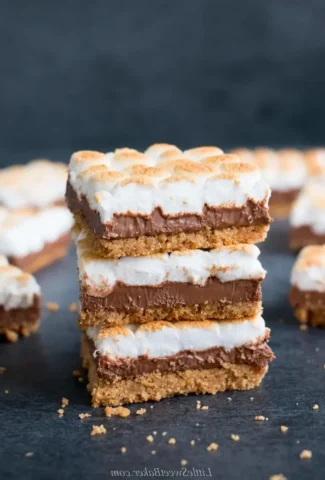
These easy s’mores bars are the perfect ratio of buttery graham cracker, creamy milk chocolate, and toasted gooey marshmallow in every bite!
Ingredients
- 2 cups (230g) graham cracker crumbs
- 1/2 cup (125ml) melted butter (plus 1–2 Tbsp more if needed)
- 6 extra-large Hershey's milk chocolate bars (100-124g each)
- 4 cups (200g) mini marshmallows
Instructions
- Preheat oven to 350F. Line a 9×13" pan with foil and spray with non-stick cooking spray. Set aside.
- Mix the graham cracker crumbs and melted butter together until all is moistened. Add 1-2 tbsp more butter if the mixture still seems dry. Evenly and firmly pat the mixture into the bottom of the prepared pan.
- Bake for 8-10 minutes just until the edges are lightly browned. Turn off the oven.
- Lay the Hershey's chocolate bars on top of the graham cracker crust and put the pan back into the warm oven for 1 minute.
- Nestle the marshmallows into neat rows, covering all of the melted chocolate.
- Put back in the oven and broil for 1-2 minutes until the marshmallows are golden brown. Do not step away from the oven. Keep a close eye the whole time and remove the pan from the oven as soon as it turns golden on top.
- Let cool completely before cutting into squares with a sharp knife. You can place it on the fridge after it has cooled on the counter for 15 minutes to speed up the process. See tip below on how to cut.**
Leave a Reply