Table of Contents
Butterfinger Balls No-Bake Bliss – A Crunchy NYC Homemade Treat
Growing up in Morocco, my mother’s kitchen was always filled with the scent of roasted nuts and honey, but since moving to NYC, I’ve fallen in love with the bold flavors of American candy. These Butterfinger Balls are my professional chef’s take on the classic “Bliss Ball,” blending that nostalgic peanut butter crunch with a sophisticated chocolate finish. In this recipe, I’m using a specific chilling technique that I learned during my pastry training in Paris to ensure your chocolate shell is perfectly snappy. It’s the ultimate no-bake dessert for busy New Yorkers who want professional results without turning on the oven.
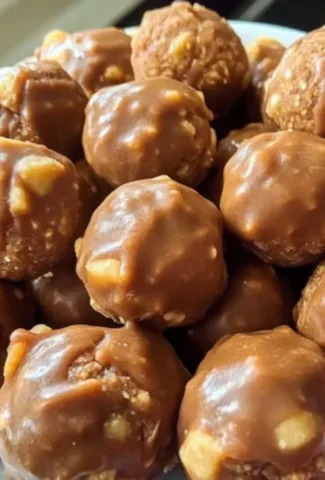
The texture of these Butterfinger Balls is truly a sensory experience; you get the initial snap of high-quality dark chocolate, followed by the creamy, salty richness of peanut butter, and finally, that iconic honeycomb crunch from the crushed candy bars. It reminds me of the artisan truffles found in Upper West Side boutiques, yet it uses simple ingredients you can find at any local bodega. The vanilla extract rounds out the sweetness, while the graham cracker crumbs provide a structural integrity that prevents the balls from becoming too soft at room temperature.
I’ve spent years perfecting the ratio of powdered sugar to peanut butter to ensure these aren’t cloyingly sweet, a common mistake I see in many home recipes. By using my Butterfinger Balls No-Bake Bliss method, you’ll achieve a balanced treat that satisfies both kids and refined adult palates. Today, I’m sharing all my professional secrets, including a critical tip on melting chocolate and how to avoid the “all-natural” peanut butter trap that can ruin the texture of no-bake treats. Let’s get into the kitchen and create something magical!
Why This Butterfinger Balls Recipe Is the Best
The true flavor secret lies in the balance of salt and sugar. My French training taught me that sugar needs a “bridge” to the palate, which is why I insist on using a standard creamy peanut butter rather than natural varieties. The emulsifiers in commercial peanut butter create a velvety mouthfeel that melds perfectly with the butter, whereas natural oils tend to separate and leave the balls greasy.
We achieve a perfected texture by incorporating graham cracker crumbs. Many recipes use only sugar and peanut butter, which can lead to a “tacky” feel that sticks to the roof of your mouth. The graham crumbs act as a stabilizer, adding a subtle wheaty depth and a crunch that mimics the inner layers of a real Butterfinger bar. It’s a technique I’ve adapted from NYC crumb cake toppings to give these truffles a professional bite.
Finally, this recipe is foolproof because it requires zero oven time. Whether you’re a beginner or a seasoned pro, the step-by-step chilling process ensures that the dough is manageable and easy to roll. It’s a fast, “fridge-to-table” dessert that looks like it came from a professional confectionery, making it my favorite choice for holiday social soirées and festive occasions.
Butterfinger Balls Ingredients
Whenever I wander the Union Square Farmers Market, I look for inspiration, but for this specific treat, I head straight to the baking aisle of my favorite grocery store. This recipe is an homage to American pantry staples, elevated through careful selection. It’s the kind of recipe that makes me smile, reminding me of the simple joys of a Parisian chocolate shop but with a Brooklyn attitude.
Ingredients List
- 4 tablespoons softened butter (½ stick)
- 1 teaspoon high-quality vanilla extract
- 8 ounces chocolate bark or semi-sweet chocolate chips
- ½ cup Butterfinger bars (finely crushed)
- 1 cup powdered sugar (sifted for best results)
- 1 cup creamy peanut butter (avoid all-natural)
- ¾ cup graham cracker crumbs
- Optional garnishes: sea salt, festive sprinkles, or extra candy dust
Ingredient Spotlight
Peanut Butter: Use a standard commercial brand like Jif or Skippy for this recipe. The stabilizers are essential for holding the “ball” shape. If you use natural peanut butter, the balls will be too oily and may collapse when dipped in warm chocolate.
Chocolate Bark: I prefer chocolate melting bark over chips for dipping because it contains vegetable fats that help it flow smoothly. If you use chocolate chips, add a teaspoon of coconut oil to help achieve that professional shiny finish.
Graham Cracker Crumbs: These provide the “sand” in the dough to keep it firm. If you are in a pinch, you can pulse digestive biscuits or even Ritz crackers in a food processor, though the latter will add a more savory note.
| Original Ingredient | Best Substitution | Flavor / Texture Impact |
|---|---|---|
| Butter | Coconut oil (solid) | Adds a tropical hint, slightly softer texture. |
| Graham Crumbs | Crushed Pretzels | Increases saltiness, heartier crunch. |
| Chocolate Bark | Dark Chocolate (70%) | Richly bitter, less sweet, needs tempering. |
How to Make Butterfinger Balls — Step-by-Step
Don’t be intimidated by the dipping process; once you find your rhythm, you’ll feel like a professional chocolatier in no time!
Step 1: Cream the Base
In a large bowl, beat the softened butter and peanut butter together until they are light and fluffy. This should take about 2 minutes with an electric mixer.
💡 Samantha’s Pro Tip: Ensure your butter is truly “room temperature.” If it’s too cold, it won’t emulsify with the peanut butter, leaving you with lumps in your dough.
Step 2: Add Flavor and Sweetener
Mix in the vanilla extract, then slowly add the powdered sugar. Scrape the sides of the bowl frequently to ensure everything is incorporated.
⚠️ Common Mistake to Avoid: Don’t dump all the sugar in at once, or you’ll be covered in a white cloud! Incremental additions keep the texture smooth.
Step 3: Folding the Crumbs
Gently fold in the graham cracker crumbs and the crushed Butterfinger bars until a stiff dough forms.
💡 Samantha’s Pro Tip: Use a sturdy spatula for this part. The dough will become quite heavy as the crumbs absorb the oils.
Step 4: Shaping and Chilling
Roll into 1-inch balls and place on a parchment-lined tray. Freeze for at least 30 minutes.
⚠️ Common Mistake to Avoid: Skipping the freezer step will cause the balls to melt into your warm chocolate during dipping.
Step 5: The Chocolate Finish
Melt your chocolate in 30-second bursts. Use a fork to dip each frozen ball, let the excess drip off, and place back on the parchment. Top with extra candy dust immediately.
💡 Samantha’s Pro Tip: Use a toothpick or a dipping tool to minimize “foot” marks on your chocolate base.
| Step | Action | Duration | Key Visual Cue |
|---|---|---|---|
| 1 | Creaming | 2 mins | Light and pale color |
| 2 | Folding | 1 min | Stiff, unified dough |
| 3 | Chilling | 30 mins | Balls are rock-firm |
| 4 | Dipping | 10 mins | Glossy coating |
Serving & Presentation
In Manhattan, presentation is everything. I like to serve these on a slate board or a vintage silver tray to contrast the rustic, golden candy sprinkle with a chic background. A light dusting of flaky sea salt (like Maldon) provides a professional touch that balances the sweetness of the chocolate bark. It’s a trick I learned in Paris: always add a touch of salt to chocolate to wake up the cocoa notes.
For a social soirée, place each ball into a small paper truffle liner. This makes them easy to grab and prevents any chocolate from melting onto your guests’ hands. If you’re giving them as a gift, nestle them in a parchment-lined tin with a festive ribbon—this is my go-to “thank you” for neighbors in my NYC apartment building.
| Pairing Type | Suggestions | Why It Works |
|---|---|---|
| Beverage | Espresso or Cold Brew | Caffeine cuts through the rich peanut butter. |
| Garnish | Maldon Sea Salt | Elevates the flavor profile with salinity. |
| Occasion | Champagne Toast | The bubbles cleanse the palate between bites. |
Make-Ahead, Storage & Reheating
My NYC schedule is always packed, so I love that these can be made days in advance. I often prep a double batch and keep them in the freezer for unexpected visitors. Since they are no-bake, they actually benefit from a “setting” period where the flavors can deepen and the crumbs can soften slightly into the peanut butter base.
| Method | Container | Duration | Reheating Tip |
|---|---|---|---|
| Refrigerator | Airtight Container | Up to 2 weeks | Serve slightly chilled for snap. |
| Freezer | Ziploc Bag | 3 months | Thaw 15 mins on the counter. |
| Make-Ahead | Sealed Tin | 3 days in advance | Dipping is best done Day 1. |
Always store these in a single layer separated by parchment or wax paper. If you stack them without a barrier, the chocolate shells might stick together as they come to room temperature. I don’t recommend “reheating” because the goal is a firm truffle, but if you like a softer center, leave them on the counter for 20 minutes before serving.
Variations & Easy Swaps
| Variation | Key Change | Best For | Difficulty Impact |
|---|---|---|---|
| Moroccan Twist | Add 1/2 tsp Cinnamon | Exotic flare | None |
| Vegan Friendly | Use Vegan Butter/Chips | Special diets | Medium |
| Extra Salty | Crushed Potato Chips | Ultimate crunch | Low |
The “Marrakech” Sweet Mix
In my mother’s kitchen, we often paired nuts with cinnamon. Add half a teaspoon of Ceylon cinnamon to the dough. It subtly complements the peanut butter and makes the Butterfinger flavor pop in a way that feels very artisanal and French-Moroccan. This is my secret way to make them stand out at a party!
Dairy-Free Bliss
You can make these vegan by using a plant-based butter substitute and dairy-free chocolate chips (like Enjoy Life). Ensure your graham crackers are the honey-free variety. I’ve tested this with vegan buttery sticks, and the texture remains excellent as long as you keep them refrigerated until serving.
The Midnight NYC Crunch
If you want to go full “NYC bodega style,” swap half of the graham cracker crumbs for finely crushed salty pretzels or potato chips. This creates an intense salty-sweet profile that is incredibly addictive. It’s the version I make when I’m craving those bold, late-night flavors of the city.
Can I use natural peanut butter for Butterfinger Balls?
I highly recommend avoiding all-natural peanut butter for this specific recipe. As a chef, I love natural ingredients, but the oil separation in those varieties prevents the balls from setting firmly. Commercial peanut butter like Jif or Skippy contains stabilizers that ensure your treats hold their shape during the dipping process without becoming a greasy mess.
How do I prevent the chocolate from cracking?
Chocolate cracks when there is a extreme temperature difference or if the shell is too thin. Ensure your balls are firm but not literally frozen solid when dipping, and avoid adding too much water or liquid to your melting chocolate. Adding a teaspoon of coconut oil to the melted chocolate also adds flexibility to the shell.
Do these need to be kept in the refrigerator?
Yes, for the best texture and longevity, keep your Butterfinger Balls in the fridge. While they can sit out for an hour or two at a party, the peanut butter base will soften significantly in warm environments. Keeping them chilled ensures that “snap” when you bite into the chocolate coating that we all love.
What is the best way to crush the Butterfinger bars?
For a consistent texture, I suggest placing the candy bars in a sturdy Ziploc bag and using a rolling pin to crush them. You want some “dust” and some small “pebbles.” Using a food processor can turn them into a paste too quickly due to the heat of the blades, which ruins that signature crunch.
Can I use white chocolate for the coating instead?
Absolutely! White chocolate provides a very creamy, sweet contrast to the salty peanut butter. Just be aware that white chocolate melts at a lower temperature and is more finicky than dark bark. Melt it slowly at 30% power and consider a drizzle of dark chocolate on top for a beautiful visual effect.
Share Your Version!
I can’t wait to see how your Butterfinger Balls turn out! This recipe is a staple in my NYC apartment, and I hope it becomes one in yours too. Did you try the cinnamon twist, or did you stick to the classic version? If you have any questions about the dipping technique, leave a comment below—I’m here to help you channel your inner pastry chef!
Please leave a star rating if you loved this recipe, and tag me @mykitchenstorie on Instagram or Pinterest so I can share your beautiful creations. Seeing your photos really makes all the testing in my kitchen worthwhile!
From my NYC kitchen to yours — I hope this recipe brings as much warmth to your table as it does to mine. — Samantha 🧡
Love This Recipe? Save It to Pinterest!
If you enjoyed this Butterfinger Balls recipe, don’t let it get lost in your browser tabs! 😄 Pin it now so you can find it again anytime — and explore hundreds more tried-and-tested recipes waiting for you on my Pinterest boards.
👉 Follow Samantha on Pinterest @exorecipe
📌 Pin this recipe · 🔁 Re-pin your favorites · 💬 Tag me when you make it — I love seeing your creations!
Want more chef-tested treats? Join our community and let’s cook something amazing today!
Butterfinger Balls
Indulge your taste buds with these irresistible Butterfinger Bliss Balls, where creamy peanut butter harmoniously melds with the crunch of graham crackers and Butterfinger candy bars, all cloaked in sumptuous melted chocolate. Perfect for social soirées and festive occasions, these heavenly morsels will vanish before you know it!
Ingredients
- 4 tablespoons softened butter (½ stick)
- 1 teaspoon vanilla extract
- 8 ounces chocolate bark or chocolate chips
- ½ cup Butterfinger bars (crushed)
- 1 cup powdered sugar
- 1 cup peanut butter (avoid all-natural varieties)
- ¾ cup crumbs from graham crackers
- Optional garnishes: additional crushed Butterfinger bars (festive sprinkles, or coarse sea salt)
Instructions
- Prepare the Dough: In a mixing bowl, combine the peanut butter and softened butter. Use an electric or stand mixer set to medium speed and blend until the mixture is creamy and uniform.
- Add Aromatic Notes: Incorporate the vanilla extract and blend thoroughly.
- Sweeten the Deal: Gradually add the powdered sugar in increments, blending at a low speed. Don't forget to scrape down the sides of the bowl to ensure even mixing.
- Crunch Time: Gently fold in the graham cracker crumbs and crushed Butterfinger bars.
- Shape 'em Up: Align a large cookie sheet with parchment paper. Scoop out approximately 1 to 1½ tablespoons of the dough, roll into neat balls, and place on the cookie sheet.
- Chilling Phase: Freeze the dough balls on the sheet for roughly 30 minutes until they are completely firm.
- Melting the Chocolate
- Chocolate Symphony: Once the dough balls are chilled, proceed to melt the chocolate. Utilize a microwave-safe bowl and heat in 30-second spurts at 50% power, stirring in between each interval. Be cautious not to overheat; some lumps should remain and will melt as you stir.
- Coat and Decorate: Submerge each chilled ball into the luscious melted chocolate. You can fully coat them or leave a bit of the peanut butter mixture exposed.
- Finishing Touches: Add a sprinkle of additional crushed Butterfinger bars, holiday-themed sprinkles, or a dash of flaky sea salt for that extra pop.
- The Grand Finale: Allow the chocolate to solidify completely before indulging in your Butterfinger Bliss Balls.
Leave a Reply