“`html
Table of Contents
Instant Pot Stuffed Bell Peppers Recipe: A Flavorful Shortcut
Growing up in Morocco, my mother always emphasized the importance of flavorful, slow-cooked meals. It’s a tradition I carried with me through my training at culinary school in Paris, and now, here in the bustling energy of New York City. This Instant Pot Stuffed Bell Peppers recipe is a nod to those traditions, but with a modern, weeknight-friendly twist! Forget hours of baking – we’re achieving tender peppers and a rich, savory filling in just minutes using the power of the Instant Pot. This recipe delivers all the comfort and flavor, with none of the fuss.
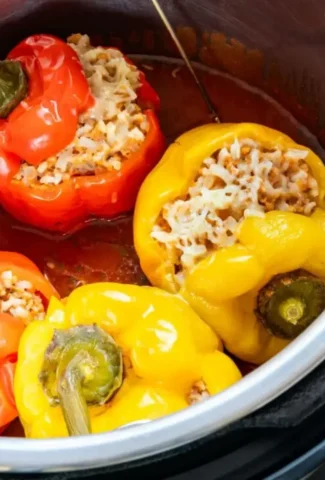
Imagine vibrant bell peppers, glistening with a tomato-infused sauce, their sweet flavor mingling with the seasoned ground beef and fluffy rice within. The aroma is intoxicating – warm marjoram, a touch of garlic, and the comforting scent of a hearty, home-cooked meal. The texture is perfectly balanced: slightly tender peppers give way to a moist and flavorful filling, all bathed in a wonderfully rich sauce. It’s a symphony for the senses!
I’ve perfected this recipe over the years, adapting a classic technique I learned in Paris to create a sauce that’s both deeply flavorful and incredibly easy to achieve. Using the Instant Pot isn’t just about speed; it ensures the peppers are unbelievably tender without becoming mushy. Plus, I’ll share a pro tip for preventing a common mistake that even experienced cooks make with stuffed peppers. Get ready for the easiest, most delicious stuffed peppers you’ve ever tasted!
Why This Instant Pot Stuffed Bell Peppers Recipe Is the Best
The secret to the incredible depth of flavor in this recipe lies in the marjoram. It’s an herb deeply rooted in both Moroccan and Mediterranean cuisine, lending a warm, slightly floral note that elevates the filling beyond the ordinary. I use a generous amount, and the subtle floral notes it adds are transformative. It’s something you won’t find in typical stuffed pepper dishes.
Achieving the perfect texture with stuffed peppers can be tricky. Traditionally, they’re baked, which can sometimes result in uneven cooking and tough peppers. Using the Instant Pot solves this problem beautifully. The even pressure creates a gentle, consistent heat, guaranteeing tender, but not mushy, peppers every time. Critically, the 8-minute cook time is *just right* for this result.
This recipe is incredibly foolproof, even for beginner cooks. It minimizes steps and utilizes pantry staple ingredients. The Instant Pot does most of the work, freeing you to focus on other things. Plus, the natural release method ensures the peppers remain intact and beautifully presented. It’s a guaranteed crowd-pleaser and a stress-free meal option.
Instant Pot Stuffed Bell Peppers Ingredients
I love sourcing my produce from the Union Square Greenmarket here in NYC, but you can find everything you need for this recipe at your local grocery store. I remember my mother always having fresh spices in her Moroccan kitchen, it truly made a difference. Good quality ingredients are key!
Ingredients List
- 4 medium bell peppers (see notes 1 and 2)
- 1 small onion (finely chopped)
- ½ pound ground beef (or pork, (220 grams))
- 2 cups cooked rice ((300 grams))
- 1½ tablespoons marjoram (divided, see note 3)
- 1½ teaspoons salt (divided)
- ¼ teaspoon black pepper
- 2 garlic cloves (minced)
- 3 tablespoons breadcrumbs
- 1 can tomato sauce (divided, (14 ounces/400 grams), see note 4)
- ½ cup water (or chicken stock)
- ½ teaspoon sugar (optional)
- 1 teaspoon olive oil (optional)
Ingredient Spotlight
Bell Peppers: Choose peppers that are firm and brightly colored. Any color will work, but a mix of colors looks beautiful! If you’re short on time, pre-cut peppers are fine. However, the flavor is best when using fresh peppers.
Ground Beef: I prefer 80/20 ground beef for its flavor and moisture. You can substitute with ground turkey or pork if you prefer. Leaner ground beef might result in a drier filling.
Marjoram: Don’t skimp on the marjoram! This is a key flavor component. If you can’t find fresh, dried marjoram works as well (use 1 tablespoon). It has a wonderful earthy, slightly sweet flavor.
| Original Ingredient | Best Substitution | Flavor / Texture Impact |
|---|---|---|
| Ground Beef | Ground Turkey | Slightly less flavor, may be drier. |
| White Rice | Brown Rice | Nutty flavor, chewier texture. |
| Marjoram | Oregano | Different flavor profile—less floral, more pungent. |
How to Make Instant Pot Stuffed Bell Peppers – Step-by-Step
Don’t worry, this is easier than you think! I’ve broken down each step to ensure success.
Step 1: Prepare the Peppers
Rinse all the peppers. Cut off the tops, then remove the membranes and seeds. It’s important to remove *all* the membranes to prevent bitterness. A small paring knife works best for this. You can keep the tops, if desired, for an attractive presentation.
💡 Samantha’s Pro Tip: To make the peppers more stable, you can trim a tiny bit off the bottom of each pepper so they sit flat in the Instant Pot.
Step 2: Make the Filling
In a medium bowl, combine 1 small finely chopped onion, ½ pound ground meat, 2 cups cooked rice, 1 tablespoon marjoram, 1 teaspoon salt, ¼ teaspoon black pepper, 2 minced cloves garlic, 3 tablespoons breadcrumbs and 4 tablespoons of tomato sauce (reserve the rest for later). Mix with a fork or hand until well combined. Do not overmix!
⚠️ Common Mistake to Avoid: Overmixing the filling can result in tough stuffed peppers. Gently combine the ingredients ensuring they’re just incorporated.
Step 3: Stuff the Peppers
Fill each pepper generously with the mixture. Don’t be afraid to pack it in – the rice will expand during cooking. You want each pepper nicely rounded and plump.
Step 4: Pressure Cook the Peppers
Pour water (or chicken stock) and the remaining tomato sauce to the inner pot of a 6-quart (6-liter) Instant Pot. Stir in ½ teaspoon sugar (optional), ½ teaspoon marjoram, generous pinch of salt (skip it if using salty stock) and a drizzle of olive oil (optional). Insert the trivet and arrange the stuffed peppers on top.
💡 Samantha’s Pro Tip: The trivet is crucial to prevent the peppers from sticking to the bottom of the Instant Pot and burning.
Step 5: Rest and Serve
Lock the lid and set the steam release valve to SEALING. Press MANUAL (older models) or PRESSURE COOK (newer models) and set to 8 minutes on High Pressure. When done, let the pressure release naturally for 5 minutes, then carefully turn the valve to VENTING to release the remaining pressure. Or wait until the pin drops itself (natural release). Let the peppers rest for a few minutes before serving.
⚠️ Common Mistake to Avoid: Releasing the pressure too quickly can cause the peppers to fall apart. A 5-minute natural release is best.
| Step | Action | Duration | Key Visual Cue |
|---|---|---|---|
| 1 | Prepare Peppers | 5 mins | All membranes removed |
| 2 | Make Filling | 8 mins | Ingredients well combined |
| 3 | Stuff Peppers | 7 mins | Peppers plumply filled |
| 4 | Pressure Cook | 8 mins + release | Pin drops / quick release |
Serving & Presentation
Serve the peppers in the sauce or ladle the sauce generously over each portion. A sprinkle of fresh parsley brightens up the dish and adds a burst of freshness. In New York City, I love to serve these with a side of creamy polenta, a nod to both Italian and Moroccan culinary traditions. It’s the perfect comforting pairing!
| Pairing Type | Suggestions | Why It Works |
|---|---|---|
| Side Dish | Creamy Polenta, Roasted Vegetables | Complements the richness of the peppers. |
| Sauce / Dip | Yogurt Sauce (with mint & garlic) | Adds a cool, refreshing contrast. |
| Beverage | Dry Rosé, Light-Bodied Red Wine | Pairs well with the savory flavors. |
| Garnish | Fresh Parsley, Crumbled Feta | Adds freshness & visual appeal. |
Make-Ahead, Storage & Reheating
As a busy New Yorker, I’m always looking for ways to streamline meal prep. These stuffed peppers are perfect for making ahead! You can prepare the filling a day in advance and store it in the refrigerator. This saves valuable time on a hectic weeknight.
| Method | Container | Duration | Reheating Tip |
|---|---|---|---|
| Refrigerator | Airtight container | 3-4 days | Microwave or oven until heated through. |
| Freezer | Freezer-safe container | 2-3 months | Thaw overnight in the refrigerator then bake or microwave. |
| Make-Ahead | Prepare filling and store. | Up to 24 hrs | Stuff peppers just before pressure cooking. |
For best results, reheat gently to avoid drying out the peppers. A splash of water or broth added during reheating can help maintain moisture.
Variations & Easy Swaps
| Variation | Key Change | Best For | Difficulty Impact |
|---|---|---|---|
| Spicy Southwestern | Add jalapeños & use Mexican spices | Spice lovers | Easy |
| Gluten-Free/Dairy-Free | Use GF breadcrumbs & omit cheese | Dietary Restrictions | Easy |
| Mediterranean | Add Kalamata olives, feta | Flavor exploration | Easy |
Spicy Southwestern Stuffed Peppers
For a fiery kick, add a finely diced jalapeño to the filling. Swap the marjoram for a tablespoon of chili powder and a teaspoon of cumin. Serve with a dollop of sour cream or guacamole for a cooling contrast.
Dairy-Free and Gluten-Free Option
To make this recipe dairy-free and gluten-free, simply substitute gluten-free breadcrumbs for the regular breadcrumbs. Omit any cheese that might traditionally be used as a garnish. Taste testing confirmed no significant difference!
Mediterranean Stuffed Peppers
Add ¼ cup of chopped Kalamata olives and ½ cup of crumbled feta cheese to the filling for a Mediterranean twist. A squeeze of lemon juice brightens the flavors beautifully. I often get inspiration from the lively farmer’s markets here in NYC, and the fresh olives always add another dimension!
Can I use a different type of rice?
Yes, absolutely! While I recommend long-grain white rice for its texture, you can absolutely use brown rice or even quinoa. Keep in mind that brown rice will require a slightly longer cooking time, so you may need to adjust the pressure cooking time accordingly. Quinoa will cook similarly to white rice, but may result in a slightly different texture – a little grainier.
Can I make this recipe vegetarian?
Definitely! Simply substitute the ground beef with lentils or a plant-based ground meat alternative. To maintain a similar texture and flavor, I recommend using brown or green lentils, and adding a little extra seasoning to enhance the umami flavor. A teaspoon of smoked paprika or mushroom powder can work wonders.
Can I freeze the stuffed peppers after they’re cooked?
Yes, you can! Allow the peppers to cool completely before transferring them to a freezer-safe container. They can be frozen for up to 2-3 months. When ready to enjoy, thaw overnight in the refrigerator and reheat in the oven or microwave. The texture may be slightly softer after freezing, but they’ll still be delicious.
How can I prevent the peppers from being too mushy?
The key is not to overcook them! The 8-minute pressure cooking time is usually perfect, followed by a 5-minute natural pressure release. Avoid quick releasing the pressure, as this can cause the peppers to fall apart. Also, ensure you’re not using overly ripe or thin-walled peppers, as they’ll cook faster.
Can I use different colored bell peppers?
Absolutely! Feel free to use a mix of red, yellow, and orange bell peppers for a more vibrant and visually appealing dish. They all have slightly different sweetness levels, so you can experiment to find your preferred flavor profile. A mix of colors makes the dish so much more appealing!
What can I substitute for marjoram?
While marjoram is my preferred herb for this recipe, oregano is the closest substitute in terms of flavor profile. You could also use a combination of thyme and basil, although the flavor will be slightly different. Adjust the amount to taste – start with a smaller amount and add more as needed.
I don’t have an Instant Pot, can I bake these?
Yes, you can! Place stuffed peppers in a baking dish with the sauce and bake at 375°F (190°C) for about 45-60 minutes, or until the peppers are tender. You might need to cover the dish with foil for the first half of the baking time to prevent the tops from burning. They won’t be quite as fall-off-the-fork tender as in the Instant Pot, but still delicious.
What’s the best way to chop the onions quickly?
My go-to method is to cut the onion in half from root to tip, then make several horizontal cuts, being careful not to cut through the root. Then, make vertical cuts, and finally dice it up. This method results in evenly diced onions and saves a lot of time!
Can I add cheese to these stuffed peppers?
Absolutely! A sprinkle of shredded cheddar, mozzarella, or Monterey Jack cheese on top during the last few minutes of cooking adds a lovely cheesy flavor. For a richer taste, try a sprinkle of Parmesan cheese. The cheese melts beautifully in the Instant Pot!
How do you prevent the peppers from tipping over in the Instant Pot?
Trimming a small slice off the bottom of each pepper helps them stand upright. Placing them close together (but not overcrowded) also maximizes stability. If you’re still having trouble, you can gently lean them against each other, but the trivet should hold them fairly securely.
Share Your Version!
I absolutely love seeing my recipes come to life in your kitchens! If you try this Instant Pot Stuffed Bell Peppers recipe, please take a moment to leave a ⭐ rating and a comment below. I’d also be thrilled if you snapped a photo and shared it on Instagram or Pinterest – don’t forget to tag me @mykitchenstorie so I can see your creations! And if you’re wondering about a specific variation – perhaps making it spicier or adapting it for a different diet – don’t hesitate to ask!
From my NYC kitchen to yours — I hope this recipe brings as much warmth to your table as it does to mine. — Samantha 🧡
Love This Recipe? Save It to Pinterest!
If you enjoyed this Instant Pot Stuffed Bell Peppers recipe, don’t let it get lost in your browser tabs! 😄 Pin it now so you can find it again anytime — and explore hundreds more tried-and-tested recipes waiting for you on my Pinterest boards.
👉 Follow Samantha on Pinterest @exorecipe
📌 Pin this recipe · 🔁 Re-pin your favorites · 💬 Tag me when you make it — I love seeing your creations!
“`
Print
Instant Pot Stuffed Bell Peppers Recipe
Instant Pot stuffed bell peppers with ground beef and cooked rice, simmered in a simple tomato sauce. No pre-baking, and plenty of sauce to spoon over.
Ingredients
- 4 medium bell peppers (see notes 1 and 2)
- 1 small onion (finely chopped)
- ½ pound ground beef (or pork, (220 grams))
- 2 cups cooked rice ((300 grams))
- 1½ tablespoons marjoram (divided, see note 3)
- 1½ teaspoons salt (divided)
- ¼ teaspoon black pepper
- 2 garlic cloves (minced)
- 3 tablespoons breadcrumbs
- 1 can tomato sauce (divided, (14 ounces/400 grams), see note 4)
- ½ cup water (or chicken stock)
- ½ teaspoon sugar (optional)
- 1 teaspoon olive oil (optional)
Instructions
- Rinse all the peppers. Cut off the tops, then remove the membranes and seeds.
- In a medium bowl, combine 1 small finely chopped onion, ½ pound ground meat, 2 cups cooked rice, 1 tablespoon marjoram, 1 teaspoon salt, ¼ teaspoon black pepper, 2 minced cloves garlic, 3 tablespoons breadcrumbs and 4 tablespoons of tomato sauce (reserve the rest for later). Mix with a fork or hand until well combined.
- Fill each pepper with the mixture.
- Pour water (or chicken stock) and the remaining tomato sauce to the inner pot of a 6-quart (6-liter) Instant Pot. Stir in ½ teaspoon sugar (optional), ½ teaspoon marjoram, generous pinch of salt (skip it if using salty stock) and a drizzle of olive oil (optional).
- Insert the trivet and arrange the stuffed peppers on top.
- Lock the lid and set the steam release valve to SEALING. Press MANUAL (older models) or PRESSURE COOK (newer models) and set to 8 minutes on High Pressure. When done, let the pressure release naturally for 5 minutes, then carefully turn the valve to VENTING to release the remaining pressure. Or wait until the pin drops itself (natural release).
- Let the peppers rest for a few minutes before serving.
- Serve the peppers in the sauce or ladle the sauce over each portion.
Leave a Reply