Table of Contents
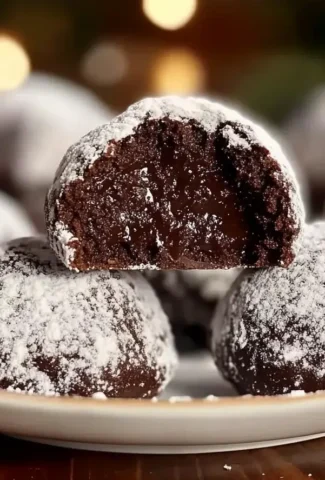
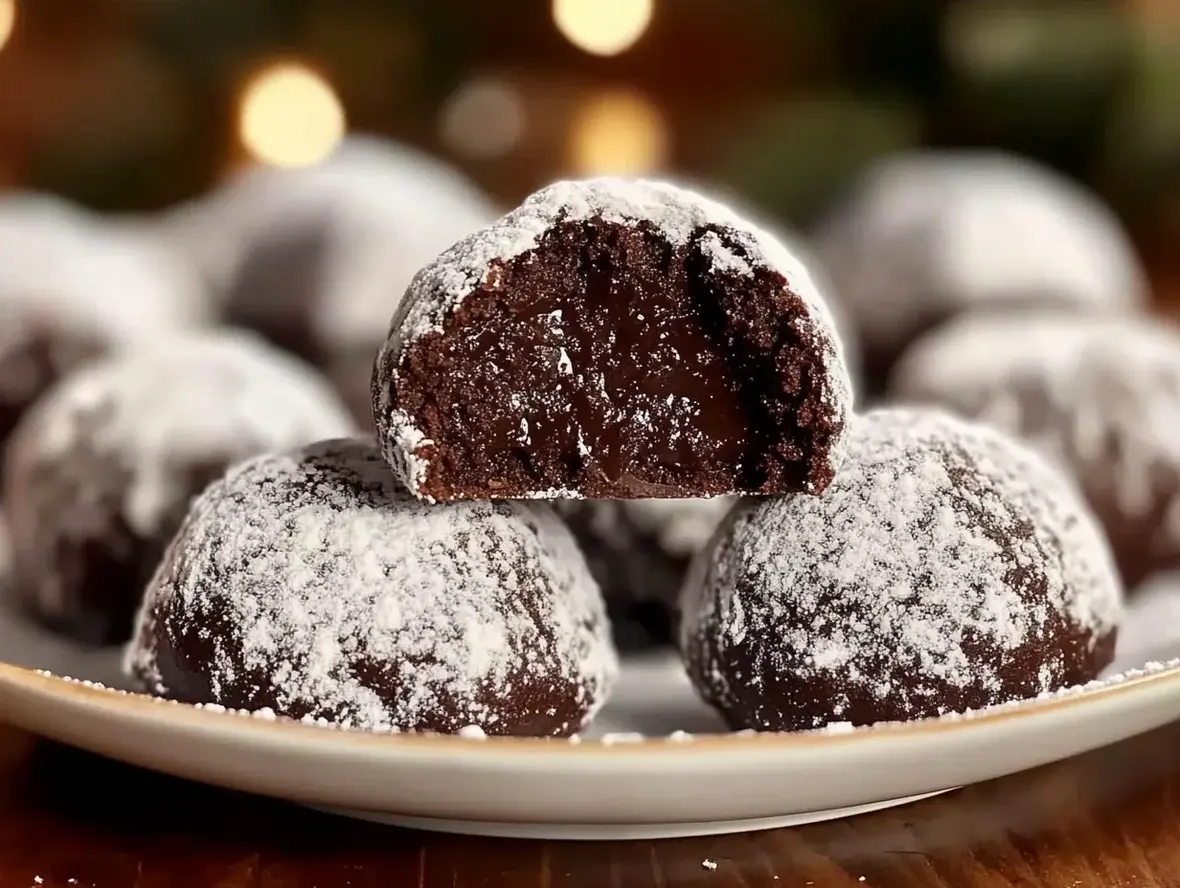
Chocolate Snowball Cookies: Your Go-To Holiday Treat!
Are you looking for a classic holiday cookie that’s incredibly easy to make and always a crowd-pleaser? If so, you’ve landed in the right spot! Chocolate snowball cookies, also known as Mexican wedding cookies or Russian tea cakes, are a charming and delicious addition to any festive spread. Their melt-in-your-mouth texture and delicate sweetness, often enhanced with a hint of chocolate, make them irresistible. This recipe hones in on creating that perfect balance, ensuring your homemade snowballs are not just a treat, but a treasured part of your holiday traditions.
Why These Chocolate Snowball Cookies Are a Holiday Must-Have
When the holiday season rolls around, the sweet scent of baking often fills our homes. Among the many delectable treats, cookies hold a special place. So, what makes chocolate snowball cookies so popular? It’s their unique combination of simplicity and decadence. Unlike intricate sugar cookies or time-consuming gingerbread houses, these beauties come together with minimal fuss, yet deliver maximum flavor and texture. They’re perfectly formed little spheres, coated in powdered sugar, resembling miniature snowballs, which is exactly why they are a perfect fit for your holiday baking repertoire. With less than 30 minutes of active prep time, you can have a batch ready for gifting or enjoying with a warm mug of cocoa. This recipe is designed to be foolproof, ensuring even novice bakers can achieve delightful results.
Ingredients You’ll Need
The magic of chocolate snowball cookies lies in their simple, quality ingredients. These are pretty standard pantry staples, making them accessible for everyone.
- 2 cups all-purpose flour: The foundation of our cookie structure. For a slightly richer flavor, you can experiment with cake flour, but all-purpose is classic.
- 1/2 cup unsweetened cocoa powder: This is where the deep chocolate flavor comes from. Use good quality cocoa for the best taste.
- 1/2 teaspoon baking soda: Helps with a slight lift and tenderness.
- 1/4 teaspoon salt: Balances the sweetness and enhances all the flavors.
- 1 cup (2 sticks) unsalted butter, softened: Crucial for a tender, crumbly texture. Make sure it’s truly softened, not melted.
- 3/4 cup granulated sugar: For sweetness and structure.
- 1 teaspoon vanilla extract: Enhances the chocolate and adds a warm aromatic note.
- 1 large egg yolk: Adds richness and helps bind the dough.
- 1/2 cup powdered sugar (for rolling): The snowy coating that gives these cookies their name.
Substitutions & Notes:
- Gluten-Free: Substitute a good quality gluten-free all-purpose flour blend (1-to-1 ratio) for the all-purpose flour.
- Dairy-Free: Use a high-quality vegan butter substitute. The texture might be slightly different but still delicious.
- Nuts: If you prefer, you can add 1/2 cup of finely chopped pecans or walnuts to the dough for an added crunch and nutty flavor.
Timing is Everything
20 minutes
30 minutes
12-15 minutes
1 hour 5 minutes
Compared to many holiday cookies that can take hours from start to finish, these chocolate snowball cookies are remarkably quick. The active prep time is minimal, and the chilling step is necessary to achieve the right cookie consistency, but it requires no effort from you. Baking is also swift, meaning you can be enjoying warm, decadent cookies in just over an hour!
Step-by-Step Instructions
Let’s get baking! Follow these simple steps to create your perfect batch of chocolate snowball cookies.
Step 1: Cream Butter and Sugar
In a large bowl, using an electric mixer (handheld or stand mixer with paddle attachment), cream together the softened unsalted butter and granulated sugar until light and fluffy. This usually takes about 2-3 minutes. This process incorporates air, which contributes to the cookies’ tender texture.
Step 2: Add Vanilla and Egg Yolk
Beat in the vanilla extract and the large egg yolk until well combined. Scrape down the sides of the bowl as needed to ensure everything is incorporated evenly.
Step 3: Combine Dry Ingredients
In a separate medium bowl, whisk together the all-purpose flour, unsweetened cocoa powder, baking soda, and salt. Whisking ensures the leavening agent and salt are evenly distributed throughout the flour mixture.
Step 4: Mix Dough
Gradually add the dry ingredients to the wet ingredients, mixing on low speed until just combined. Be careful not to overmix, as this can lead to tough cookies. The dough will be thick and slightly crumbly.
Step 5: Chill the Dough
Cover the bowl with plastic wrap and refrigerate the dough for at least 30 minutes. Chilling the dough makes it easier to handle, prevents the cookies from spreading too much during baking, and deepens the flavors.
Step 6: Form Snowballs
Preheat your oven to 350°F (175°C). Line baking sheets with parchment paper. Scoop rounded tablespoons of the chilled dough and roll them between your palms to form smooth balls, about 1 to 1.5 inches in diameter. Place them about 2 inches apart on the prepared baking sheets.
Step 7: Bake the Cookies
Bake for 12-15 minutes, or until the edges are set and the centers look slightly underbaked. They will not spread much. Do not overbake, as they will continue to cook slightly on the baking sheet.
Step 8: Cool and Decorate
Let the cookies cool on the baking sheets for 5-10 minutes before transferring them to a wire rack to cool completely. Once cooled, generously roll the cookies in powdered sugar until they are thoroughly coated, resembling snowballs.
Nutritional Snapshot
While this recipe is a delightful indulgence, here’s a general idea of what you can expect per cookie (this is an estimate and can vary based on exact ingredients and portion sizes):
- Calories: Approximately 150-180
- Fat: Approximately 9-12g
- Carbohydrates: Approximately 15-20g
- Sugar: Approximately 8-12g
- Protein: Approximately 1-2g
Please note: This is an estimation and does not include the powdered sugar coating.
Making Them a Little Lighter
Looking for ways to make these chocolate snowball cookies a bit more health-conscious without sacrificing flavor?
- Reduced Sugar: While challenging for cookies requiring structure, you can reduce the granulated sugar by a tablespoon or two, or use a sugar substitute like erythritol or stevia blends, adjusting to taste.
- Whole Wheat Flour: Replace about half of the all-purpose flour with whole wheat pastry flour for added fiber and nutrients. The texture might be slightly denser.
- Darker Cocoa: Use Dutch-processed or a higher quality dark cocoa powder; it often has a more intense flavor, allowing you to potentially use slightly less sweetener overall.
- Coconut Sugar: For a less refined sugar option, use coconut sugar instead of granulated sugar. Note that this may slightly alter the color and flavor profile.
- Mindful Coating: Instead of a heavy dusting of powdered sugar, consider a very light dusting, or even a drizzle of melted dark chocolate for a more intense chocolate experience with less surface sugar.
Serving Suggestions
These chocolate snowball cookies are incredibly versatile:
- Classic Pairing: Serve them with a steaming mug of hot chocolate or a strong cup of coffee.
- Holiday Cookie Platter: They make a beautiful addition to any festive cookie assortment, offering a different texture and flavor profile.
- With Milk: A glass of cold milk is always a perfect companion.
- As a Gift: Package them in festive tins or cellophane bags tied with ribbon for a homemade holiday gift that’s sure to be appreciated.
- With Fruit: The richness of the cookie can be nicely balanced by fresh berries, especially raspberries or strawberries.
Avoiding Common Cookie Pitfalls
Even simple recipes can have their quirks. Here are common mistakes to watch out for:
- Overmixing the Dough: This develops the gluten too much, resulting in tough cookies rather than tender, crumbly ones. Mix dry ingredients into wet until *just* combined.
- Not Softening Butter Properly: If your butter is too cold, it won’t cream well, affecting the texture. If it’s melted, the cookies will spread excessively. Aim for soft but not greasy.
- Overbaking: Chocolate cookies can look done when they are still slightly soft in the center. Remove them from the oven when the edges are set, as they will continue to firm up on the hot baking sheet.
- Not Chilling the Dough: This makes the dough sticky and hard to handle, and the cookies may spread too much.
- Uneven Ball Size: Smaller or larger cookies will bake at different rates, leading to some being overcooked and others undercooked. Try to make them as uniform as possible.
How to Store Your Snowball Cookies
Proper storage is key to keeping these delightful cookies fresh and delicious:
- At Room Temperature: Once completely cooled and rolled in powdered sugar, store them in an airtight container at room temperature. They will stay fresh for up to 3-4 days. Padded with wax paper between layers can prevent sticking.
- Refrigerator: For slightly longer storage (up to a week), you can put them in an airtight container in the refrigerator. However, this can sometimes dry them out slightly.
- Freezing: These cookies freeze beautifully! Place them in a single layer on a baking sheet until firm, then transfer to a freezer-safe bag or container. They can be frozen for up to 2-3 months. Thaw at room temperature. Note that the powdered sugar coating might melt slightly upon thawing if not handled carefully. It’s often best to re-roll them in powdered sugar after thawing for that fresh snowball look.
There you have it – your perfect chocolate snowball cookie recipe for the holidays (and beyond!). We hope these cookies bring a little extra joy and sweetness to your celebrations. What are your favorite holiday cookies to bake? Let us know in the comments below, and share this recipe with your friends and family!
Frequently Asked Questions
***Can I make these cookies without cocoa powder?***
Absolutely! If you omit the cocoa powder, you’ll have a classic vanilla snowball cookie. You might want to slightly increase the flour by a tablespoon or two to compensate for the missing cocoa powder. They will be delicious!
***Why are my cookies spreading too much?***
This is usually due to several factors: the butter being too soft or melted, overmixing the dough, or not chilling the dough sufficiently. Ensure your butter is softened but firm, mix just until combined, and always chill the dough.
***How do I get that perfect snowball shape?***
Scoop rounded tablespoons of dough and roll them between your palms until smooth and uniform. Chilling the dough is crucial here as it makes it less sticky and easier to shape.
***Can I add nuts to this recipe?***
Yes, you can! Finely chopped pecans or walnuts are a wonderful addition. Add about 1/2 cup of nuts to the dough along with the dry ingredients. Ensure they are chopped small so they don’t interfere with the cookie’s texture and shape.
***How long do the cookies last?***
Stored properly in an airtight container at room temperature, they should last for about 3-4 days. They are best enjoyed within the first few days for optimal texture.
Chocolate Snowball Cookies
TheseChocolate Snowball Cookiesare buttery, melt-in-your-mouth treats with a rich cocoa flavor and a snowy powdered sugar coating. Perfect for the holidays or any occasion, these cookies are easy to make and customizable for gluten-free or nut-free diets.
Ingredients
- 1 cupunsalted butter, softened½ cuppowdered sugar (plus extra for rolling)1 teaspoonvanilla extract2 cupsall-purpose flour¼ cupcocoa powder½ teaspoonsalt1 cupfinely chopped nuts (optional, such as pecans or walnuts)
- ½ cuppowdered sugar (plus extra for rolling)1 teaspoonvanilla extract2 cupsall-purpose flour¼ cupcocoa powder½ teaspoonsalt1 cupfinely chopped nuts (optional, such as pecans or walnuts)
- 1 teaspoonvanilla extract2 cupsall-purpose flour¼ cupcocoa powder½ teaspoonsalt1 cupfinely chopped nuts (optional, such as pecans or walnuts)
- 2 cupsall-purpose flour¼ cupcocoa powder½ teaspoonsalt1 cupfinely chopped nuts (optional, such as pecans or walnuts)
- ¼ cupcocoa powder½ teaspoonsalt1 cupfinely chopped nuts (optional, such as pecans or walnuts)
- ½ teaspoonsalt1 cupfinely chopped nuts (optional, such as pecans or walnuts)
- 1 cupfinely chopped nuts (optional, such as pecans or walnuts)
Instructions
- 1️⃣Prepare the Oven and Baking Sheet:Preheat your oven to 350°F (175°C). Line a baking sheet with parchment paper.2️⃣Mix the Dough:In a large mixing bowl, cream the softened butter and powdered sugar together until light and fluffy. Mix in the vanilla extract.3️⃣Add Dry Ingredients:Gradually sift in the flour, cocoa powder, and salt. Mix until the dough is smooth and fully combined.4️⃣Fold in Nuts (Optional):If using nuts, gently fold them into the dough until evenly distributed.5️⃣Shape the Cookies:Roll the dough into 1-inch balls and place them on the prepared baking sheet, leaving about 1 inch of space between each cookie.6️⃣Bake the Cookies:Bake in the preheated oven for 12–15 minutes, or until the edges are set. Allow the cookies to cool on the baking sheet for 5 minutes.7️⃣Add the “Snow” Coating:While the cookies are still warm, roll them in powdered sugar for the first snowy coating. Once cooled, roll them again in powdered sugar for a festive, snowball-like finish.
- 2️⃣Mix the Dough:In a large mixing bowl, cream the softened butter and powdered sugar together until light and fluffy. Mix in the vanilla extract.
- 3️⃣Add Dry Ingredients:Gradually sift in the flour, cocoa powder, and salt. Mix until the dough is smooth and fully combined.4️⃣Fold in Nuts (Optional):If using nuts, gently fold them into the dough until evenly distributed.5️⃣Shape the Cookies:Roll the dough into 1-inch balls and place them on the prepared baking sheet, leaving about 1 inch of space between each cookie.6️⃣Bake the Cookies:Bake in the preheated oven for 12–15 minutes, or until the edges are set. Allow the cookies to cool on the baking sheet for 5 minutes.7️⃣Add the “Snow” Coating:While the cookies are still warm, roll them in powdered sugar for the first snowy coating. Once cooled, roll them again in powdered sugar for a festive, snowball-like finish.
- 4️⃣Fold in Nuts (Optional):If using nuts, gently fold them into the dough until evenly distributed.5️⃣Shape the Cookies:Roll the dough into 1-inch balls and place them on the prepared baking sheet, leaving about 1 inch of space between each cookie.6️⃣Bake the Cookies:Bake in the preheated oven for 12–15 minutes, or until the edges are set. Allow the cookies to cool on the baking sheet for 5 minutes.7️⃣Add the “Snow” Coating:While the cookies are still warm, roll them in powdered sugar for the first snowy coating. Once cooled, roll them again in powdered sugar for a festive, snowball-like finish.
- 5️⃣Shape the Cookies:Roll the dough into 1-inch balls and place them on the prepared baking sheet, leaving about 1 inch of space between each cookie.
- 6️⃣Bake the Cookies:Bake in the preheated oven for 12–15 minutes, or until the edges are set. Allow the cookies to cool on the baking sheet for 5 minutes.7️⃣Add the “Snow” Coating:While the cookies are still warm, roll them in powdered sugar for the first snowy coating. Once cooled, roll them again in powdered sugar for a festive, snowball-like finish.
- 7️⃣Add the “Snow” Coating:While the cookies are still warm, roll them in powdered sugar for the first snowy coating. Once cooled, roll them again in powdered sugar for a festive, snowball-like finish.
Notes
For a festive twist, add a pinch of cinnamon or peppermint extract to the dough.Store the cookies in an airtight container for up to a week or freeze for longer storage.
Store the cookies in an airtight container for up to a week or freeze for longer storage.
Leave a Reply