Table of Contents
Frozen S’mores — Creamy No-Bake Summer Treat That Will Bring Back the Campfire
I still remember the first time I tasted a s’more as a little girl in Morocco. We didn’t have campfires the way you do here in the States, but we had something close: we’d roast marshmallows over the embers of my mother’s tabouna oven after baking bread. That gooey, blackened marshmallow pressed between two cookies was heaven. Now, living in NYC and trained in Paris, I’ve transformed that memory into these frozen s’mores—a no-bake, creamy, summertime twist that cuts through the heat. With layers of chocolate pudding and marshmallow creme, these frozen s’mores are the best way to enjoy a s’more on a hot day, without ever lighting a flame. The unique angle here is the use of cream cheese in the marshmallow layer, which adds a subtle tang and silky texture that you don’t get from marshmallow alone.
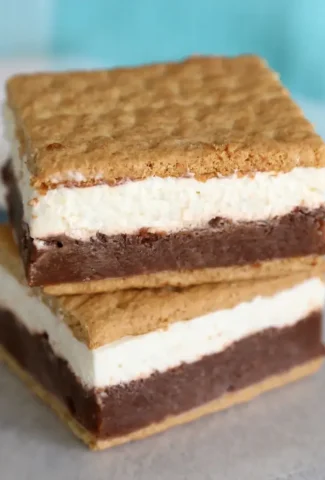
Imagine biting into a cold, creamy bar of chocolatey pudding and light-as-air marshmallow crème, sandwiched between crisp graham crackers. The first layer is a rich, instant chocolate pudding that I whip up in minutes, lightened with a bit of frozen whipped topping so it stays smooth even after freezing. Then comes the marshmallow layer, which I make by folding cream cheese into marshmallow crème for a touch of stability and a hint of French-style tang—a trick I picked up in pastry school in Paris. The whole thing freezes into neat little bars that you can slice with a sharp knife. It’s like a frozen cheesecake crossed with a classic campfire dessert, and it’s absolutely perfect for backyard barbecues, pool parties, or just a hot afternoon when you need something cold and sweet.
What sets these frozen s’mores apart from every other version you’ve seen is the technique: I use instant pudding and whipped topping to streamline the process, and I rely on a cream cheese–marshmallow crème combo for a marshmallow layer that doesn’t get icy. I’ll share my 💡 Samantha’s Pro Tip for getting the cleanest slices, plus a common mistake to avoid when spreading the layers. Compared to traditional s’mores that require a fire and can be messy, these are foolproof, make-ahead, and perfect for feeding a crowd. You can even customize them with different pudding flavors or add a drizzle of melted chocolate on top. From my NYC kitchen to yours, let me show you how to make the ultimate frozen summer treat.
Why This Frozen S’mores Recipe Is the Best
The flavor secret starts with the marshmallow layer. I grew up eating marshmallow crème straight from the jar in Morocco (we had a similar confection called “halwa”), but here I wanted more structure. So I added cream cheese, softened and beaten until smooth. This gives the marshmallow layer a slight tang that balances the sweet chocolate pudding, and it keeps the texture rich and creamy even after hours in the freezer. The result is a frozen dessert that tastes like a gourmet version of the campfire classic, but with a deeper, more sophisticated profile. I’ve taken this Parisian pastry technique and applied it to an American favorite, and it works beautifully.
Perfected texture comes from a specific layering method. Rather than mixing everything together, I create distinct layers: a crisp graham cracker base, a thick chocolate pudding layer that’s been lightened with whipped topping, an airy marshmallow cream layer, and another layer of graham crackers on top. The key is freezing the pan after adding the pudding layer, so that when you spread the marshmallow layer, the pudding stays put and doesn’t mix. This gives you that perfect cross-section when you slice it—three distinct strata with contrasting textures. The graham crackers soften just slightly in the freezer, becoming tender but not soggy, while the fillings stay creamy and cold.
Foolproof and fast—that’s what makes this recipe approachable for every cook. Even if you’re a beginner, you can make these frozen s’mores with confidence. There’s no baking, no complicated candy thermometer, and no special equipment beyond a 9×13 pan. The instant pudding sets up quickly with cold milk, and the whipped topping is already thawed and ready to fold. I tested this recipe in my tiny Manhattan apartment kitchen, and it came together in less than 15 minutes of active time. The hardest part is waiting for it to freeze! For busy parents, weekend hosts, or anyone craving a cool dessert, this is the recipe you’ll turn to all summer long.
Frozen S’mores Ingredients
I picked up my graham crackers from the bodega on the corner of my street in Brooklyn, but you can find them at any US grocery store. The marshmallow crème is a staple I always have on hand—it reminds me of the sweet preserves my mother used to make. In Paris, I learned to value simple, quality ingredients, and that’s what this list is all about.
Ingredients List
- 1 box Instant Chocolate Pudding (5.9 oz)
- 2.5 cups Cold Milk (whole or 2%)
- 12-15 Graham Crackers (about 6 full sheets)
- 7 oz Marshmallow Creme
- 4 oz Cream Cheese (softened)
- 8 oz Frozen Whipped Topping (thawed)
Ingredient Spotlight
Instant Chocolate Pudding: It’s the backbone of the chocolate layer. I recommend using the 5.9-ounce box, not the smaller 3.4-ounce size, to get a thick enough pudding that holds its shape after freezing. The instant kind is key because it sets in just minutes with cold milk—no cooking required. You can use sugar-free if you prefer, but the texture will be a bit less creamy. For a richer chocolate flavor, swap in one box of dark chocolate instant pudding.
Marshmallow Creme: This is the soul of the recipe. Marshmallow crème (like Jet-Puffed or store brand) has a smooth, spreadable consistency that’s perfect for freezing. Do not substitute mini marshmallows melted down; they’ll become too dense and sticky when frozen. The crème stays light and airy, especially when you fold it with cream cheese and whipped topping. I get mine from the baking aisle of any US supermarket.
Graham Crackers: Traditional honey graham crackers give that classic s’mores flavor. Make sure they’re fresh and crisp; stale ones will be too soft. You can use cinnamon graham crackers for a subtle spice note, or chocolate graham crackers for an extra rich dessert. I’ve also tested this with gluten-free graham-style crackers, and they work perfectly with no adjustment needed.
Frozen Whipped Topping: Thawed frozen whipped topping (like Cool Whip) is what I use to lighten both layers. It folds in easily and keeps the texture silky, not icy. Do not substitute freshly whipped cream; it will deflate and make the filling too soft. The stabilizers in frozen whipped topping ensure that the frozen s’mores hold their shape even after slicing and thawing slightly. One 8-ounce tub is just the right amount.
| Original Ingredient | Best Substitution | Flavor / Texture Impact |
|---|---|---|
| Instant Chocolate Pudding | Dark chocolate instant pudding or butterscotch pudding | Richer chocolate or caramel-like flavor; texture stays the same |
| Marshmallow Creme | Fluff or store-brand marshmallow crème (not marshmallows) | Same fluffy texture; avoid melting marshmallows as they crystallize |
| Graham Crackers | Chocolate graham crackers, gluten-free graham crackers, or digestive biscuits | Chocolate adds double chocolate; digestives are a tad richer and more crumbly |
| Frozen Whipped Topping | Coconut whipped topping (for dairy-free) | Slightly coconut flavor; still light and creamy, but less stable |
How to Make Frozen S’mores — Step-by-Step
Making these frozen s’mores is straightforward, and I’ll guide you through each step with tips I’ve learned from years of testing. Let’s get started!
Step 1: Prepare the Pan
Line a 9×13-inch pan with parchment paper, leaving enough paper overhanging on two opposite sides so you can lift the entire block out later. Break 6 full graham cracker sheets in half to create 12 squares. Place them in a single layer on the bottom of the pan. If your pan has perfectly straight sides (not tapered), you can fit 15 squares by overlapping slightly—but 12 works fine. Press them gently so they lay flat.
💡 Samantha’s Pro Tip: Use a ruler to measure your pan’s interior. If you have a standard 9×13 that’s slightly tapered at the bottom, 12 squares is the sweet spot. For a rectangular lasagna pan with straight sides, you can fit 15.
Step 2: Make the Chocolate Layer
In a medium bowl, whisk together the instant chocolate pudding mix and 2.5 cups of cold milk until the powder is fully dissolved and the mixture is smooth and creamy, about 2 minutes. It will start to thicken almost immediately. Gently fold in about a quarter of the thawed frozen whipped topping (roughly ½ cup or slightly more). This lightens the pudding and prevents it from becoming too dense when frozen.
⚠️ Common Mistake to Avoid: Don’t use warm milk—the pudding won’t set properly. And don’t skip folding in the whipped topping; it’s what keeps the pudding layer soft and scoopable even after freezing.
Step 3: Freeze Initial Layer
Spoon the chocolate pudding mixture over the graham crackers in the pan. Use an offset spatula or the back of a spoon to spread it into an even layer, making sure it reaches the edges. Place the pan in the freezer for about 15-20 minutes, just until the pudding is firm to the touch. This step is crucial because it creates a barrier so the marshmallow layer won’t mix into the chocolate when you spread it.
💡 Samantha’s Pro Tip: While the pan is chilling, you can prepare the marshmallow layer. This way everything is ready to go, and the timeline stays efficient.
Step 4: Prepare Marshmallow Layer
While the pan chills, beat the softened cream cheese in a medium bowl with a hand mixer (or a sturdy whisk) until smooth and fluffy. Add the marshmallow crème and beat again until completely incorporated—no lumps. Fold in the remaining frozen whipped topping until the mixture is uniform and airy. Remove the pan from the freezer and spoon the marshmallow mixture over the pudding layer. Spread it gently and evenly, taking care not to disturb the chocolate layer underneath.
⚠️ Common Mistake to Avoid: If the cream cheese is not fully softened, you’ll end up with lumps. Let it sit at room temperature for at least 30 minutes before starting. Also, be gentle when folding; you want to keep the air in the whipped topping for a light texture.
Step 5: Add Top Crackers
Place another layer of graham cracker squares on top of the marshmallow mixture—12 or 15, matching the bottom. Press them down lightly so they adhere to the surface. They don’t need to be fully submerged; just make sure they’re making contact with the marshmallow layer.
💡 Samantha’s Pro Tip: If some crackers break, just fit the pieces together like a puzzle. It won’t affect the final look because the filling will hold them together once frozen.
Step 6: Freeze Firmly
Cover the pan with aluminum foil and place it in the freezer for at least 6 hours, or overnight. The frozen s’mores need to be firm enough to slice cleanly. If you try to cut too early, the fillings will squish out.
⚠️ Common Mistake to Avoid: Don’t rush the freezing. Six hours is the minimum; for cleaner slices, go for 8 hours or overnight. Also, don’t stack anything heavy on top of the pan while it’s freezing—it can compress the layers.
Step 7: Slice and Serve
Remove the pan from the freezer and let it sit at room temperature for about 10 minutes. This softens the edges just enough to make slicing easy. Use a long sharp knife and run it under hot water, then dry it, before each cut. First, trim off the excess filling that may have oozed out around the edges of the graham crackers. Then slice in between each cracker to create individual bars. Serve immediately.
💡 Samantha’s Pro Tip: Wipe the knife clean between cuts for the neatest edges. If the bars start to feel too soft, pop them back in the freezer for 15 minutes.
Step 8: Store for Later
To store leftovers, place the individual frozen s’mores in an airtight container with a piece of parchment paper between each bar to prevent sticking. They’ll keep in the freezer for up to three months. When you’re ready to eat, let them sit at room temperature for 10 minutes before serving—this softens the texture perfectly.
⚠️ Common Mistake to Avoid: Don’t leave them out for longer than 20 minutes; they’ll become too soft and lose their shape. And never store them in the fridge—condensation makes the graham crackers soggy.
| Step | Action | Duration | Key Visual Cue |
|---|---|---|---|
| 1 | Prepare pan with graham crackers | 5 mins | Crackers cover bottom fully |
| 2 | Make and spread chocolate pudding | 5 mins | Pudding thickens and spreads evenly |
| 3 | Freeze pudding layer | 15-20 mins | Pudding is firm to the touch |
| 4 | Make and spread marshmallow layer | 5 mins | Fluffy, smooth, and white |
| 5 | Add top graham crackers | 2 mins | Crackers sit flat on top |
| 6 |
Leave a Reply