
Table of Contents
Ice Cream Sandwich Cake: Easy No-Bake Dessert for Summer
I still remember the first time I made an Ice Cream Sandwich Cake — it was a sweltering July afternoon in my tiny NYC apartment, and I craved something cold, creamy, and utterly indulgent without turning on the oven. Growing up in Morocco, my mother would layer simple ingredients to create stunning desserts that felt special without fuss. This Easy Ice Cream Sandwich Cake is a love letter to that philosophy: it’s the simplest way to make your own homemade ice cream cake using ice cream sandwiches, with no baking required. Every time I bring this to a potluck or family gathering, it disappears in minutes — kids and adults alike can’t resist that nostalgic crunch of cookies against silky cream and rich chocolate.
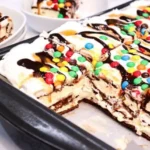
Imagine slicing into a tall, frosty cake: the vanilla ice cream sandwiches are soft and creamy at the edges, while the cool whip layer is cloud-like and airy. Chocolate syrup and caramel sauce weave through every bite, pooling in ribbons of sweetness, and the mini M&M’s add a pop of color and a satisfying crunch. I love how this dessert feels both elevated and familiar — like something you’d find at a fancy NYC restaurant, yet made from ingredients you can grab at any grocery store. The contrast between the cold, creamy layers and the sweet, sticky syrup is pure bliss on a hot day.
What sets this ice cream sandwich cake apart is the layering technique I perfected in my Parisian pastry training — ensuring every slice is balanced and beautiful. You stack the ice cream sandwiches whole, so each piece has a perfect cross-section of cookie and ice cream. 💡 Samantha’s Pro Tip: Don’t skip the parchment paper lining — it makes lifting the cake out of the pan a breeze, keeping those clean, sharp edges intact. ⚠️ Common Mistake to Avoid: Over-saturating the cool whip with syrup — balance is key. Let me show you how to nail this no-bake wonder every time.
Why This Ice Cream Sandwich Cake Recipe Is the Best
The Flavor Secret: This isn’t just any ice cream cake — it’s a layered masterpiece inspired by my French training in sauce work. The combination of chocolate syrup and caramel sauce creates a bittersweet-savory depth that reminds me of the salted caramel tarts I learned in Paris. Using store-bought ice cream sandwiches as the base ensures a perfectly chewy edge with a creamy center, saving you hours of churning and baking.
Perfected Texture: Through trial and error in my own kitchen, I discovered that freezing the cake for exactly 2 hours gives the ideal texture — firm enough to slice cleanly but still creamy and soft to the bite. Any longer and the cookies get too hard; any shorter and it’s a mess. The cool whip layer acts as a light, airy buffer that keeps everything together without weighing it down.
Foolproof & Fast: With just 15 minutes of active prep and zero baking, this is the dessert everyone can make, even first-timers. No eggs, no flour, no complicated techniques — just stacking, spreading, drizzling, and freezing. It’s the kind of recipe my mother would approve of: simple, generous, and full of love.
Ice Cream Sandwich Cake Ingredients
I buy my ice cream sandwiches from the freezer aisle at my local ACME in New York, but any brand works — just make sure they’re the classic vanilla kind for the most neutral, creamy base. The cool whip I pick up from Trader Joe’s (their house brand is excellent), and the chocolate syrup? Hershey’s is my nostalgic go-to, though my French training whispers to use a high-quality sauce sometimes. For the caramel, I love the thick, buttery jar from Stonewall Kitchen I find at the Union Square Greenmarket. And the mini M&M’s — well, those are pure childhood joy.
Ingredients List
- 24 Ice Cream Sandwiches (vanilla, standard size)
- 16 oz. Container of Cool Whip (thawed)
- 8 oz. Hershey’s Chocolate Syrup
- 8 oz. Caramel Sauce
- 1 Cup Mini M&M’s
Ingredient Spotlight
Ice Cream Sandwiches: These form the structural backbone. Choose a brand that’s firm but not rock-hard in the package — they need to be pliable enough to layer without breaking. If you find the oblong kind, they fit perfectly in a 9×13 pan; square ones work too but may need a little trimming.
Cool Whip: This isn’t just a topping — it’s the glue that holds the layers together. Thaw it completely in the fridge (not on the counter) so it spreads like a dream. You can substitute with homemade stabilized whipped cream, but Cool Whip keeps its shape better after freezing.
Chocolate Syrup & Caramel Sauce: The duo is my secret weapon. Use high-quality syrups so the flavors pop — I’ve tested with Hershey’s and Torani, both work. Avoid thin, watery sauces that will seep into the cool whip; thick, pourable sauces are best.
| Original Ingredient | Best Substitution | Flavor / Texture Impact |
|---|---|---|
| Cool Whip | Homemade whipped cream stabilized with 1 tsp gelatin | Less stable after freezing; use right away |
| Hershey’s Chocolate Syrup | Homemade chocolate fudge sauce | Richer, more intense chocolate flavor |
| Caramel Sauce | Dulce de leche | Thicker, more caramel-forward; needs less drizzle |
| Mini M&M’s | Crushed toffee bits or rainbow sprinkles | Crunchy toffee adds buttery notes; sprinkles for color only |
How to Make Ice Cream Sandwich Cake — Step-by-Step
Let’s build this ice cream sandwich cake together — it’s easier than you think, and the results are truly spectacular. Just follow each step, and I promise you’ll have a showstopper dessert that wows everyone.
Step 1: Prepare the Pan
Line a 9×13 metal cake pan with a double layer of parchment paper, leaving overhang on two opposite sides — this creates handles for lifting the cake out later. The paper should cover the bottom and up the sides snugly. If you have a ceramic or glass dish, it works too, but metal helps the cake freeze faster.
💡 Samantha’s Pro Tip: Fold the parchment corners like a gift box to eliminate gaps — this prevents ice crystals from forming between the paper and the pan.
Step 2: First Layer of Sandwiches
Unwrap 12 ice cream sandwiches and place them in a single layer across the bottom of the pan. Arrange them snugly — if there are gaps, break a sandwich in half to fill the space. Press down gently so they sit flush. Work quickly so the sandwiches don’t melt too much.
⚠️ Common Mistake to Avoid: Don’t let the sandwiches sit out too long — they soften fast. Keep them in the freezer until the last minute.
Step 3: First Cream and Sauce Layer
Spread half of the thawed Cool Whip (about 8 ounces) evenly over the first layer of sandwiches. Use a rubber spatula to smooth it out to the edges. Then drizzle with about half the chocolate syrup and half the caramel sauce — aim for a zigzag pattern so every bite gets both flavors.
Step 4: Repeat the Layers
Add the remaining 12 unwrapped ice cream sandwiches on top of the Cool Whip layer, again fitting them snugly. Spread the rest of the Cool Whip over the top, then finish with the remaining chocolate and caramel drizzles. Use the back of a spoon to swirl the sauces slightly into the Cool Whip for a marbled effect.
💡 Samantha’s Pro Tip: For a cleaner swirl, don’t overmix — just two or three figure-eights with the spoon tip are enough. This keeps the layers distinct.
Step 5: Add the Topping
Sprinkle the mini M&M’s evenly over the top layer of sauce. Gently press a few into the Cool Whip so they don’t fall off when you cut the cake. You can also add extra sprinkles for a festive look — my kids love the rainbow ones.
Step 6: Freeze and Serve
Place the pan in the freezer for a minimum of 2 hours — overnight is even better if you have the time. The cake needs to be completely solid so it slices cleanly. When ready to serve, lift it out using the parchment overhang, let it sit at room temperature for 5 minutes to soften slightly, then cut into squares with a sharp knife.
⚠️ Common Mistake to Avoid: Cutting straight from the freezer will crack the cake. The 5-minute rest softens the edges just enough for a perfect slice.
| Step | Action | Duration | Key Visual Cue |
|---|---|---|---|
| 1 | Prepare pan with parchment | 2 mins | Paper overhangs on two sides |
| 2 | Layer 12 sandwiches | 3 mins | Pan bottom fully covered |
| 3 | Spread half Cool Whip, drizzle syrups | 3 mins | Even white layer with ribbons of chocolate and caramel |
| 4 | Repeat layers with remaining sandwiches, Cool Whip, syrups | 5 mins | Second layer flush; top swirled with sauce |
| 5 | Sprinkle M&M’s | 2 mins | Colorful even coating on top |
| 6 | Freeze | 2+ hours | Cake is solid to the touch |
Serving & Presentation
When I serve this ice cream sandwich cake at my NYC rooftop barbecues, I love to invert it onto a large wooden board — the parchment makes it so easy to transfer. Slice it into squares or rectangles, and watch the colorful layers reveal themselves. I always add a light drizzle of extra chocolate syrup and a few fresh berries (like raspberries or sliced strawberries) for a tart contrast that cuts through the sweetness. In Morocco, my mother would add a sprinkle of rose petals or crushed pistachios for elegance — feel free to try that!
This cake is a showstopper for birthdays, summer parties, or even as a make-ahead dessert for holidays. Serve it in small bowls with a dollop of fresh whipped cream on the side, or alongside a strong coffee (I love a double espresso from my local NYC spot, Blue Bottle) to balance the richness. For a playful touch, use a warm knife to cut the cake — run it under hot water and wipe dry for the cleanest slices.
| Pairing Type | Suggestions | Why It Works |
|---|---|---|
| Side Dish | Fresh berries, sliced peaches | Acidity cuts the sugar, adds freshness |
| Sauce / Dip | Extra chocolate syrup, warm fudge sauce | Intensifies chocolate for the ultimate indulgence |
| Beverage | Iced coffee, cold brew, milk | Richness pairs beautifully with bitter or creamy drinks |
| Garnish | Crushed M&M’s, chocolate shavings, fresh mint | Adds texture, color, and a fresh finish |
Make-Ahead, Storage & Reheating
This ice cream sandwich cake is my go-to for parties because it’s entirely make-ahead friendly. I often prep it the night before, so it’s ready to pull out and serve in minutes. Here’s exactly how I store it in my own freezer (between all the NYC takeout leftovers and frozen vegetables!).
| Method | Container | Duration | Reheating Tip |
|---|---|---|---|
| Refrigerator | Not recommended | N/A |
Leave a Reply