Table of Contents
Oreo Ice Cream Sandwich Cake – Easy No-Bake 6-Layer Dessert
Growing up in my mother’s kitchen in Morocco, I learned that the best desserts don’t need an oven—just a little creativity and a lot of heart. This Oreo Ice Cream Sandwich Cake is a perfect example: it’s a no-bake, six-layer wonder that combines ice cream sandwiches, creamy whipped topping, rich hot fudge, and crushed Oreos for a dessert that’s as beautiful as it is delicious. The secret? A gentle layering technique I picked up at culinary school in Paris, where we learned that even the simplest desserts deserve a chef’s precision.
Imagine slicing into a chilled cake where each forkful reveals a ribbon of fudge, a whisper of whipped topping, and the satisfying crunch of crushed Oreos. The ice cream sandwiches soften just enough to meld with the other layers, creating a texture that’s part ice cream, part cake, and entirely addictive. The hot fudge sauce adds a deep, chocolatey richness that I love to balance with a pinch of sea salt—a tip I picked up from my years working in NYC pastry kitchens, where even classic recipes get an upgrade.
I’ve tested this recipe dozens of times to make sure it’s foolproof for home cooks. The key is letting the cake freeze for at least 30 minutes so the layers set beautifully, and allowing it to thaw for about 10 minutes before serving for the perfect texture. 💡 Samantha’s Pro Tip: For an even richer flavor, use a high-quality hot fudge sauce found at specialty grocery stores—it makes all the difference.
Why This Oreo Ice Cream Sandwich Cake Recipe Is the Best
The Flavor Secret: This recipe leans on the contrast between the creamy, slightly vanilla-flavored ice cream sandwiches and the intense chocolate fudge. As a pastry chef trained in Paris, I’ve learned that balance is everything. The crushed Oreos add both texture and a touch of cocoa bitterness, which cuts through the sweetness of the whipped topping. It’s a harmony I first discovered while experimenting with layered desserts at a NYC pop-up—and it’s simply unbeatable.
Perfected Texture: The key is the layering sequence—ice cream sandwiches first, then a thin, even spread of whipped topping, followed by a drizzle of fudge and a sprinkle of Oreos. If you spread the whipped topping too thick, the cake becomes too rich; too thin, and it feels dry. I recommend using a spatula to gently coax the topping into an even layer, just like we did in Paris for delicate mille-feuille.
Foolproof & Fast: This is the kind of recipe I make after a long day in the kitchen—when I’m tired but still want something impressive. It’s completely no-bake, requires minimal cleanup, and can be assembled in just 15 minutes. I’ve made it for backyard BBQs in Brooklyn, after-school treats for my friend’s kids, and even a last-minute dessert for a dinner party. It always disappears first.
Oreo Ice Cream Sandwich Cake Ingredients
When I’m in NYC, I pick up ice cream sandwiches from the local grocery store—they’re a staple in every fridge here, and for good reason. Hot fudge sauce I sometimes make from scratch, using a technique I learned in Paris, but a store-bought version works beautifully. The whipped topping brings back memories of my mother’s cold, creamy desserts in Morocco, where she would whip fresh cream with a dash of orange blossom water.
Ingredients List
- 24 Ice cream Sandwiches (about 1.5 packs)
- 12 Oreos (crushed, about 1 cup)
- 1 cup Hot Fudge Topping (store-bought or homemade)
- 8 oz Whipped Topping (thawed and divided, like Cool Whip)
Ingredient Spotlight
Ice Cream Sandwiches: The foundation of this cake. Choose a standard vanilla ice cream sandwich for neutrality—the flavors of the fudge and Oreos do the work. For a twist, try chocolate-chip cookie sandwiches. Select cartons that feel solid and aren’t melting at the grocery store. A tested substitution: use 24 chocolate cookie sandwiches for a double-chocolate version, though the cake will be sweeter.
Oreos: The classic cookie provides the essential crunch and cocoa flavor. Crush them by hand in a sealed bag for a rustic texture, or pulse in a food processor for finer crumbs. A tested substitution: use chocolate wafer cookies like Nabisco Famous Wafers for a similar effect. Avoid sandwich-style cookies with cream filling, as they won’t crush evenly.
Hot Fudge Topping: Choose a thick, premium fudge sauce—Hershey’s Simple Pour works, but high-end brands like Ghirardelli or a homemade fudge (made with cream and dark chocolate) elevate the richness. A tested substitution: caramel sauce for a salted caramel twist, though the consistency should be thick enough to not run off the layers.
Whipped Topping: Thawed whipped topping (Cool Whip is common, but any brand works) provides lightness between the dense ice cream sandwiches. A tested substitution: make stabilized whipped cream by whipping 1 cup heavy cream with 2 tablespoons powdered sugar and 1 teaspoon vanilla extract, then fold in 1 teaspoon unflavored gelatin dissolved in 2 tablespoons water. This yields a richer texture but requires more effort.
| Original Ingredient | Best Substitution | Flavor / Texture Impact |
|---|---|---|
| Ice Cream Sandwiches | Chocolate cookie sandwiches | Double chocolate flavor; sweeter overall. |
| Oreos | Chocolate wafer cookies | Less sweet; more delicate crunch. |
| Hot Fudge Topping | Caramel sauce | Salted caramel twist; less chocolate intensity. |
| Whipped Topping | Stabilized whipped cream | Richer, airier; takes more time to prepare. |
How to Make Oreo Ice Cream Sandwich Cake — Step-by-Step
This is such a simple recipe, and I promise it’s impossible to mess up. The layering is the most important part—just take your time and enjoy the process.
Step 1: Layer Sandwiches in Pan
Arrange 12 ice cream sandwiches in a single layer on the bottom of a 9×13-inch pan. If needed, cut a sandwich to fit snugly. Leave no gaps—this creates a sturdy base.
💡 Samantha’s Pro Tip: Use a metal spatula to press the sandwiches down slightly so they merge into an even surface. This helps prevent air pockets.
Step 2: Spread Whipped Topping
Spread half of the whipped topping (about 4 oz) evenly over the ice cream sandwiches.
⚠️ Common Mistake to Avoid: Don’t spread the topping too thick—it should be a thin, even layer. If it’s too thick, the cake feels heavy and less creamy.
Step 3: Drizzle Fudge
Drizzle half of the hot fudge sauce (about 1/2 cup) over the whipped topping. Warm the fudge slightly if it’s too thick to drizzle evenly.
💡 Samantha’s Pro Tip: For a professional finish, warm the fudge in a small saucepan or microwave for 15 seconds, then drizzle with a spoon—this ensures even distribution without pooling.
Step 4: Sprinkle Oreos
Sprinkle half of the crushed Oreos (about 6 cookies’ worth) over the fudge layer.
⚠️ Common Mistake to Avoid: Don’t dump all the Oreos in one spot. Sprinkle evenly so every slice gets crunch.
Step 5: Repeat Layers
Repeat steps 1–4: add another layer of ice cream sandwiches, spread the remaining whipped topping, drizzle the remaining fudge, and sprinkle the remaining crushed Oreos.
💡 Samantha’s Pro Tip: Press the second layer of sandwiches gently so the layers stick together. This ensures clean slices when you serve.
Step 6: Freeze the Cake
Freeze the cake for at least 30 minutes (or up to a few hours) to set. If freezing for longer than a few hours, cover with plastic wrap to prevent freezer burn.
⚠️ Common Mistake to Avoid: Don’t freeze for less than 30 minutes—the cake won’t slice cleanly. For best results, freeze for 2-3 hours.
Step 7: Thaw and Serve
Allow the cake to thaw at room temperature for about 10 minutes before serving. This softens the edges slightly for easier slicing.
💡 Samantha’s Pro Tip: Use a sharp knife warmed under hot water to slice cleanly. Wipe the blade between cuts for picture-perfect slices.
| Step | Action | Duration | Key Visual Cue |
|---|---|---|---|
| 1 | Layer ice cream sandwiches | 2 min | No gaps in bottom |
| 2 | Spread whipped topping | 1 min | Thin, even layer |
| 3 | Drizzle hot fudge | 1 min | Even ribbons across top |
| 4 | Sprinkle crushed Oreos | 1 min | Uniform coverage |
| 5 | Repeat steps 1-4 | 5 min | Second layer aligned |
| 6 | Freeze | 30+ min | Firm to the touch |
| 7 | Thaw and serve | 10 min | Edges slightly soft |
Serving & Presentation
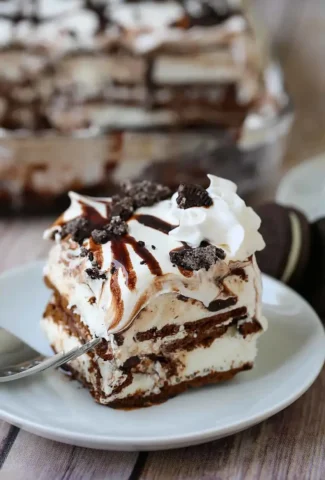
I love serving this cake at NYC summer gatherings—it’s a showstopper that requires zero effort. Slice it into squares just like a bar cookie, and garnish with a dollop of extra whipped cream and a few whole Oreo cookies for visual appeal. The contrast of the dark fudge, white topping, and black Oreos is stunning on a white plate.
For a Morrocan-inspired twist, I sometimes dust the top with a pinch of cinnamon or drizzle with honey before serving—a nod to the desserts I had as a child. In Paris, we’d pair it with a strong espresso to cut the richness. At home, I find it’s perfect on its own or with a glass of cold milk.
💡 Samantha’s Pro Tip: If you’re serving at a party, line the pan with parchment paper before assembling. Then lift the entire cake out for a clean presentation on a cutting board.
| Pairing Type | Suggestions | Why It Works |
|---|---|---|
| Side Dish | Fresh fruit salad, berries, or a citrus salad | Acidity cuts richness |
| Sauce / Dip | Extra hot fudge, caramel sauce, or strawberry sauce | Enhances chocolate flavor |
| Beverage | Cold milk, espresso, or a dark chocolate stout | Balances sweetness |
| Garnish | Whole Oreos, fresh mint, or chocolate shavings | Adds crunch and color |
Make-Ahead, Storage & Reheating
One of my favorite things about this cake is how well it stores. When I’m planning a busy NYC week, I’ll make it on Sunday and keep it in the freezer, slicing a piece whenever the craving hits. It’s also a lifesaver for unexpected guests—just slice and serve straight from the freezer after a 10-minute thaw.
| Method | Container | Duration | Reheating Tip |
|---|---|---|---|
Reader Interactions |
Leave a Reply