Table of Contents
Best Matilda’s Chocolate Cake: The Ultimate Glossy Fudge Masterpiece
Growing up in Morocco, chocolate cake was always a rare, sophisticated treat, but it wasn’t until my culinary training in Paris that I truly understood the chemistry of a decadent gâteau. Now, in the heart of NYC, I’ve perfected the Best Matilda’s Chocolate Cake—a velvety, one-bowl wonder that relies on a specific hot coffee bloom technique to unlock intense cocoa depth. This recipe captures that cinematic, nostalgic richness while being surprisingly easy to whip up in any home kitchen.
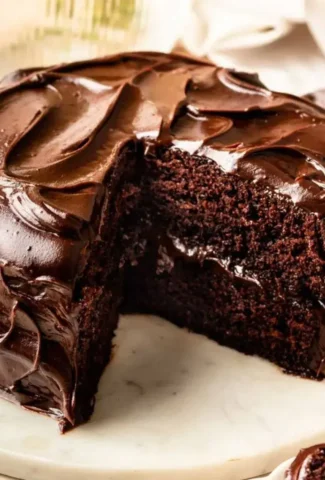
Imagine biting into a crumb so moist it melts instantly, draped in a mirror-like ganache that reflects the light. The unique angle here is the Dutch-processed cocoa combined with the hot coffee—it transforms standard cocoa powder into a complex chocolate experience. The aroma fills the entire house, reminiscent of elite Le Marais patisseries I used to frequent, but with the comforting approachability of an American classic.
I am sharing my secrets to ensure you never end up with a dry, flat cake. As a professional chef, I’ve seen enough “chocolate disasters” to know that the secret lies in not over-mixing the batter and using the correct temperature for your emulsion. Follow my tips, and you will achieve that signature, glossy fudge frosting that famously defines this legendary cake, making it the showstopper for every birthday or dinner party you host.
Why This Best Matilda’s Chocolate Cake Is the Best
This cake wins because it balances the sophisticated deep-roast flavors of high-quality cocoa with the practical convenience of a one-bowl method. By blooming the cocoa powder in hot coffee, we draw out the natural oils in the chocolate, resulting in a flavor profile that is miles ahead of any boxed mix you’ve ever tasted.
The texture is where this recipe truly shines. I emphasize the importance of room-temperature ingredients, a technique drilled into me by my French mentors. This ensures the emulsion with your buttermilk and oil remains stable, creating a structure that is sturdy enough to hold that luscious, heavy frosting without sinking or crumbling.
Finally, this recipe is incredibly foolproof. Whether you are a seasoned baker or just finding your way around a kitchen, the clear steps and precise cooling times ensure consistent results. You get a professional-quality, bakery-style chocolate cake in under an hour, with minimal dishwashing, making it the highest-performing recipe in my collection.
Best Matilda’s Chocolate Cake Ingredients
I source my cocoa and dark chocolate from the specialty importers here in Union Square, but you can find everything you need at your local supermarket. Focus on quality—specifically, look for a cocoa powder labeled “Dutch processed” to ensure that deep, dark color and mellow flavor.
Ingredients List
- 2 1/2 cups Flour
- 1 3/4 cups Granulated sugar
- 2 tsp Baking powder & 1 tsp Baking soda
- 1/2 tsp Kosher salt
- 1/2 cup Cocoa powder
- 2/3 cup Vegetable oil
- 1 tsp Vanilla extract
- 3 Eggs, room temperature
- 2/3 cup Buttermilk
- 1 cup Hot Coffee
- 11.11 oz Butter
- 14.1 oz Dark chocolate (60%-70%)
- 1 1/3 cups Heavy cream & 1 1/3 cups Powdered sugar
How to Make Matilda Cake — Step-by-Step
Let’s create something magical today. Follow these stages to ensure your cake is as perfect as a Parisian masterpiece.
Step 1: The Bloom
Whisk your hot coffee and cocoa in a bowl until perfectly smooth. This step “blooms” the cocoa, releasing the flavor oils.
💡 Samantha’s Pro Tip: Ensure the coffee is steaming but not boiling, as you want to intensify the chocolate, not scorch the powder.
Step 2: Mixing the Batter
Sift your dry ingredients, then mix in your wet ingredients. Stir slowly until the batter is just combined—if you over-work it, the cake will be dense rather than fluffy.
Step 3: Baking
Divide between your 8-inch pans. Bake at 350°F (175°C) until the internal temperature reaches 205°F.
Can I use regular cocoa powder instead of Dutch-processed?
While you can use regular natural cocoa powder, note that Dutch-processed is treated with alkali to reduce acidity. Using regular cocoa may lead to a lighter color and a slightly more acidic, fruity flavor profile. I recommend sticking to Dutch-processed for that iconic, deep, dark “Matilda” look and the mellow, smooth chocolate finish that the recipe is famous for.
Why must the frosting be chilled?
The fudgy frosting contains heavy cream, butter, and dark chocolate. When first mixed, it will be thin and liquid-like due to the warmth. Chilling it in the refrigerator allows the fats to solidify and the sugar to stabilize, transforming the mixture into a thick, glossy, spreadable fudge. Don’t rush this step, or you won’t get that mirror-shine finish.
Can I make this cake ahead of time?
Absolutely! You can bake the cake layers a day in advance. Simply wrap them tightly in plastic wrap once they are completely cooled to room temperature. You can also make the frosting ahead of time; store it in an airtight container in the fridge and gently bring it back to a spreadable consistency before assembly.
How do I keep the cake moist?
The combination of buttermilk and vegetable oil is the secret to a perfectly moist crumb. Moisture-retention is key, so remember to never over-bake the layers. Using an internal thermometer to check for 205°F is the most accurate way to ensure you pull the cake from the oven exactly when it is finished, avoiding the dreaded dry crumb.
What if I don’t have buttermilk?
If you don’t have buttermilk on hand, don’t worry! You can easily create a substitute by adding one tablespoon of white vinegar or lemon juice to a measuring cup and filling the rest of the way with milk. Let it sit for about five to ten minutes until it curdles slightly before adding it to your batter.
Love This Recipe? Save It to Pinterest!
If you enjoyed this Best Matilda’s Chocolate Cake recipe, pin it now so you can find it later!
Have you tried this recipe? I’d love to see your creations! Leave a rating, drop a comment, and tag me on socials. What’s the main occasion you’re baking this for?
From my NYC kitchen to yours — I hope this recipe brings as much warmth to your table as it does to mine. — Samantha 🧡
Best Matilda’s Chocolate Cake
This easy one-bowl Matilda chocolate cake is incredibly moist, rich, and topped with a glossy chocolate fudge frosting.
Ingredients
- 2 1/2 cups Flour (AP, plain flour)
- 1 3/4 cups Granulated sugar
- 2 tsp Baking powder
- 1 tsp Baking soda
- 1/2 tsp Kosher salt
- 1/2 cup Cocoa powder (Dutch processed cocoa powder)
- 2/3 cup Vegetable oil (or canola oil)
- 1 tsp Vanilla extract
- 3 Eggs (room temperature large eggs)
- 2/3 cup Buttermilk
- 1 cup Coffee (hot)
- 11.11 oz Butter (unsalted)
- 14.1 oz Dark chocolate (about 60%-70%)
- 1/3 cup Cocoa powder (Dutch processed )
- 1 1/3 cups Heavy cream
- 1 1/3 cups Powdered sugar
- 1/2 tsp Kosher salt
- 1 tsp Vanilla extract
Instructions
- Preheat the oven to 350°F (175°C). Grease two 8-inch cake pans and line the bottoms with parchment paper.
- Whisk the hot brewed coffee and Dutch-processed cocoa powder in a small bowl until smooth. Set aside.
- Sift the flour, sugars, baking soda, baking powder, and salt into a large mixing bowl. Whisk briefly to combine.
- Create a well in the dry ingredients. Add the eggs, buttermilk, oil, and vanilla. Whisk by hand until the batter is smooth.
- Slowly pour the warm cocoa-coffee mixture into the main bowl. Gently stir until the batter is uniform.
- Divide the batter evenly between the pans. Bake for 3035 minutes, or until the internal temperature hits 205°F (96°C).
- Let the cakes cool in the pans for 10 minutes before transferring to a wire rack to cool completely.
- Add the chopped chocolate, butter, heavy cream, and sifted powdered sugar into a saucepan.
- Place over the lowest heat setting possible. Whisk constantly until the chocolate is melted and the sugar is fully dissolved.
- Pour the warm frosting through a fine-mesh strainer into a square pan to ensure a perfectly smooth, bubble-free texture.
- Place the pan in the refrigerator. Let it chill, stirring occasionally, until it thickens to a spreadable, fudge-like consistency.
- Place the first cake layer on a plate and spread a generous amount of thickened frosting over the top.
- Add the second layer and coat the top and sides. The frosting should be thick enough to hold its shape while maintaining its signature mirror-shine.
Leave a Reply