Table of Contents
BEST Sweet and Sour Sauce – Homemade, Simple & Restaurant-Quality
The first time I tasted a truly great sweet and sour sauce was not in a Chinatown restaurant, but in my mother’s kitchen in Morocco, where she’d simmered a pot of preserved lemons and apricots for a tagine. That balance—bright, tangy, and deeply sweet—stayed with me. Years later, after training at Le Cordon Bleu in Paris and later settling in New York City, I became obsessed with recreating that perfect balance in a classic sweet and sour sauce. This homemade recipe is the result: no preservatives, no high-fructose corn syrup, just pure flavor. It takes less than 15 minutes to make and tastes exponentially better than anything from a bottle. This is the BEST sweet and sour sauce you’ll ever make at home.
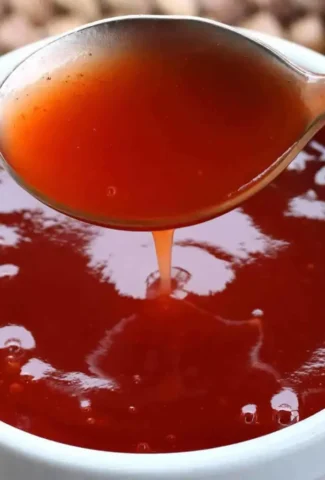
Imagine a glossy, deep amber sauce that clings to your spoon—tangy from rice vinegar, sweet from brown sugar, and subtly savory from soy sauce and ketchup. There’s a whisper of pineapple that adds both sweetness and acidity, a trick I learned from a chef in Paris who insisted that fruit should balance every sauce. The aroma is lively and inviting, with a hint of ginger and garlic if you choose to add them. It coats every piece of chicken, shrimp, or vegetable in a silky, shiny glaze that’s both comforting and exciting. My family in NYC always comments on how vibrant and fresh it tastes compared to the dark, gloppy stuff from the store.
What sets this recipe apart is technique: I use a cornstarch slurry for the perfect thickness without any gelatin or artificial thickeners, and I simmer the base just long enough to meld the flavors without boiling off the vinegar’s sharpness. The unique angle is the pineapple juice—it’s the backbone of the sauce, giving it a natural sweetness and tang that balances the brown sugar and rice vinegar perfectly. One common mistake I see is omitting the slurry and just dumping in cornstarch, which creates lumps. I’ll show you exactly how to avoid that and more. 💡 Samantha’s Pro Tip: Use canned pineapple juice (not fresh) for consistency and a more intense pineapple flavor that holds up to cooking.
Why This BEST Sweet and Sour Sauce Recipe Is the Best
The flavor secret lies in the careful layering of sweet and sour elements. Growing up in Morocco, I learned that sweetness must never be cloying—it should always be balanced by a sharp counterpoint. Here, the brown sugar brings a deep, molasses-like sweetness, while the rice vinegar provides a clean, bright acidity. The pineapple juice bridges the two, adding a tropical fruitiness that elevates the whole sauce. This three-part harmony is what makes every spoonful addictive. It’s the same principle I use in French gastriques: sweet and sour in perfect dialogue.
Perfected texture is all about the cornstarch slurry technique. Many recipes fail because they add cornstarch directly to the hot liquid, resulting in lumps or a gluey texture. Instead, I dissolve 1 ½ tablespoons of cornstarch in 2 tablespoons of cold water before adding it to the simmering sauce. This creates a silky, smooth sauce that thickens evenly to a glossy, pourable consistency. It clings to a spoon but still slides easily, just like the best sauces from French culinary school. The result is a sauce that feels luxurious without being heavy.
Foolproof and fast—this recipe is designed for absolute success. It requires just one saucepan and a whisk, and you can have it ready in less than 15 minutes. Whether you’re a beginner or a seasoned cook, the steps are clear, and the visual cues (like the bubbles and the glossy sheen) make it easy to know exactly when it’s done. I’ve taught this to my NYC cooking students, and they all nail it on the first try. It’s the kind of recipe that makes you wonder why you ever bought the bottled version.
Sweet and Sour Sauce Ingredients
I find the best ingredients at my local NYC markets—canned pineapple juice from the bodega on the corner, rice vinegar from the Asian grocery in Chelsea Market, and always organic ketchup and soy sauce from the farmers market. These simple pantry staples come together to create something truly special.
Ingredients List
- 1 cup canned pineapple juice (see note)
- 3/4 cup packed light brown sugar OR brown sugar alternative (for low sugar option)
- 1/3 cup rice vinegar (found in the Asian or general vinegar section of any grocery store, or you can substitute apple cider vinegar)
- 3 tablespoons ketchup
- 2 tablespoons soy sauce or tamari (GF)
- For the Cornstarch Slurry: 1 1/2 tablespoons cornstarch dissolved in 2 tablespoons water
- Optional: 2-3 drops natural red food coloring
Ingredient Spotlight
Pineapple juice is the heart of this sauce—its natural sugars and acids give the sauce its signature sweet-sour profile and a fruity depth that can’t be replicated. Always use canned pineapple juice (unsweetened) for consistent flavor and acidity; fresh pineapple juice can be too variable.
Light brown sugar provides a gentle molasses warmth that dark brown sugar would overpower. It dissolves easily into the liquid, creating a smooth caramel-like sweetness. For a low-sugar option, a brown sugar alternative like Swerve works—though the sauce will be slightly less rich.
Rice vinegar is essential for that clean, mild acidity—it’s less sharp than white vinegar and more nuanced. Apple cider vinegar is the best substitute, but it will add a slightly fruitier note. Avoid distilled white vinegar, which can taste harsh.
Soy sauce or tamari adds the necessary umami backbone that makes the sauce savory and complex. Tamari is gluten-free and has a slightly richer flavor, but regular soy sauce works beautifully too. Be sure to use low-sodium if you’re sensitive to salt.
| Original Ingredient | Best Substitution | Flavor / Texture Impact |
|---|---|---|
| Pineapple juice | Orange juice + 1 tsp lemon juice | Brighter, less tropical, slightly thinner |
| Rice vinegar | Apple cider vinegar | More fruity, slightly sharper, still excellent |
| Light brown sugar | Coconut sugar (for refined sugar-free) | Deeper caramel notes, slightly less sweet, darker color |
| Soy sauce | Coconut aminos | Slightly sweeter, less salty, thinner consistency |
How to Make BEST Sweet and Sour Sauce — Step-by-Step
This comes together in just a few simple steps—even if you’ve never made a sauce from scratch, you’ll feel like a pro. Let’s get started!
Step 1: Combine Base Ingredients
In a small saucepan, combine the pineapple juice, brown sugar, rice vinegar, ketchup, and soy sauce. Whisk until the sugar is mostly dissolved. Bring this mixture to a boil over medium-high heat, stirring occasionally. This typically takes about 4-5 minutes. You’ll see small bubbles forming around the edges and then a full rolling boil.
💡 Samantha’s Pro Tip: Don’t walk away! Once it starts boiling, it can bubble over quickly. Keep an eye on it and reduce the heat slightly if needed.
Step 2: Thicken with Slurry
While the base is heating, prepare your cornstarch slurry. In a small bowl, whisk together 1 ½ tablespoons cornstarch with 2 tablespoons of cold water until completely smooth. Once the sauce is boiling, reduce the heat to low and slowly pour in the slurry while whisking constantly. You’ll see the sauce thicken almost immediately—continue whisking for about 1 minute until it’s glossy and smooth.
⚠️ Common Mistake to Avoid: Adding the slurry to a cold or barely simmering sauce will result in a lumpy, starchy mess. The sauce must be boiling for the cornstarch to activate properly.
Step 3: Add Color and Cool
If you’re using the optional natural red food coloring, stir in 2-3 drops now. The sauce will have a lovely deep amber color naturally from the pineapple and brown sugar. Remove the pan from the heat and let the sauce cool completely in the pan. It will continue to thicken slightly as it cools.
💡 Samantha’s Pro Tip: Don’t skip the cooling step! A warm sauce can be used immediately, but letting it cool to room temperature gives it the perfect dipping consistency.
| Step | Action | Duration | Key Visual Cue |
|---|---|---|---|
| 1 | Combine and boil base | 4-5 min | Full rolling boil with small bubbles |
| 2 | Add cornstarch slurry | 1 min | Sauce becomes glossy and thick |
| 3 | Cool completely | 20-30 min | Sauce thickens to coat a spoon |
Serving & Presentation
This sweet and sour sauce is endlessly versatile. I love to serve it as a dipping sauce for crispy chicken tenders or egg rolls, or as a glaze for stir-fried shrimp or tofu. In my NYC apartment, I often toss it with homemade tempura vegetables for a quick weeknight meal. The sauce clings beautifully to anything you coat it with.
For a classic presentation, pour the sauce over a platter of crispy fried chicken or pork, then garnish with sesame seeds and sliced green onions. The deep amber color with those tiny black-and-green flecks is stunning. You can also serve it in a small bowl alongside spring rolls or dumplings. In Morocco, my mother would have used a similar sauce as a dip for kebabs—the sweet-sour contrast is universally loved.
Don’t limit it just to Asian dishes. Try it as a glaze for roasted salmon, brushed over grilled pork chops, or stirred into a vegetable stir-fry. It also makes a fantastic BBQ sauce alternative for chicken wings. My French training taught me that a good sauce knows no boundaries—this one works everywhere.
| Pairing Type | Suggestions | Why It Works |
|---|---|---|
| Side Dish | Steamed jasmine rice, fried rice, sautéed bok choy | Neutral bases absorb the sauce beautifully |
| Sauce / Dip | Spring rolls, potstickers, chicken nuggets, tempura | Crispy textures contrast with the glossy sauce |
| Beverage | Green tea, lager beer, ginger ale | Clean, crisp drinks cut through the sweetness |
| Garnish | Sesame seeds, sliced green onions, crushed peanuts | Adds crunch and visual contrast |
Make-Ahead, Storage & Reheating
This sauce is a meal-prep dream. I always make a double batch on Sunday to use throughout the week for quick stir-fries, lunch bowls, and last-minute appetizers. The flavors actually meld and deepen overnight, making the sauce even better the next day.
| Method | Container | Duration | Reheating Tip |
|---|---|---|---|
| Refrigerator | Airtight jar or container | 2-3 weeks | Reheat gently in a saucepan or microwave in 15-second bursts |
| Freezer | Freezer-safe zip bag or small airtight container | Up to 3 months | Thaw overnight in the fridge, then reheat on the stovetop |
| Make-Ahead | In the same pan you cooked it in, covered | Up to 3 days in advance | Reheat with a splash of water if too thick |
When reheating, the sauce may thicken slightly in the fridge or freezer. Simply add a teaspoon of water or pineapple juice and whisk over low heat until it reaches your desired consistency. My NYC test-kitchen tip: always taste after reheating—a pinch of salt or a drop of vinegar can revive the flavors beautifully. Don’t microwave for too long; 30 seconds at a time is enough.
Variations & Easy Swaps
| Variation |
Reader Interactions |
|---|
Leave a Reply