Table of Contents
Chocolate Lava Cake – Instant Pot Method Meets Classic Oven A Melt-in-Your-Mouth French‑Inspired Dessert That Comes Out Perfectly Every Time
When I first fell in love with chocolate, it was in the bustling souk of Marrakech, where a street vendor’s fragrant steam of fermented honey mingled with the aroma of freshly ground coffee. Fast‑forward to the French patisserie where I learned the delicate art of layering chocolate and butter, and now in my concrete‑packed NYC kitchen, I blend those techniques into a dessert that feels both indulgent and accessible. This chocolate lava cake is one of those “wow” moments— a glossy shell that cracks open to reveal a silky, molten center— and the modern twist? You can make it in the Instant Pot or the oven with the same flawless outcome.
The first bite is a treasure of deep, bittersweet cocoa that shivers in your mouth. The exterior is airy, a whisper of flakey flour that rises aloft, while the center liquefies to a silky chocolate river that tastes like midnight after a desert night under the North African sky. A hint of optional espresso adds a robust depth, almost like the city’s night espresso shop, and if you drizzle a touch of Baileys, it evokes the smooth, aromatic indulgence of a Parisian brunch.
I perfected this kitchen‑friendly version by experimenting with the pressure cooker’s sealed warmth and the ovens’ dry heat. The trick lies in just the right ratio of chocolate to butter and the slight sprinkling of cocoa at the bottom of each ramekin; it gives the cake that signature “push‑of” sound when you slice it. A common mistake is over‑mixing the batter—my first batch collapsed into a sticky mess. Swipe to learn how to flick the batter just enough to keep it glossy and airy.
Why This Chocolate Lava Cake Recipe Is the Best
From my Moroccan roots, I learned that a good dessert thrives on balance, so I harmonized dark chocolate’s velvety depth with a whisper of espresso and a splash of citrus‑infused butter. That simple twist gives the cake an extra velvety layer that’s hard to find in classic French fondants.
The texture is the result of precise folding techniques I honed at Le Cordon Bleu—folding, not whisking the batter to keep air pockets intact. Folding stops the batter’s gluten from over‑developing, ensuring the ramekins leak that rich chocolate pour instead of solid crumb. The pressure cooker’s steam seals the outside quickly, giving a robust shell while the inner heat catalyzes chocolate flow—perfecting it for any kitchen.
The recipe’s accessibility is a blessing for the busy NYC baker in all of us: it takes no fancy pans beyond ramekins, runs smoothly in both a stovetop appliance and a conventional oven, and the residual heat keeps the mousse inside the pan warm for up to a couple of minutes—making it a hit at dinner parties, date nights, or quick weekend treats.
Chocolate Lava Cake Ingredients
I usually shop my ingredients at Eataly for the chocolate, the local Brooklyn farmer’s market for seasonal citrus, and Yale Blocks in Harlem for extras like Baileys. Each component has a story: the chocolate was sourced from a small‑batch Moroccan chocolate maker; the butter, freshly churned in Seattle, gives that silky mouthfeel. Below is the exact list, with a few optional additions that bring extra depth.
Ingredients List
- 1 cup (180 g) dark chocolate chips (or chopped dark chocolate)
- ½ cup (113 g) unsalted butter (cubed)
- 3 large eggs
- 1 tsp vanilla bean paste (or extract)
- 1 ½ cups (180 g) powdered sugar
- 7 Tbsp all‑purpose flour
- 1 tsp instant espresso powder (optional)
- 1 tsp ground cinnamon
- ¼ tsp salt
- 4 tsp cocoa powder (for dusting)
- Melted butter or cake release spray
- 2 Tbsp Baileys (optional)
- Vanilla ice cream (optional)
Ingredient Spotlight
Dark Chocolate (170–190 % COC): A deep, bittersweet base that carries a slight hint of medicinal spice. Choose a sauce‑grade chocolate for smoothness. If you prefer a sweeter cake, a 70% chocolate will do, though it will soften the intensity of the cocoa‑honey boom.
Unsalted Butter: Adds richness and ensures even heat distribution. Swap for salted butter if you want a touch of savory contrast—but be mindful of the extra salt.
Flour: All‑purpose flour is the cake’s backbone. For a finer crumb, use cake flour or a 1:1 mixture of cake and all‑purpose; I’ve found that reduces gluten development and yields a lighter finish.
Espresso Powder: The optional espresso gives a coffee burst that deepens the chocolate; if you’re a latte lover, feel free to add half a cup of brewed espresso for a richer flavor.
| Original Ingredient | Best Substitution | Flavor / Texture Impact |
|---|---|---|
| Dark Chocolate | Semi‑sweet chocolate | Softer, less cocoa bite, sweeter |
| Unsalted Butter | Salted butter | Brings savory hint, more overall richness |
| All-purpose Flour | Cake flour | Light, airy crumb; less chewy |
How to Make Chocolate Lava Cake — Step-by-Step
Now that you’ve got your ingredients, it’s time to bring the heat (literally). Whether you love the convenience of the Instant Pot or the tactile feeling of an oven, the steps are almost identical—just the cooker type changes the cooking time.
Step 1: Melt Chocolate and Butter
Combine chocolate and cubed butter in a heat‑resistant bowl. Microwave in 30‑second bursts, stirring each time, until smooth. If you prefer a gentler melt, use a double boiler. Let cool 2 minutes.
💡 Samantha’s Pro Tip: Stir this mixture until it’s silky lip‑smooth—any lumps will ruin the final texture.
Step 2: Add Eggs & Vanilla
Whisk eggs and vanilla paste together, then fold into chocolate. The mixture thickens into a glossy, semi‑runny batter. Remember to add the eggs slowly; the batter should retain some fluidity.
⚠️ Common Mistake to Avoid: Adding eggs too fast or overdoing the whisking will over‑cream the batter, causing the cake to split during cooking.
Step 3: Sift Dry Ingredients
Sift powdered sugar, flour, espresso powder, cinnamon, and salt into the bowl. Fold gently until fully incorporated, with no streaks.
💡 Samantha’s Pro Tip: Use a silicone spatula on a higher edge to lift the batter—this keeps the chocolate lumps from re‑melted chocolate.
Step 4: Prep Ramekins
Give four ramekins or metal pudding molds a light spray of release or brush with melted butter. Dust the base with a light layer of cocoa powder, swirling to coat; the extra cocoa gives a dramatic appearance.
⚠️ Common Mistake to Avoid: Using too much cocoa will make the finished cake seem burnt; a thin coat is sufficient.
Step 5: Assemble
Divide the batter among the ramekins, filling each about ¾ full. Smooth tops with a spatula.
💡 Samantha’s Pro Tip: Place the ramekins on the trivet carefully, leaving air gaps between them to prevent merging.
Step 6: Add Water for Instant Pot
Place the trivet in the Instant Pot, add 1 cup of water. Slip the ramekins onto the trivet. Secure the lid, ensuring the valve is sealed.
💡 Samantha’s Pro Tip: Use a silicone lid if you’re worried about batter cracking—its flexibility helps distribute the pressure evenly.
Step 7: Cook at High Pressure
Set to 10 minutes, high pressure. When the cycle finishes, perform a quick release (press valve). Remove the cake quickly; condensation can form on top.
⚠️ Common Mistake to Avoid: Letting the pressure return slowly; this can cause the cakes to overcooked and dry.
Step 8: Alternative Oven Bake
Preheat oven to 400 °F (200 °C). Place the carved ramekins on a heavy tray and bake 18‑20 minutes. If the tops look overly set, add a minute or two.
💡 Samantha’s Pro Tip: Check the tops about 15 minutes; when they look slightly shiny and a toothpick leaves a sticky core, they’re ready.
Step 9: Air Fryer (Optional)
Preheat air fryer to 350 °F (180 °C). Cook for 10‑12 minutes until the tops set; the interior should still be slightly mushy.
⚠️ Common Mistake to Avoid: Over‑baking in air fryer; the high heat can pull the rise prematurely.
Step 10: Cool in Ramen Forms
Let the cakes rest for 2 minutes. A quick swirl of kitchen paper to absorb condensation works best.
💡 Samantha’s Pro Tip: The residual heat allows the interior to maintain glow without setting completely.
Step 11: Invert onto Plates
Run a knife around edges; carefully lift each cake onto a warm plate. The pool of molten chocolate will pour out, revealing the liquid center.
⚠️ Common Mistake to Avoid: Turning the cake too early; wait until the outer shell stiffens slightly to prevent spills.
Step 12: Serve with Ice Cream
Serve immediately: a scoop of vanilla ice cream on the side and a drizzle of Baileys, if desired, for a rich finishing flourish.
💡 Samantha’s Pro Tip: Chill the ramekins a bit before baking; a little extra chill reduces the chocolate’s propensity to leak during cooling.
Step 13: Enjoy the Melt
Relish warm, gooey, chocolate bliss. Keep leftovers in a sealed container; we’ll revisit them in the Make‑Ahead section.
⚠️ Common Mistake to Avoid: Storing on a flat surface, because the molten center can leak into the plate and ruin the presentation.
| Step | Action | Duration | Key Visual Cue |
|---|---|---|---|
| 1 | Melt chocolate & butter | 2 min | Smooth, lump‑free batter |
| 2 | Add eggs & bind | Glossy, slightly thick | |
| 3 | Fold dry | Even streaks | |
| 4 | Prep ramekins | Smooth coat | |
| 5 | Fill ramen | ¾ full | |
| 6 | Add water & seal | 10 min | |
| 7 | High pressure cook | 10 min | |
| 8 | Oven bake | 18‑20 min |
Serving & Presentation
Present each cake on a warm plate with a light dusting of fresh cocoa powder. A touch of fried figs or crumbled almond brittle adds a Moroccan‑style crunch that cuts through the rich center.
If you’re skeptical about serving in a city crowd, put the cakes on a decorative plate with a small pile of vanilla ice cream the color of New York City streetlights. A drizzle of Baileys along the rim turns the final bite into a silky, Italian‑style vel mirror like a rooftop view.
For a classic “dessert in seconds” feel, let the cakes sit untouched for 30 seconds before cracking the tops—this allows the flesh to set without sacrificing the core.
| Pairing Type | Suggestions | Why It Works |
|---|---|---|
| Side Dish | Pasta with brown butter or roasted veggies | Crunchy contrast to melt |
| Sauce / Dip | Caramel sauce, peanut butter drizzle | Sweet and salty tensions |
| Beverage | Espresso, cold brew, Red Wine | Depth complementary to chocolate |
| Garnish | Whipped cream, pistachios, orange zest | Texture & aroma accent |
Make-Ahead, Storage & Reheating
When I need a fast dessert for a work lunch or a night‑over party, I bake the cakes and then section them. They stay fresh for three days in the fridge.
| Method | Container | Duration | Reheating Tip |
|---|---|---|---|
| Refrigerator | Zip‑top bag | 3 days | Microwave 30 s |
| Freezer | Vacuum bag | 1 month | Reheat in oven 5 min |
| Make‑Ahead | Cardboard box | 2 days | Wrap in foil before reheating |
I heat an already baked cake in a slow‑roasting oven at 300 °F to preserve the molten center. If the cake has been frozen, I let it thaw overnight; that removes moisture pockets that can make the chocolate burst prematurely.
Variations & Easy Swaps
| Variation | Key Change | Best For | Difficulty Impact |
|---|---|---|---|
| Baileys Infused | Add 2 Tbsp Baileys to batter | Impromptu brunch | Easy |
| Gluten‑Free Edition | Use almond flour & coconut flour mix | Allergy friendly | Moderate |
| Festive Citrus Twist | Add zest of orange & a dash of limoncello | Holiday gatherings | Easy |
Baileys Infused
Pour a splash of Baileys into the batter before baking or drizzle on top after the cake is out. The creamy liqueur adds a silky Irish chocolate twist that feels luxurious yet familiar.
Gluten‑Free Edition – Almond & Coconut Flour
Replace the all‑purpose flour with a 1:1 mix of almond flour and coconut flour. Keep the ratio mild to avoid a dry crumb; the result is a chewy, chocolatey bite with a subtle nutty taste.
Festive Citrus Twist – Orange & Limoncello
Add a tablespoon of fresh orange zest and a dash of limoncello into the batter. The citrus brightens the chocolate, making it perfect for holiday parties or a summer rooftop soirée.
Can I use dark chocolate chips or only chopped chocolate?
You can definitely use dark chocolate chips or finely chopped chocolate—just be sure they melt evenly in the microwave or double boiler. Chips might melt a bit faster, so keep an eye on them; lumps can build if left unattended. Both options give a velvety sauce when the cake is served.
Is a Maggi pad per 1 cup water for Instant Pot needed?
No, the 1‑cup water squarely provides the steam needed for pressure cooking. The skillet rack inside the pot rises the ramekins away from direct contact so you get an even bake. Adding extra water is unnecessary and can cause the batter to steam and over‑cook.
What’s the best way to ensure the lava center remains liquid?
The secret is to stop cooking at the last second. For the Instant Pot, use the quick‑release immediately; for the oven, test at 18 minutes and take it out if you still see a glossy, slightly wet center. A tiny flame from the oven or a gentle swirl will let you feel the pour‑out. Over‑baking turns the inside to a firm chocolate.
Can I freeze the lava cakes?
Yes, you can freeze them; wrap each cake individually in clean parchment and place in a sealable bag. They’ll keep good for up to one month. When ready, thaw overnight and reheat in a low oven or toaster oven until warmed, watching never to over‑bake.
Yes, you can freeze them; wrap each cake individually in clean parchment and place in a sealable bag. They’ll keep good for up to one month. When ready, thaw overnight and reheat in a low oven or toaster oven until warmed, watching never to over‑bake.
What is the minimal adult alcohol content you can add to the batter?
To keep it alcohol‑free for kids or low‑proof options, replace the Baileys with rose water or a splash of mango puree. If you do want a genuine adult flavor, keep the alcohol content low by using just 1 Tbsp of any liqueur; this yields mellow flavor without overpowering the chocolate.
To keep it alcohol‑free for kids or low‑proof options, replace the Baileys with rose water or a splash of mango puree. If you do want a genuine adult flavor, keep the alcohol content low by using just 1 Tbsp of any liqueur; this yields mellow flavor without overpowering the chocolate.
How does using cake flour alter the texture?
Cake flour contains less protein and produces a tender crumb. By substituting 50 % of all‑purpose flour with cake flour, the batter holds more moisture and the cake rises slightly larger. This improves both mouthfeel and stability, especially when baking in the oven.
What is the recommended oven temperature for pre‑heat?
Pre‑heat your oven to 400 °F (200 °C). This temperature allows the outer shell to set while keeping the interior moist. If you’re unsure, keep a lower temperature such as 375 °F for a slower rise, but the finish will be slightly less glossy.
Will the cakes hold up in a travel cooler?
Yes, as long as you keep them in a sealed container, they will hold up for a day or two. The heat should be protected from direct sunlight by wrapping with foil or a thick insulated bag. When you’re ready, simply let them sit at room temperature for 10 minutes before serving.
Yes, as long as you keep them in a sealed container, they will hold up for a day or two. The heat should be protected from direct sunlight by wrapping with foil or a thick insulated bag. When you’re ready, simply let them sit at room temperature for 10 minutes before serving.
Can I cut this into a longer time to be sure?
While the cookies are carried beyond the recommended 18–20 minutes in oven, the center will cool and the molten effect will disappear. The best approach is to test frequently and correct; the typical “over‑bake” window is close enough to be forgiving in most scenarios.
While the cookies are carried beyond the recommended 18–20 minutes in oven, the center will cool and the molten effect will disappear. The best approach is to test frequently and correct; the typical “over‑bake” window is close enough to be forgiving in most scenarios.
How do I serve the cake on a hot day?
Enjoy them straight from a prep cooler or on a chilled plate; the ambient temperature affects the melted core. If the weather is hot, serve the cakes on a small bowl of crushed ice (ensuring no ice water drips into your cake). Pair with cool yogurt or a lightly sweetened mousse.
Enjoy them straight from a prep cooler or on a chilled plate; the ambient temperature affects the melted core. If the weather is hot, serve the cakes on a small bowl of crushed ice (ensuring no ice water drips into your cake). Pair with cool yogurt or a lightly sweetened mousse.
Share Your Version!
I’d love to hear how you twist this molten delight—maybe you swapped in peanut butter or a scoop of pistachio ice cream? Drop a comment or star rating below and share a photo on Instagram or Pinterest using the hashtag #MyKitchenStorie.
If you’re going to adjust the baking time or use a different type of chocolate, let me know what worked and what didn’t. Your feedback helps keep this recipe fresh for the community.
From my NYC kitchen to yours — I hope this recipe brings as much warmth to your table as it does to mine. — Samantha 🧡
Love This Recipe? Save It to Pinterest!
If you enjoyed this Chocolate Lava Cake recipe, don’t let it get lost in your browser tabs! 😄 Pin it now so you can find it again anytime — and explore hundreds more tried‑and‑tested recipes waiting for you on my Pinterest boards.
👉 Follow Samantha on Pinterest @chefrecipes2
📌 Pin this recipe · 🔁 Re‑pin your favorites · 💬 Tag me when you make it — I love seeing your creations!
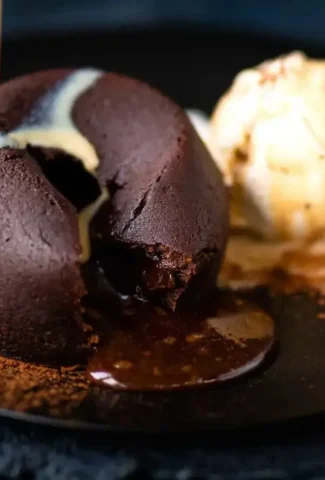
Molten chocolate lava cakes
These molten chocolate lava cakes (also known as chocolate fondants) hide a core of gooey chocolate inside their sponge shell. A delicious and easy dessert in your Instant Pot or oven.
Ingredients
- 1 cup (180g) dark chocolate chips (or chopped dark chocolate)
- ½ cup (113g) unsalted butter (cubed)
- 3 large eggs
- 1 tsp vanilla bean paste (or extract)
- 1 ½ cups (180g) cups powdered sugar ((= icing sugar))
- 7 tbsp flour (all purpose / plain)
- 1 tsp instant Espresso powder ((optional))
- 1 tsp ground cinnamon
- ¼ tsp salt
- 4 tsp cocoa powder (or as needed)
- melted butter (or cake release spray)
- 2 tbsp Baileys (optional)
- vanilla ice cream (optional)
Instructions
- Put the chocolate and butter in a bowl and microwave for 30 second bursts, stirring in between, until melted and smooth. Alternatively set the bowl over a pot of barely simmering water and allow the chocolate to melt gradually (double boiler method). Set aside to cool slightly.
- Add the eggs and vanilla. Mix together using a small balloon whisk. The chocolate will thicken.
- Sift the flour, icing sugar, espresso powder, ground cinnamon and salt over the chocolate. Fold together until you have a glossy, thick batter and no dry streaks remain.
- Spray four ramekins or metal pudding molds with cake release or brush with melted butter. Add a scant teaspoon of cocoa powder in each and swirl to cover. Discard any excess cocoa powder. Divide the batter between the prepared ramekins or molds.
- Place the metal trivet in your pressure cooker and add 1 cup / 250ml of water. Place the ramekins on the trivet – you should have enough space to fit them all in a single layer but if not you can stack them.
- Set vent to sealing and cook for 10 minutes at high pressure. Release the steam manually and remove them lava cakes from the cooker. If any condensation has collected on top of the cakes, pat it dry with kitchen paper.
- Leave to cool for a couple of minutes before serving. Carefully invert the lava cakes on plates (the moisture from the pressure cooker makes them really easy to release).
- Preheat your oven to 400°F / 200°C. Place the molds on a heavy baking tray (one that will not warp in the oven) and cook for 18-20 minutes. The lava cakes will rise slightly if they are very soft and squidgy on top you might need to cook them for a couple of minutes more.
- Leave to cool for two minutes. Carefully run a knife around the edge of the molds. Invert onto plates and serve.
- Preheat the air fryer to 350°F / 180°C. Place the molds in the air fryer basket and bake for 10-12 minutes until the lava cakes are set on top with a slight jiggle in the middle.
- Remove the lava cakes from the air fryer basket and leave them to cool for two minutes. Carefully run a knife around the edge of the molds. Invert onto plates and serve.
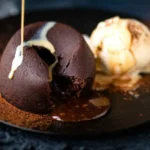
- Serve warm with a scoop of vanilla ice cream on the side and perhaps a little Baileys drizzled over.
Leave a Reply