Table of Contents
Chocolate Peanut Butter Layer Dessert – Irresistibly Delicious Treat
Growing up in Morocco, I had a love for desserts filled with rich flavors, especially when they included peanut butter. When I first had the idea for this Chocolate Peanut Butter Layer Dessert, it was a blend of nostalgia from my mother’s kitchen and a twist of American decadence. This rich dessert layers creamy peanut butter with chocolate pudding over a salty pretzel crust, creating a unique flavor combination that hits all the right notes!
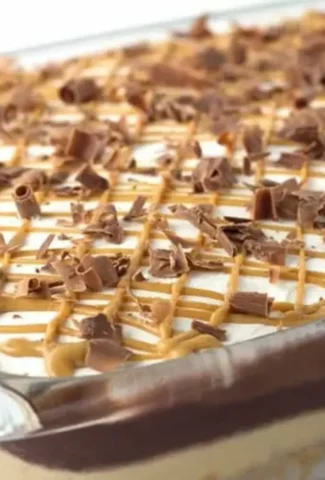
Imagine slicing through the luscious layers of this dessert: the creamy peanut butter mousse, the rich chocolate pudding, and that delightful salty crunch from the crust. It’s irresistible and visually stunning – truly a party on a plate! When you present it, the combination of colors from the chocolate and cream topping is sure to catch everyone’s eye and excite the taste buds.
What sets my version apart is the homemade touch—the balance of salty and sweet creates layers that you simply cannot resist. 💡 Samantha’s Pro Tip: Don’t skip the folding technique when integrating whipped cream into the peanut butter mixture—it keeps the filling light and airy. A common mistake is overmixing, which can lead to a dense texture that just won’t do!
Why This Chocolate Peanut Butter Layer Dessert Recipe Is the Best
The secret to the flavor in this dessert lies in the perfect balance between creamy peanut butter and rich chocolate. Drawing inspiration from my Moroccan roots, I emphasize using quality peanut butter, which adds depth and authenticity to the recipe. This isn’t just another chocolate dessert; it’s an indulgent experience of flavors bringing together sweet and salty tones.
Achieving the right texture is paramount, and here, the lightness of the whipped cream folded into the peanut butter mixture creates an exceptional mouthfeel. By baking the pretzel crust just right, you get a crunchy exterior that holds all the creamy layers beautifully, preventing sogginess that often troubles desserts like this.
This recipe is not just for the experts; it is foolproof and perfect for beginners in the kitchen. The steps are simple and straightforward, allowing you to recreate this layers delight without any fuss. You’ll impress your family or guests with these impressive layers and delightful flavors.
Chocolate Peanut Butter Layer Dessert Ingredients
In New York City, I source my ingredients from local farmers’ markets or specialized grocery stores, ensuring I use only the freshest components. The blend of textures and flavors in this dessert makes all the difference. For instance, selecting the right peanut butter can elevate the dish’s authenticity and taste.
Ingredients List
- 2 1/2 cups pretzels (crushed)
- 1/4 cup granulated sugar
- 3/4 cup butter (melted)
- 8 ounces cream cheese (room temperature)
- 1 cup creamy peanut butter
- 1 tablespoon butter (room temperature)
- 1 cup granulated sugar
- 1 teaspoon vanilla extract
- 1 cup heavy cream (whipped to stiff peaks)
- 5.85 ounce box instant chocolate pudding (family size)
- 2 cups whole milk
- 11.75 ounce jar hot fudge topping
- 8 ounces whipped topping (thawed)
- 1 1/2 tablespoons creamy peanut butter
Ingredient Spotlight
**Crushed Pretzels:** The pretzel crust adds that fantastic salty-sweet element to the dessert, making each bite unforgettable. When selecting pretzels, opt for those without artificial ingredients for a more natural flavor. You can substitute with gluten-free pretzels for a delicious alternative without compromising the overall crunch.
**Cream Cheese:** This ingredient contributes to the rich, creamy filling that contrasts the chocolate pudding perfectly. Always choose full-fat cream cheese for the best results. A good alternative can be mascarpone, which adds a subtle sweetness and creaminess.
**Heavy Cream:** Whipping cream turns fluffy, aerating the peanut butter mixture. Ensure you whip it to stiff peaks for a well-structured layer. For a lighter version, try coconut cream, but be aware that it will impart a slight coconut flavor.
| Original Ingredient | Best Substitution | Flavor / Texture Impact |
|---|---|---|
| Crushed Pretzels | Gluten-Free Pretzels | Provides a similar crunch without gluten. |
| Cream Cheese | Mascarpone Cheese | Adds a slightly sweeter, creamier texture. |
| Heavy Cream | Coconut Cream | Gives a tropical flavor while remaining creamy. |
How to Make Chocolate Peanut Butter Layer Dessert — Step-by-Step
This dessert may look fancy, but it’s surprisingly easy to whip together. Follow these steps for a delightful treat.
Step 1: Preheat the Oven
Preheat your oven to 350 degrees F. This ensures our crust bakes evenly from the start.
Step 2: Make the Crust
In a 9×13 pan, combine the crushed pretzels, granulated sugar, and melted butter. Stir to evenly coat the pretzels.
💡 Samantha’s Pro Tip: Press the mixture firmly into the bottom of the pan for a solid layer.
Step 3: Bake the Crust
Bake for 10 minutes, then remove from the oven and set aside to cool.
Step 4: Make the Filling
In a medium bowl, beat the cream cheese, peanut butter, and room temperature butter until light and fluffy. Then mix in the granulated sugar and vanilla extract.
⚠️ Common Mistake to Avoid: Mixing on high speed can lead to a dense filling!
Step 5: Fold in the Cream
Gently fold in a quarter of the whipped cream to lighten the mixture and then fold in the remaining whipped cream carefully.
Step 6: Spread the Filling
Spread the peanut butter mixture over the cooled pretzel crust, sealing off the edges to avoid sogginess.
Step 7: Make the Pudding
In a mixing bowl, combine the chocolate pudding mix with whole milk. Beat with a mixer on medium until well combined and allow it to thicken for about 5 minutes.
Step 8: Add the Pudding Layer
Spread the chocolate pudding evenly over the peanut butter layer, reaching all edges.
Step 9: Add the Hot Fudge
Microwave the hot fudge topping for about 45 seconds, stirring well, then drizzle it over the pudding layer.
Step 10: Add Whipped Topping
Spread the thawed whipped topping over the hot fudge layer, making sure to cover the whole dessert.
Step 11: Drizzle Peanut Butter
Microwave 1 1/2 tablespoons of creamy peanut butter for about 20 seconds until liquid, then drizzle over the top.
| Step | Action | Duration | Key Visual Cue |
|---|---|---|---|
| 1 | Preheat the oven | 5 mins | Oven reaches temperature |
| 2 | Make the crust | 5 mins | Mixture well combined |
| 3 | Bake the crust | 10 mins | Edges start to brown |
| 4 | Make filling | 5 mins | Light and fluffy |
| 5 | Fold in cream | 5 mins | Cream light and airy |
| 6 | Spread filling | 5 mins | Layer is even |
| 7 | Make pudding | 5 mins | Pudding thickens |
| 8 | Add pudding layer | 3 mins | Even distribution |
| 9 | Add hot fudge | 2 mins | Warm and pourable |
| 10 | Add whipped topping | 2 mins | Smooth layer |
| 11 | Drizzle peanut butter | 2 mins | Decorative drizzle |
Serving & Presentation
Serve this dessert chilled, straight from the refrigerator, for the best flavor. You can garnish with extra whipped cream, chocolate shavings, or a sprinkle of sea salt for an elevated touch. Each layer is so visually appealing, you’ll want to show it off before diving in.
In Morocco, we often pair desserts with strong mint tea. This dessert would complement a rich coffee or even a shared platter of fresh fruits, balancing the sweetness beautifully. It’s also perfect for brunch gatherings, birthday parties, or any festive occasion.
| Pairing Type | Suggestions | Why It Works |
|---|---|---|
| Side Dish | Fresh Fruit Salad, Vanilla Ice Cream | Brings freshness and balances richness. |
| Sauce / Dip | Chocolate Sauce, Caramel Sauce | Enhances sweetness and adds depth. |
| Beverage | Coffee, Mint Tea | Coffee cuts sweetness while mint tea refreshes palate. |
| Garnish | Chocolate Shavings, Sea Salt Flakes | Adds texture and contrasts flavors. |
Make-Ahead, Storage & Reheating
One of the fantastic things about this dessert is how well it can be prepped ahead of time. I often make this the night before a gathering, allowing all the flavors to meld together beautifully. It’s a lifesaver for busy days!
| Method | Container | Duration | Reheating Tip |
|---|---|---|---|
| Refrigerator | 8×8 or 9×13 pan | Up to 3 days | Serve chilled, no reheating needed. |
| Freezer | 8×8 or 9×13 pan covered | Up to 2 months | Thaw overnight in the fridge before serving. |
| Make-Ahead | Assembled dish | 1 day in advance | No need to reassemble, simply chill. |
To avoid sogginess, ensure your crust is cooled properly before layering. When storing, an airtight container helps maintain freshness. The dessert tends to taste even better the next day as the flavors deepen.
Variations & Easy Swaps
| Variation | Key Change | Best For | Difficulty Impact |
|---|---|---|---|
| Peanut Butter Swirl | Add swirls of peanut butter on top | Visual Appeal | Easy |
| Vegan Option | Use plant-based cream cheese and whipped topping | Vegan Guests | Medium |
| Chocolate Mint Variant | Add a mint layer with mint extract | Mint Lovers | Easy |
Peanut Butter Swirl
To elevate your dessert, try adding visible swirls of peanut butter on top of the whipped cream layer. It provides a beautiful contrast and an extra burst of flavor. This technique is simple yet incredibly effective, reminiscent of Moroccan creamy desserts I grew up with.
Vegan Option
For a vegan-friendly version, swap the cream cheese and whipped topping for plant-based alternatives. The texture may vary slightly, but you will still achieve that creamy indulgence while catering to diverse dietary needs.
Chocolate Mint Variant
If you’re a fan of mint, a few drops of mint extract in the chocolate pudding will elevate this dessert into a fresh chocolate mint experience. It’s a delightful twist that brings a new dimension to the classic flavors.
Can I use sugar substitutes in this recipe?
Yes, you can use sugar substitutes in this recipe. Just be mindful of the type you choose, as some may alter the texture or flavor. For example, a granulated erythritol can be used, but it might result in a slightly different sweetness level compared to regular sugar. Always check the conversion ratio on the packaging for the best results.
How long can I store the dessert?
You can store the dessert in the refrigerator for up to 3 days without losing its quality. If you decide to freeze it, it can last for up to 2 months. Just make sure it’s tightly covered to protect it from freezer burn, and you’ll be able to enjoy it later without sacrifice.
Can I make this dessert gluten-free?
Absolutely! To make this dessert gluten-free, simply substitute the regular pretzels with gluten-free ones. Many brands offer delicious options that will still provide that satisfying salty-sweet crunch you crave. Just be sure to check the labels to confirm they are certified gluten-free.
What can I serve with this dessert?
This dessert pairs wonderfully with fresh fruit, particularly berries that complement the chocolate and peanut butter flavors. You can also serve it with vanilla ice cream for a creamy contrast. For drinks, consider rich coffee or a refreshing mint tea to cleanse the palate between bites.
What’s the best type of peanut butter to use?
The best type of peanut butter for this dessert is creamy natural peanut butter. Look for options with minimal ingredients—just peanuts and possibly a pinch of salt for flavor. Avoid those with added sugars or oils, as they can alter the overall taste and texture of your dessert.
Share Your Version!
I’d love to see your creations with this Chocolate Peanut Butter Layer Dessert! Leave a star rating and a comment below to let me know how it turned out for you. If you’re on Instagram or Pinterest, share a photo and tag @mykitchenstorie so I can admire your take on this delicious treat!
From my NYC kitchen to yours — I hope this recipe brings as much warmth to your table as it does to mine. — Samantha 🧡
Love This Recipe? Save It to Pinterest!
If you enjoyed this Chocolate Peanut Butter Layer Dessert recipe, don’t let it get lost in your browser tabs! 😄 Pin it now so you can find it again anytime — and explore hundreds more tried-and-tested recipes waiting for you on my Pinterest boards.
👉 Follow Samantha on Pinterest @exorecipe
📌 Pin this recipe · 🔁 Re-pin your favorites · 💬 Tag me when you make it — I love seeing your creations!
Chocolate Peanut Butter Layer Dessert
Love peanut butter desserts? This rich chocolate peanut butter layer dessert recipe will do the trick. The sweet and salty pretzel crust is amazing!
Ingredients
- 2 1/2 cups pretzels (crushed)
- 1/4 cup granulated sugar
- 3/4 cup butter (melted)
- 8 ounces cream cheese (room temperature)
- 1 cup creamy peanut butter
- 1 tablespoon butter (room temperature)
- 1 cup granulated sugar
- 1 teaspoon vanilla extract
- 1 cup heavy cream (whipped to stiff peaks)
- 5.85 ounce box instant chocolate pudding (family size)
- 2 cups whole milk
- 11.75 ounce jar hot fudge topping
- 8 ounces whipped topping (thawed)
- 1 1/2 tablespoons creamy peanut butter
Instructions
- Preheat oven to 350 degrees F.
- In a 9×13 pan, add in the crushed 2 1/2 cups pretzels, 1/4 cup granulated sugar, and melted 3/4 cup butter. Stir to coat all the pretzels in the melted butter.
- Firmly press the crushed pretzels into the pan.
- Place into the oven and bake for 10 minutes. Remove from the oven and let cool. Begin working on the cheesecake filling.
- In a medium bowl, add in the 8 ounces cream cheese, 1 cup creamy peanut butter, and 1 tablespoon butter Beat on medium/high until light and fluffy.
- Add in the 1 cup granulated sugar and 1 teaspoon vanilla extract Beat until incorporated.
- Add in a quarter of the whipped cream and fold it into the cream cheese mixture. This will lighten up the mixture before adding the remaining whipped cream and deflating it all.
- Add in the remaining whipped cream and carefully fold it in.
- Spread the filling into the cooled crust. Be sure to get to all of the edges of the crust. Seal off any holes on the edges to prevent the pudding from seeping through and making our pretzel crust soggy.
- In a mixing bowl, add in the 5.85 ounce box instant chocolate pudding mix and 2 cups whole milk. Using a handmixer, beat on medium until incorporated. Let thicken about 5 minutes before spreading on top of the cheesecake layer.
- Spread the pudding evenly over top of the peanut butter cream cheese layer. Be sure to get to the edges.
- Remove the lid from the 11.75 ounce jar hot fudge topping and microwave for 45 seconds. Stir well.
- Scoop all of the fudge topping into a sandwich bag. Cut a small hole out of the corner of the sandwich bag.
- Drizzle the hot fudge topping all over the top of the pudding. I started from the corner and drizzled back and forth until everything was covered.
- Spread the thawed 8 ounces whipped topping all over the top of the dessert. Again, make sure to take the topping all the way over to the edges.
- Add the 1 1/2 tablespoons creamy peanut butter into a sandwich bag. Place into the microwave for about 20 seconds. Squish it around in your hand to make sure it's all runny.
- Cut a small hole in the corner of the sandwich bag. Drizzle peanut butter on top of the dessert. I drizzled one direction all the way across the dessert and then drizzled in the opposite direction all the way across.
Leave a Reply