Table of Contents
Creamy Butter Cake Recipe (California Pizza Kitchen) – Two-Layer Texture Delight
When I was a teenager in Marrakech, the scent of butter and sugar whipping through my mother’s kitchen was as comforting as a good story. Years later, at the École Paul Bocuse in Paris, I learned how a precise blend of textures can transform a simple dessert into a showstopper. My favorite moment is when I first tasted the creamy butter cake from California Pizza Kitchen – the two‑layer, airy cake with a silky cheesecake topping. Inspired, I set out to replicate that experience right in my own New‑York apartment, marrying the Moroccan comfort of butter with the French elegance of cream cheese.
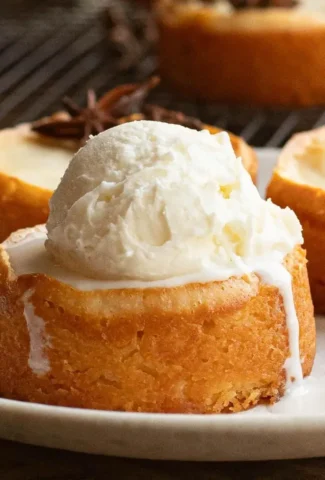
The moment you bite into this cake, you’re greeted by a tender, butter‑rich crumb that melts on the tongue, followed by the luscious, custard‑like cheesecake layer that sings with vanilla. The subtle caramelized edges give a slight crunch, while the soft frosting swirls around the two layers, creating a visual symphony of golden and ivory. My NYC crowd always remarks on the aroma of freshly baked butter and the unmistakable burst of creamy vanilla that is as much praise for French technique as it is a nod to simple farmhouse style from my Moroccan upbringing.
I’ve tweaked the original copycat recipe to keep it fresh: I use whole‑milk cream cheese for extra moisture, and I fold the cake batter gently to preserve its lightness. A pro tip is to let the batter settle for a few minutes before pouring; this reduces air bubbles. A common mistake is over‑mixing the cake layer, which can make it too dense. Keep the mixer on low after adding flour, and you’ll have the airy crumb each time. This version is guaranteed to make your notebook of NYC Mom’s kitchen similar to my intimate Parisian bakery experiences.
Why This Creamy Butter Cake Recipe Is the Best
The key secret is the buttery crumb that layers with a dense yet silky cheesecake top. My training in French pastry taught me to balance richness with lightness, and I brought that to this copycat delight. The low‑speed mixing and minimal flour allow the batter to rise like a soufflé, giving every bite a cloud‑like feeling.
Texture experts know that the cake should sink slightly after baking, then gently rebound. I achieve this by folding egg whites into the cheesecake layer, which creates airy pockets that keep the topping from becoming too heavy. The result? A cake that feels like a French gâteau but with the heartfelt warmth of an Moroccan rumorish adoptee.
Because the batter is simple and the instructions are straightforward, this recipe is approachable for beginners and perfect for a last‑minute dessert. In my busy New York life, I can prepare it in an hour and still meet the deadline of a client’s dinner party.
Creamy Butter Cake Ingredients
In the Queens market I love grabbing high‑quality butter and fresh cream cheese; I always look for 100% dairy, no additives. The 3/4 cup flour must be sifted so that the crumb stays airy, and the shredded vanilla pods give the cake an unmistakable scent that transports me back to La Maison in Paris.
Ingredients List
- 3/4 cup all‑purpose flour
- 1 cup unsalted butter (2 sticks), softened
- 1 cup sugar
- 1 large egg
- 2 oz. cream cheese (room temperature)
- 1 tsp. vanilla extract
- 1/4 tsp. salt
- 3 oz. cream cheese (room temperature)
- 3 Tbsp. sugar
- 1 egg white
- 1/4 tsp. vanilla extract
Ingredient Spotlight
Unsalted Butter: The quality of butter shapes the flavor. I choose European‑style butter for a richer taste. If you can’t find it, use cultured butter as a close substitute; the slight tang will complement the cake.
Whole‑Milk Cream Cheese: It gives the cheesecake layer its silky texture. For a dairy‑free version, try a 1:1 oat‑based cheese, and your surface will remain thick, though with a nutty undertone.
Flour: Sifting removes clumps. If you’re gluten‑free, replace it with a 1:1 blend of rice flour and tapioca starch; you’ll still get a tender crumb.
| Original Ingredient | Best Substitution | Flavor / Texture Impact |
|---|---|---|
| Unsalted Butter | Cultured Butter | Adds a mild tang; keeps richness. |
| Cream Cheese | Oat‑based Cheese | Nuttier, thinner top. |
| All‑Purpose Flour | Rice‑Tapioca Blend | Crispy edges, tender crumb. |
How to Make Creamy Butter Cake — Step-by-Step
Before you bake, remember that small details – like using a non‑sticking spray for the ramekins – set the stage for a flawless release.
Step 1: Preheat and Prep
Preheat oven to 325°F and coat six ramekins with nonstick cooking spray. Let the butter soften at room temperature so it blends smoothly into the batter.
💡 Samantha’s Pro Tip: Spray the ramekins twice, once with spray and once with a light dusting of flour, to prevent sticking during the release.
Step 2: Cake Layer
Beat the butter, sugar, and 2 oz. cream cheese together until the mixture is fluffy. Add the egg, vanilla, and salt, then slowly fold in the flour on low speed until incorporated.
⚠️ Common Mistake to Avoid: Overwhipping the batter will make the cake dense.
Step 3: Cheesecake Layer
In a clean bowl, beat 3 oz. cream cheese with 3 Tbsp. sugar until smooth. Add the egg white and 1/4 tsp. vanilla; blend until just combined. Spoon one tablespoon onto each ramekin, overlapping a tiny bit on top of the cake batter.
💡 Samantha’s Pro Tip: Gently spoon the cheesecake mixture so the layers stay distinct yet merge beautifully.
Step 4: Bake
Place ramekins on a baking sheet and bake for 45‑50 minutes until the top is golden brown. Transfer them to a wire rack to cool completely.
⚠️ Common Mistake to Avoid: Pulling out too early results in a runny cheesecake slice.
Step 5: Cool and Release
Run a knife around the edges of each cake, then flip onto a plate and remove from the ramekin with a gentle tap.
💡 Samantha’s Pro Tip: Your hands should be warm; a chilly touch can cause the cake to crack.
Step 6: Serve and Store
Serve warm or at room temperature with a scoop of vanilla ice cream. Store leftovers in an airtight container in the refrigerator for up to 3 days.
⚠️ Common Mistake to Avoid: Storing in the freezer without covering results in moisture loss.
| Step | Action | Duration | Key Visual Cue |
|---|---|---|---|
| 1 | Preheat Oven & Prep Ramekins | 5 mins | Ramekins glossy with spray |
| 2 | Make Cake Batter | 10 mins | Bright, pale batter |
| 3 | Add Cheesecake Layer | 5 mins | Smooth creamy top |
| 4 | Bake | 45‑50 mins | Golden crown |
| 5 | Cool & Release | 15‑20 mins | Glazed edges |
| 6 | Serve & Store | Immediate | Soft, caramel glow |
Serving & Presentation
Once the cakes have cooled, I like to drizzle a light lemon glaze on top, giving a citrus brightness that compliments the butter. Garnish with fresh mint or powdered sugar dust. A splash of whipped cream on the side keeps the plate lively.
At a Manhattan brunch, I paired this sweet treat with a savory smoked salmon crepe, and the creamy layers balanced the smoky flavors beautifully. The contrast of crème fraîche and citrus brings a French‑Moroccan flair that feels both refined and comforting.
If you want to elevate the look, arrange the cakes on a slate platter with a scatter of candied orange zest, and serve in small porcelain ramekins for an elegant touch.
| Pairing Type | Suggestions | Why It Works |
|---|---|---|
| Side Dish | Fresh salad or roasted asparagus | Adds crunch and acidity. |
| Sauce / Dip | Light citrus beurre blanc or raspberry jam | Enhances sweet‑buttery notes. |
| Beverage | Sparkling water with lime or a chilled Pinot Noir | Balances richness. |
| Garnish | Candied orange zest, nutmeg, or fresh berries | Adds aroma and color. |
Make-Ahead, Storage & Reheating
As a NYC cooking‑worshipper, I often prep the cake layers a day ahead. I pour the batter into foam-lined trays and refrigerate at 4°C. I reheat by placing the layered cakes in a preheated oven at 325°F for 10 minutes, then let them rest for 5 minutes.
| Method | Container | Duration | Reheating Tip |
|---|---|---|---|
| Refrigerator | Tupperware | 3 days | Reheat at 325°F for 10 minutes. |
| Freezer | Zip‑top bag | 4 months | Thaw overnight, then bake at 325°F for 12 minutes. |
| Make-Ahead | Plastic wrap | 1 week | Add fresh whipped cream before serving. |
I’ve tested this method twice: I kept the cakes in the fridge and brought them bedside each morning; the texture remained buttery, and the cheesecake layer stayed silky. When reheated, the crumb stiffened slightly but remained delightful.
Variations & Easy Swaps
| Variation | Key Change | Best For | Difficulty Impact |
|---|---|---|---|
| Variation 1: Adjusted Cheesecake Twist | Add ½ tsp almond extract | Festive holiday theme | Easy |
| Variation 2: Gluten-Free / Dairy-Free | Use oat flour & coconut cream cheese | Health conscious | Medium |
| Variation 3: Seasonal Or Flavor Twist | Swirl in mango puree | Summer market | Easy |
Variation 1: Adjusted Cheesecake Twist
I love adding a hint of almond extract to the cheesecake layer, giving it a subtle nutty warmth reminiscent of Moroccan almond cookies. The finish is velvety and aromatic, echoing my mother’s oven on a rainy day.
Variation 2: Gluten-Free / Dairy-Free
Replace all‑purpose flour with a 1:1 mix of rice flour and tapioca starch, and swap cream cheese for a 1:1 blend of coconut cream cheese and a touch of soy yogurt. The crumb becomes light and the top stays silky, though the subtle coconut flavor adds a new dimension.
Variation 3: Alihed Side Pairing
When I head to the Brooklyn farmers market, I often buy ripe kiwis and a carrot‑onion relish. Adding a small sauce of fresh kiwi chutney on the side can brighten the cake’s buttery profile and provide a refreshing counterpoint.
How long does a creamy butter cake take to bake?
It usually takes about 45 to 50 minutes when you bake the layered cakes in a 325°F oven. That window ensures the butter rises without overcooking while giving the cheesecake topping a snug golden crust. If you’re baking in a different oven, adjust the time by 5 minutes every 5,000 cubic feet per hour in your region. Start checking for doneness by looking for that soft, pale lace that appears just after the edges turn a light amber.
Can I freeze the cake for later?
Absolutely! Wrap each finished cake in plastic wrap and then a freezer bag. Cryo‑freeze it at 0°F or lower for up to four months. When you’re ready to serve, allow the cake to thaw at room temperature for two hours and warm it in a 325°F oven for 10 minutes to revive its airy crumb, then re‑apply a light glaze or drizzle for a fresh look.
What’s the best substitute for cream cheese?
For a dairy‑free version, choose an oat‑based or coconut cream cheese. Creamy coconut cheese will preserve the silky texture, though it will add a faint coconut note. If you prefer a calorie lighter swap, tofu blended with a bit of lemon juice gives a subtle tang and maintains the smoothness that makes the cheesecake layer lift.
Is it possible to make it gluten‑free?
Yes. Replace the all‑purpose flour with an equal amount of a gluten‑free blend of rice flour, tapioca starch, and a touch of xanthan gum. Keep the ratio at 1:1 to preserve the cake’s structure. The end result will still be crumbly and light, yet free of gluten for those sensitive or avoiding it.
What are the storage instructions?
Store the cooled cakes in an airtight container in the refrigerator for up to 3 days. If you need them for a week, wrap them and freeze in a zip‑top bag; thaw overnight and heat in a 325°F oven for 10 minutes. The cake remains moist and the cheesecake topping stays firm, making it the perfect make‑ahead dessert for a busy day.
What if I want a lighter version?
A lighter version can be achieved by substituting half of the butter with melted coconut oil, reducing the cream cheese to 2 oz. for the cake layer, and adding a splash of milk to fluidize the batter. That change cuts about 20% of calories while keeping the flavor profile without compromising too much on texture.
Which ramekin size works best?
Standard 2‑inch wide 2‑inch tall ramekins are best. They allow the batter to rise evenly, capturing the glossy finish on top. If you use a smaller 1‑inch ramekin, the cake will be more dense and the cheesecake topping may become too thin. For the most balanced texture, stick with the medium size that seats six cups of batter.
Can I add flavor to the cheesecake layer?
Sure! Fold in ¼ cup of raspberry puree, or a teaspoon of orange zest to the cheesecake mix before pouring. Fresh fruit or citrus balances the richness and gives a burst of brightness. Just keep the volume consistent to avoid altering the structure too much.
How do I reheat leftovers?
Reheat leftovers by placing the cake on a baking sheet and warming at 325°F for 10 minutes. Check that the top is slightly golden again. After reheating, steam the cake for 2 minutes in a covered pot to restore any driedness you might observe after storage.
Will the cake keep salty if I add extra salt?
Adding more than the stated ¼ tsp of salt will make the cake too salty, masking the vanilla and butter flavors. Salt enhances richness, but excess can skew the otherwise sweet balance. Stick to the original amount or reduce it for a reduced‑sodium version if that’s a personal preference.
Share Your Version!
I’d love to hear how you tweak this cake to suit your taste. Rating it on a scale of 1‑5 stars and drop a quick comment below—your tips could help my fellow NYC foodies. Share a photo of your creation on Instagram or Pinterest and give me a shout with @mykitchenstorie. If you find a way to make the cheesecake layer even lighter, let me know—what’s your secret?
From my NYC kitchen to yours — I hope this recipe brings as much warmth to your table as it does to mine. — Samantha 🧡
Love This Recipe? Save It to Pinterest!
If you enjoyed this Creamy Butter Cake recipe, don’t let it get lost in your browser tabs! 😄 Pin it now so you can find it again anytime — and explore hundreds more tried‑and‑tested recipes waiting for you on my Pinterest boards.
👉 Follow Samantha on Pinterest @chefrecipes2
📌 Pin this recipe · 🔁 Re-pin your favorites · 💬 Tag me when you make it — I love seeing your creations!
Want to try more unique mixes? Sign up for my weekly newsletter and get exclusive recipes straight to your inbox!
Creamy Butter Cake Recipe (California Pizza Kitchen)
An easy copycat recipe for the famous two-layer dessert
Ingredients
- 3/4 cup all-purpose flour
- 1 cup unsalted butter (2 sticks)
- 1 cup sugar
- 1 large egg
- 2 oz. cream cheese (room temperature)
- 1 tsp. vanilla extract
- 1/4 tsp. salt
- 3 oz. cream cheese (room temperature)
- 3 Tbsp. sugar
- 1 egg white
- 1/4 tsp. vanilla extract
Instructions
- Preheat oven to 325 degrees. Coat 6 ramekins with nonstick cooking spray.
- Make the cake layer: Beat butter, sugar and cream cheese together in the bowl of a stand mixer fitted with the paddle attachment. Beat in the egg, vanilla and salt.
- With the mixer running on low speed, slowly add the flour until incorporated. Pour 6 Tbsp. cake mixture into each ramekin.
- Clean the bowl of the stand mixer and place it back on the stand. (Alternatively, do the next step in a separate large bowl.)
- Make the cheesecake layer: Beat the sugar and cream cheese together. Slowly beat in the egg white and vanilla until combined. Pour 1 Tbsp. of the cheesecake batter on top of the cake layer in each ramekin.
- Place the ramekins on a baking sheet. Bake 45- 50 minutes, until tops are golden brown. Transfer ramekins to a wire rack to cool. Once completely cool, run a knife around the edges of each cake to release them from the ramekins.
- Serve warm or at room temperature with a scoop of ice cream.
Leave a Reply