
Table of Contents
Galette Dough – Buttery, Overlapping‑Pleated Crust! (Svelte, Quick & Versatile)
When I first stepped into my New York kitchen, I was craving the comforting aroma of a home‑baked galette I’d seen my mother make in Rabat—flaky, buttery crumbs that crackled like Moroccan tiles at sunset. That memory sparked the creation of this Galette Dough recipe, focused on a buttery, overlapping‑pleated crust that makes every galette feel like a gourmet treat, whether it’s a sweet crab pie or a cheesy spinach tart.
The dough converges flavors of crisp, golden edges, a buttery melt that dissolves like jasmine perfume, and a tender crumb that folds gently under the filling. The technique of cutting cold butter into small cubes, then quickly pleating the dough, creates little pockets of steam that turn the crust into a flaky, cloud‑like wonder. In the kitchen, the dough feels silky, giving you room to stretch it into a 12‑inch circle without tears.
What sets my version apart is the double pale‑rolling step that locks in the butter layers—this is a chef‑approved trick I learned in Paris. I’ll tease you with a pro tip: keep the dough cold throughout the process, and avoid overworking, which often turns the pastry into a tough sheet. The most common mistake—over‑kneading—results in a dense crust that doesn’t flex; I’ll note that in the step instructions.
Why This Galette Dough Recipe Is the Best
The flavor secret is simplicity: the buttery butter cubes lock in a creamy aroma that whispers of Moroccan mint tea. My Parisian pastry training taught me that precise cold butter ensures steam pockets that create a flaky, buttery base unlike any pre‑made mix.
For texture, each roll and pleat is a gentle hand‑craft. I fold the dough into a 4‑inch disk, refrigerate, then roll out to a 12‑inch circle. The quick freeze between rolls prevents gluten from gaining structure, giving a half‑biscuit, half‑croissant feel that holds fillings without crumbling.
Foolproof and fast, the dough can be made in hours yet works in minutes. It requires minimal equipment—just a food processor and a butter knife—and can be adapted for sweet or savory fillings straight from the fridge.
Galette Dough Ingredients
I usually source these from the Brooklyn farmers market or the upscale Whole Foods in Greenpoint—fresh, frozen or still cold. Every item here is a staple in my kitchen, just as the spices in my grandmother’s tajine.
Ingredients List
- 1 ½ cups all‑purpose flour (213 g) – plus extra for dusting
- ½ teaspoon kosher salt
- 10 tablespoons (142.5 g) cold unsalted butter, cut into 1‑inch cubes
- 4–5 tablespoons ice‑cold water, in one‑tablespoon increments
- 1 large egg yolk, for egg wash
Ingredient Spotlight
All‑Purpose Flour (1 ½ cups) – This is the backbone; choose a mid‑protein flour for pliability. In New York’s W. 10th, the “All‑American” option gives a slightly buttery lift. If you prefer a quick switch, try pastry flour (lower protein) for an even softer crumb minus the firmness needed for the overlapping folds.
Unsalted Butter (10 tbsp) – The butter’s coldness is what makes the crust flaky. Look for a high‑fat dairy brand like Plug‑In; the 80‑percent fat content will give consistent pockets. Substitutions: 10 tbsp of chilled coconut cream provides a tropical twist but will be sweeter and harden quickly.
Ice‑Cold Water (4-5 tbsp) – Water hydrates the flour and stops the fat from melting. Use distilled or filtered water to avoid mineral taste. If you don’t have ice water, cool tap water in the fridge and keep it cold before adding.
| Original Ingredient | Best Substitution | Flavor / Texture Impact |
|---|---|---|
| All‑Purpose Flour | Pastry Flour | Less gluten → softer, flakier crust |
| Unsalted Butter | Olive Oil | Tender edge, less flaky but richer |
| Ice‑Cold Water | Ice‑Chilled Milk | Moisture increase → slightly denser |
How to Make Galette Dough — Step-by-Step
This dough is a joy to make—no pinch‑of‑salt formula, just real butter and a mindful rolling technique.
Step 1: Place Flour and Salt
Add the flour and kosher salt to your food processor bowl. Pulse a few times until mixed; you’re preparing the base that will hold the buttery layers.
💡 Samantha’s Pro Tip: Keep the flour cold and sprinkle a dash of cornstarch next time—though not necessary, it reduces gluten a touch and keeps the dough silky.
Step 2: Add Butter Cubes
Toss the 10 tablespoons of cubed cold butter into the processor. Pulse 8–10 times until the butter pieces turn into small clumps—like tiny crumbs.
⚠️ Common Mistake to Avoid: Adding butter that is soft or warm will melt into the flour, producing a greasy dough.
Step 3: Add Water
Switch the processor to “on” and drop in 4 tablespoons ice‑cold water one tablespoon at a time, watching for the dough to start coming together. If it feels dry, add the remaining tablespoon.
💡 Samantha’s Pro Tip: Add water while pulsing—this stops over‑mixing and keeps the crumb light.
Step 4: Form a Ball
The dough should now form a loose ball. Gently press it flat, wrap in plastic, and refrigerate for at least one hour. Overnight works best for a relaxed gluten structure.
⚠️ Common Mistake to Avoid: Leaving the dough at room temperature for too long makes it hard to roll.
Step 5: Refrigerate Dough
Retrieve the dough from the fridge about ten minutes before you roll it out. This keeps the butter firm so it doesn’t melt into the dough.
💡 Samantha’s Pro Tip: Line a clean surface with parchment paper to keep the dough from sticking as it warms slightly.
Step 6: Prepare for Rolling
Dust a clean surface with flour and lay the dough on it. Gently press it into a 4‑inch disc and cover with plastic wrap.
⚠️ Common Mistake to Avoid: Using too much flour on the surface can dry your dough.
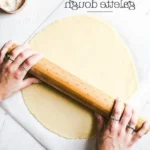
Step 7: Roll Out Dough
Roll the disc into a 12‑inch circle, keeping the dough shiny and pliable. Transfer onto parchment paper, then onto a baking sheet.
💡 Samantha’s Pro Tip: Roll on the back of a knife to check thickness; aim for about 1/8 inch for the perfect balance between crispy and tender.
Step 8: Place Filling
Place your chosen filling—be it a savory cheese‑spinach mix or a sweet berry compote—on top, slightly mounted in the center, and leave a 3‑inch border.
⚠️ Common Mistake to Avoid: Pushing too much filling toward the edges can deform the crust’s pleats.
Step 9: Pleat the Sides
Carefully fold the dough edges over the filling, overlapping and pleating around the perimeter. This seals the crust and creates the classic galette look.
💡 Samantha’s Pro Tip: Tighten the pleats on the inside to keep the filling contained, but leave the outside loose for a floured, airy finish.
Step 10: Brush with Egg Yolk
Brush the outer crust with a beaten egg yolk for a glossy, golden finish.
⚠️ Common Mistake to Avoid: Over‑brushing results in a soggy edge; a light sweep is best.
| Step | Action | Duration | Key Visual Cue |
|---|---|---|---|
| 1 | Mix flour & salt | 30s | Even crumb |
| 2 | Add butter | 20s | Clumps formed |
| 3 | Add water | 15s | Ball forms |
| 4 | Form ball & chill | 1h | Firm surface |
| 5 | Roll out | 3:30m | Even thickness |
| 6 | Add filling, pleat | 5m | Secured edge |
| 7 | Brush yolk & bake | 25m | Golden crust |
Serving & Presentation
Serve your galette warm, straight from the oven, the buttery crust still slightly tender. A sprinkle of fresh herbs—mint from Marrakech or basil from a Greenpoint farm—adds a vibrant green pop. Pair with a crisp white wine like a dry Sauvignon Blanc for sweet variants, or a robust Chardonnay for savory ones.
On a wooden board, drizzle a quick honey glaze or a sauce à la crème‑fraîche and chives. The easy tradition of Moroccan bread, but in a shiny, crispy new format, will impress both family and guests alike.
| Pairing Type | Suggestions | Why It Works |
|---|---|---|
| Side Dish | Roasted mixed vegetables or fresh salad | Complementary flavors without overpowering the crust |
| Sauce / Dip | Honey mustard, béarnaise, or a simple tomato salsa | Bright acidity or sweet contrast enhances buttery base |
| Beverage | Sparkling water with lime, or a chilled pinot noir | Foamy or fruity notes cut through richness |
| Garnish | Fresh herbs, toasted almonds, or microgreens | Adds color, crunch, and herbaceous aroma |
Make‑Ahead, Storage & Reheating
I love preparing a batch of dough if I know I’ll need galettes on a busy week‑night. After the dough forms, keep it in the freezer, wrapped tightly. When you’re ready to bake, thaw overnight, roll out, assemble, and bake directly.
| Method | Container | Duration | Reheating Tip |
|---|---|---|---|
| Refrigerator | Clear zip‑lock bag | 2‑3 days | Reheat 15 minutes at 375°F (190°C). |
| Freezer | Foil and parchment paper | 2‑3 months | Bake from frozen, 30 min at 375°F (190°C), then 10‑min rise. |
| Make‑Ahead | Individual parchment sheets | Up to 1 week | Roll, bake, cool, stack for quick assemble. |
When reheating from the fridge, a short time in a pre‑heated oven restores the crispness; if you thaw from the freezer, add an extra 10 minutes. I always test on a mini portion first to avoid drying out the center.
Variations & Easy Swaps
| Variation | Key Change | Best For | Difficulty Impact |
|---|---|---|---|
| Sweet Berries with Honey Crust | Add honey to butter mixture | Breakfast or brunch | Easy |
| Gluten‑Free Olive Oil Crust | Replace flour with GF blend, butter with oil | Diabetic-safe | Moderate |
| Autumn Squash and Sage | Swap filling to roasted butternut squash & sage | Holiday dinner | Easy |
Sweet Berries with Honey Crust
Toss some fresh blueberries, strawberries, and a drizzle of honey into the filling; bake as usual. In Morocco, honey pairs with honey‑scented pastries—this version unites that heritage with New York flair.
Gluten‑Free Olive Oil Crust
Replace the all‑purpose flour with a certified GF blend and swap butter for chilled olive oil cubes. The result is a softer, olive‑infused crust that still firms up when baked, delivering delicate flavor and chewy texture.
Autumn Squash and Sage
Roast cubed butternut squash with a splash of pumpkin spice, then arrange the mixture on the crust. Finish with fresh sage leaves for a French‑inspired autumn galette that smells like a Parisian courtyard in fall.
What is the difference between galette dough and regular pie dough?
Galette dough is lighter and flakier than traditional pie dough. It’s made with cold butter cubed and thrust into a simple flour mix, then rolled out without an initial crust base. The dough relies on overlapping pleats to seal the filling, creating a rustic, open‑end presentation that’s less restrictive than a closed pie shell. This gives the galette a buttery, flaky mouthfeel while staying airy and scent‑filled, something regular pie dough can’t quite emulate.
Can I use store‑bought shortcrust pastry instead of making dough from scratch?
Store‑bought shortcrust can work if you’re short on time, but it tends to be denser and less flaky than the buttery, overlapping‑pleated crust I recommend. Shortcrust doesn’t develop the tiny steam pockets that give galettes their signature lightness. If you decide to use a pre‑made base, consider brushing it with an egg wash and adding a dash of cornstarch to give it a more crisp texture. Whole‑meal or gluten‑free options can also work, yet the classic experience will be slightly altered.
How long does galette dough keep in the fridge?
You can store the dough wrapped in plastic for up to 3 days in the refrigerator. The cold will keep the butter from melting, preserving the flaky layers. If you need to archive longer, wrap the dough tightly, place it in a zip‑lock bag, and freeze for up to 3 months. Just thaw overnight before rolling out for the best texture.
You can store the dough wrapped in plastic for up to 3 days in the refrigerator. The cold will keep the butter from melting, preserving the flaky layers. If you need to archive longer, wrap the dough tightly, place it in a zip‑lock bag, and freeze for up to 3 months. Just thaw overnight before rolling out for the best texture.
What fillings work best with this dough?
Because the crust is thin and buttery, most savory fillings—cheesewedges, spinach, mushroom, or roasted chicken—work well. For sweet versions, strawberries, blueberries, pumpkin puree, or custard bursts fill the center. The key is not to overload the dough; keep the filling within the 3‑inch border so that the pleats can seal properly and the sweetness doesn’t leak onto the crust.
Because the crust is thin and buttery, most savory fillings—cheesewedges, spinach, mushroom, or roasted chicken—work well. For sweet versions, strawberries, blueberries, pumpkin puree, or custard bursts fill the center. The key is not to overload the dough; keep the filling within the 3‑inch border so that the pleats can seal properly and the sweetness doesn’t leak onto the crust.
How can I make the crust extra crisp?
First, ensure the dough stays cold—never let the butter melt before rolling. Second, roll a thin, uniform dough and brush the crust lightly with egg yolk; this gives it a golden finish. Third, bake at a slightly higher heat (410°F or 210°C) for the last few minutes, but keep an eye to avoid over‑browning. Finally, let the galette rest a few minutes before slicing—this allows the steam to redistribute, locking in crispness.
Can I add herbs or spices to the dough itself?
You can sprinkle herbs such as thyme, rosemary, or thyme directly into the dough for subtle flavor. A pinch of black pepper or even a hint of cumin can give a Moroccan twist that complements salty fillings. However, be careful: adding bulk seasoning may reduce the kneading time needed for optimal flakiness, so keep it light—about ¼ teaspoon per cup of flour.
You can sprinkle herbs such as thyme, rosemary, or thyme directly into the dough for subtle flavor. A pinch of black pepper or even a hint of cumin can give a Moroccan twist that complements salty fillings. However, be careful: adding bulk seasoning may reduce the kneading time needed for optimal flakiness, so keep it light—about ¼ teaspoon per cup of flour.
What’s the best way to prevent the dough from sticking during rolling?
Dust the work surface and rolling pin with flour, but not in excess. Sprinkle a light layer of cornmeal or fine semolina before rolling; it acts as a non‑stick barrier that cuts through the butter layers automatically. Press lightly to keep the dough intact, and if it tends to break, chill the dough for an additional 10‑15 minutes to firm up before continuing the roll.
Dust the work surface and rolling pin with flour, but not in excess. Sprinkle a light layer of cornmeal or fine semolina before rolling; it acts as a non‑stick barrier that cuts through the butter layers automatically. Press lightly to keep the dough intact, and if it tends to break, chill the dough for an additional 10‑15 minutes to firm up before continuing the roll.
How long should I bake galettes?
Typically, galettes bake for about 25‑30 minutes at 375‑400°F (190‑200°C). The exact time depends on your oven’s calibration and the amount of liquid in the filling. Test with a toothpick inserted in the center—if it comes out clean or with just a few crumbs, the galette is ready. Some fillings, like meatloaf, might need extra time for the center to reach a safe internal temperature. Keep an eye on the crust’s color; a golden brown finish signals perfection.
Typically, galettes bake for about 25‑30 minutes at 375‑400°F (190‑200°C). The exact time depends on your oven’s calibration and the amount of liquid in the filling. Test with a toothpick inserted in the center—if it comes out clean or with just a few crumbs, the galette is ready. Some fillings, like meatloaf, might need extra time for the center to reach a safe internal temperature. Keep an eye on the crust’s color; a golden brown finish signals perfection.
Are there any safety concerns with the butter used in galette dough?
Butter, especially when cold and toasted, can contain minimal bacteria that is harmless if the dough is baked properly. Since the filling and the crust are baked at 375°F or higher, any pathogens are effectively neutralized. The main concern is the fat content: use unsalted butter for control and keep the dough out of warm, humid spaces to prevent premature melting or spoilage. Freeze for long storage if you won’t use the dough within a few days.
Butter, especially when cold and toasted, can contain minimal bacteria that is harmless if the dough is baked properly. Since the filling and the crust are baked at 375°F or higher, any pathogens are effectively neutralized. The main concern is the fat content: use unsalted butter for control and keep the dough out of warm, humid spaces to prevent premature melting or spoilage. Freeze for long storage if you won’t use the dough within a few days.
Can I make this dough without a food processor?
Absolutely! Mix the flour and salt in a bowl, then cut in cold butter using a pastry cutter or two knives. Add the cold water inch by inch while stirring with a fork, until the mixture holds together. Continue mixing until a rough ball forms, then pass it to a floured surface to integrate any remaining butter. The tactile approach may feel more hands‑on, and you’ll experience the dough’s pliability before slicing it into a 12‑inch circle.
Absolutely! Mix the flour and salt in a bowl, then cut in cold butter using a pastry cutter or two knives. Add the cold water inch by inch while stirring with a fork, until the mixture holds together. Continue mixing until a rough ball forms, then pass it to a floured surface to integrate any remaining butter. The tactile approach may feel more hands‑on, and you’ll experience the dough’s pliability before slicing it into a 12‑inch circle.
Share Your Version!
I’d love to hear how you modify this dough—maybe with a splash of rosemary or a twist of citrus zest. Drop a comment below, star the page, or leave a rating if you found this recipe helpful. Share a photo on Instagram or Pinterest and tag @mykitchenstorie so I can see your version. If you tweak the dough to reduce the fat, let me know how it turned out for you!
From my NYC kitchen to yours — I hope this recipe brings as much warmth to your table as it does to mine. — Samantha 🧡
Love This Recipe? Save It to Pinterest!
If you enjoyed this Galette Dough recipe, don’t let it get lost in your browser tabs! 😄 Pin it now so you can find it again anytime — and explore hundreds more tried‑and‑tested recipes waiting for you on my Pinterest boards.
👉 Follow Samantha on Pinterest @chefrecipes2
📌 Pin this recipe · 🔁 Re-pin your favorites · 💬 Tag me when you make it — I love seeing your creations!
Like what you read? Hit that like button, share with friends, and drop a comment to keep the conversation going. Let me know what you think!
Galette Dough
A delicious galette starts with a buttery galette crust. This is my go-to galette dough recipe that I use for both sweet and savory galette recipes.
Ingredients
- 1 ½ cups (213 gr.) of all-purpose flour, more to flour the surfaces
- ½ teaspoon kosher salt
- 10 tablespoons (142.5 gr.) cold unsalted butter, cut into small cubes
- 4–5 tablespoons ice-cold water
- 1 large egg yolk
Instructions
- To make the galette dough: Place flour and salt in the bowl of a food processor. Pulse for a few times to mix. Add in the cold butter cubes. Pulse 8-10 times until butter resembles small clumps.
- Turn the machine on and add in 4 tablespoons of ice-cold water in one tablespoon increments.
- At this point, it should start to come together and form into a ball. If not add in the rest of the water until it does.
- Transfer onto a lightly floured surface, form it into a 4-inch disk, and wrap with plastic. Place in the fridge for at least 1 hour or overnight.
- Take it out of the fridge 10 minutes before you are ready to roll it out.
- Lightly flour your working surface. Roll the dough into a large 12-inch circle. Transfer onto the parchment paper and then onto the baking sheet.
- Place your filling (depending on the recipe you are using) on top slightly mounting in the middle, leaving a 3-inch border around the edges.
- Roll the sides of the dough overlapping as you go around and pleating the dough.
- Brush the edges of the dough (the outer crust) with egg yolk.
- Bake according to the instructions of the recipe you are using.
Leave a Reply