Table of Contents
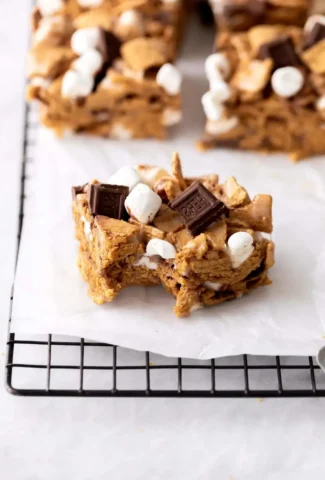
Golden Grahams S’mores Bars – Extra Gooey Mini Marshmallow Twist
When I was a child in my grandmother’s kitchen in Casablanca, we would stir hot, gooey mixtures of bread, honey, and dates while the city’s call to prayer echoed in the distance. Fast forward to the modern bustle of New York, and I still yearn for that simple, comforting sweetness. That’s why I created these Golden Grahams S’mores Bars – a no‑bake, miniature masterpiece that captures the nostalgia of a campfire pop, complete with an extra touch of mini marshmallow goo to make it feel truly special.
The first bite of these bars is like a warm sunrise over Marrakesh’s medina: a crisp layer of Golden Grahams gives way to a velvety marshmallow-melt, while bits of milk chocolate melt seamlessly into the mix. The aroma is irresistibly sweet, and the texture is a delightful contrast of crunch and ooze. I like to layer the chocolate simply by cutting it up into bite‑sized squares, mimicking a Parisian pâtissier’s technique of dicing finer ingredients for even distribution.
What sets this version apart is the methodical folding of the mini marshmallows after they melt – a technique I learned from a moelleux brûlé chef I worked with in the French Culinary Institute. By folding them in gradually, the texture stays airy and keeps the bars from becoming too sticky. A common mistake I’ve seen is adding all the marshmallows at once, which can break the layers and lead to an excessively sticky, hard-to-cut product. I’ll show you how to avoid that in the steps below.
Why This Golden Grahams S’mores Bars Recipe Is the Best
My parents taught me that great flavors come from careful layering, and I applied that learning to this s’mores recipe. By folding mini marshmallows slowly into the melted mixture, I achieve a sticky‑yet‑light consistency, creating an extra gooey bite that feels luxuriously indulgent while still maintaining that classic s’mores crunch.
From the moment I melt the butter and combine it with the marshmallow mix, I keep the temperature low—a technique borrowed straight from a French reduction method meaning “slow, low heat.” It lets the sugars caramelize gently and ensures that the chocolate and grahams absorb each other’s flavors without burning.
Because it requires no stove cooking after the butter melts, this recipe is perfect for beginners, and the “no‑heat” fold keeps the preparation quick. All it takes is a good stirring turn and a chill in the fridge, so even the busiest brunch host in NYC can whip these up in minutes.
S’mores Bars Ingredients
I always stock these in my pantry when I hit the Union Square Farmers Market for fresh, locally sourced chocolate and organic marshmallows. For a small batch of 12 bars, I use these tempered ingredients:
Ingredients List
- 1/3 cup unsalted butter, melted
- a pinch of salt
- 16 oz bag of mini marshmallows
- 5 1/2 cups Golden Grahams cereal
- 1/2 cup milk chocolate, roughly chopped
- 1 1/2 cups regular marshmallows (for extra goo)
Ingredient Spotlight
Butter – Choose a dairy‑free or vegan butter if you’re avoiding dairy; it will maintain the same richness without the lactose. In a U.S. grocery store, look for a brand like Smart Balance for full‑fat butter.
Golden Grahams – The most authentic brand is Sonne’s, known for its crunchy, honey‑sweet coating. If you can’t find them, any lightly honey‑sweetened cereal such as Honey Crunch will work, though the flavor profile will shift slightly.
Mini Marshmallows – These are key to the gooey texture. A quick substitution is regular marshmallows diced into small cubes; stir them in during the final fold, but the bars will be denser.
| Original Ingredient | Best Substitution | Flavor / Texture Impact |
|---|---|---|
| Regular marshmallows | Mini marshmallows, diced | Denser, less gooey but more chew |
| 1/2 cup milk chocolate | Dark chocolate (70%) | Bittersweet profile, richer mine |
| Golden Grahams cereal | Honey Crunch cereal | Honeier taste, sweeter crunch |
How to Make Golden Grahams S’mores Bars — Step-by-Step
Gather everything and let’s get started—no kitchen magic required, just a few simple steps that bring a dash of Moroccan spice and Parisian precision to your dessert table.
Step 1: Greasing the Pan
Spray a 9×9‑inch baking pan with a good quality cooking spray, then lay a sheet of parchment paper. This double‑layer ensures the bars won’t stick and makes cleanup effortless.
💡 Samantha’s Pro Tip: If you’re a fan of crisp edges, light‑spray the parchment too for a slightly firmer crust that crumbles nicely.
Step 2: Melting the Butter
Place the butter into a medium pot over medium heat. Watch carefully—once it starts to bubble, reduce the heat to low to keep the butter from scorching.
⚠️ Common Mistake to Avoid: Letting the butter burn, which can give the bars a bitter undertone.
Step 3: Cooking the Marshmallows
Add the regular marshmallows and a pinch of salt. Stir constantly with a rubber spatula, scraping every pan corner. When fully melted, remove immediately from the heat to freeze the texture.
💡 Samantha’s Pro Tip: Keep the sauce at the lowest heat possible; too high a temperature will cause the marshmallows to jump.
Step 4: Folding the Grahams
Transfer the hot mixture to a large bowl. Drop in the Golden Grahams, then use the same spatula to fold everything together gently, ensuring Chromic chocolate isn’t clumpy.
⚠️ Common Mistake to Avoid: Shaking the bowl violently which leads to uneven distribution.
Step 5: Adding Chocolate & Mini Marshmallows
Stir in the chopped milk chocolate and the 1½ cups of mini marshmallows. Fold again, making sure the chocolate melts fully and the mini marshmallows become a light, airy scaffold for the subsequent setting.
💡 Samantha’s Pro Tip: If the mixture feels too thick, stir in a splash of milk to loosen it.
Step 6: Pressing into Pan
Pour the thick, glossy mixture into the prepared pan. Press with a flat spatula or your palms until flat, creating an even layer that will set uniformly.
⚠️ Common Mistake to Avoid: Leaving part of the mixture uncompressed, which can create peaks that rise during refrigeration.
Step 7: Chilling & Serving
Place the pan in the fridge for at least 20 minutes. Once firm, use a sharp knife to cut into 12 neat rectangles. Serve chilled or at room temperature for a glorious soft bite.
💡 Samantha’s Pro Tip: Wipe the cutting edge of your knife with a warm towel before slicing to avoid pulling bars apart.
| Step | Action | Duration | Key Visual Cue |
|---|---|---|---|
| 1 | Grease pan & lay parchment | 2 min | Patting with paper |
| 2 | Melting butter | 3 min | Soft bubbles |
| 3 | Cooking marshmallows | 3 min | Smooth syrup |
| 4 | Fold grahams | 2 min | Even mix |
| 5 | Add chocolate & mini marshmallows | 2 min | Chocolate melt |
| 6 | Press into pan | 1 min | Flat surface |
| 7 | Refrigerate and cut | ≥20 min | Firm dough |
Serving & Presentation
These bars shine when served on a rustic wooden platter surrounded by a swirl of fresh berries. I like to garnish them with a sprinkle of crushed pistachios, a nod to Moroccan holiday platters, and top each bar with a whisper of edible gold leaf for a Parisian finish.
Pair them with a light, chilled mint tea that I brew in a tea pot from my grandfather’s Brooklyn tea shop, or a full‑bodied orange‑wine to echo the citrus that reminds me of the little citrus groves of Rabat. The mild citrus marries the caramelized sweetness and sweet chocolate, while the tea’s cooling effect sets crisp aftertaste.
| Pairing Type | Suggestions | Why It Works |
|---|---|---|
| Side Dish | Light fruit salad, basil‑sugar vinaigrette | Freshness cuts sweetness |
| Sauce / Dip | Ginger‑infused honey, chili‑salt drizzle | Adds zing and warmth |
| Beverage | Mint tea, orange‑wine, sparkling rosé | Balances sweet and acidity |
| Garnish | Pistachio crumble, fresh mint, edible gold dust | Texture & visual contrast |
Make-Ahead, Storage & Reheating
In a city that never sleeps, I pre‑make these bars in bulk and store them in the fridge for up to 3 days or freeze them for longer indulgence.
| Method | Container | Duration | Reheating Tip |
|---|---|---|---|
| Refrigerator | Zip‑lock bag or airtight container | Up to 3 days | Let at room temp 10 min before serving |
| Freezer | Freezer‑safe plastic bag | Up to 2 months | Thaw overnight, chop, re‑freeze in portions |
| Make-Ahead | Pre‑sliced, store in airtight | Chill 1 day ahead for parties | Re‑warm in a hot oven 160°F for 5 mins |
I personally keep one set in the freezer for the winter months and pull them out just before planning a dinner party. When you re‑warm them in a low oven, the chocolate stays molten and the mini marshmallows release their subtle aroma, giving you that original s’mores scent right in your kitchen.
Variations & Easy Swaps
| Variation | Key Change | Best For | Difficulty Impact |
|---|---|---|---|
| Thousand Island Ginger Flavor | Add grated fresh ginger and a splash of honey | Spicy‑sweet lovers | Easy addition |
| Gluten-Free / Dairy-Free | Swap Golden Grahams for gluten‑free cereal, use oat milk | Allergy friendly | Easy swap |
| Winter Spruce Twist | Add pine resin syrup for a fragrant hit | Seasonal patio parties | Intermediate prep |
Thousand Island Ginger Flavor
Incorporate a teaspoon of freshly grated ginger during step 4 and a drizzle of honey into the marshmallow melt. The subtle spicy kick infuses the bars with a resilient aroma reminiscent of Moroccan street food, and the sweetness of honey balances the bold notes.
Gluten-Free / Dairy-Free
Use a gluten‑free cereal like puffed quinoa or almond‑based granola for the base, and replace melted butter with coconut oil or a dairy‑free butter. The texture stays firm, and the coconut aura adds a faint tropical warmth that pairs well with the chocolate.
Winter Spruce Twist
A splash of pine resin syrup—available at specialty health stores—infuses the bars with a forested, resinous flavor. It delivers a subtle smokiness, giving the bars a sophisticated twist perfect for holiday gatherings.
Can I freeze Golden Grahams S’mores Bars?
Absolutely! Freezing is a no‑worries option because the dense mixture holds up well. Wrap each pre‑cut bar tightly in wax paper, or store the whole pan in a freezer‑safe bag. When you’re ready, let them thaw in the fridge overnight or at room temperature for a few hours. The texture can stay firm, though you’ll notice the chocolate having a darker sheen due to the freeze‑thaw cycle. Just avoid thawing in direct heat to keep the marshmallow goo from melting too quickly.
What’s the best way to store leftovers?
You can store leftovers in the refrigerator for up to three days. Place them in an airtight container or zip‑lock bag to keep moisture out. Another quick hack is slicing them evenly before you store so you can grab just one or two without breaking through the whole batch. For longer shelf life, freeze them in a flat bag and re‑warm briefly before serving. The bars remain creamy inside while the crunch stays intact.
Do I need a special pan for these bars?
Not at all. A standard 9×9 barbecue pan works beautifully. Just spray it generously with non‑stick cooking spray and line it with parchment for extra safety. The parchment ensures you can lift the whole dish out in one piece, preventing any sticky mishaps that could ruin the crunch.
Can I swap the marshmallows for another sweet?
Yes, you can experiment with diced pie crust or toasted coconut for different textures. Diced pastry will add a flaky component that can still hold the chocolate and grahams, while toasted coconut introduces a nutty, crunchy quality. The key is to fold the new ingredient in slowly, just as with marshmallows, to preserve an even distribution throughout the bars.
How long does the mini marshmallow goo need to set?
Generally, you’ll need a minimum of 20 minutes in the fridge to “set” the mixture into a firm gel that can be sliced neatly. If you keep them in the fridge longer—say an hour or two—they’ll firm up even more, making a snappy bite that still melts impeccably when you bite down. Timing is crucial; too short and the bars won’t hold shape.
What’s a good snack pairing for a summer picnic?
Pair them with a chilled mint lemonade or even a light cucumber and mint salad. The citrusy, fresh palate balances the sweetness of the bars and gives the whole meal a bright, airy feel. Bringing a small thermos of the mint tea I mentioned earlier also brings the new experience of an indoor “campfire” vibe without stepping outside.
Is it possible to make these bars vegan?
You can easily convert them to vegan by swapping the butter and milk chocolate for plant‑based versions made from coconut or almond oils. Use a vegan marshmallow alternative or mix your own with gelatin substitutes like agar‑agar. Remember to keep the sugar percentages equal, or slightly higher, because some vegan products can be a bit drier. The result will still keep its gooey texture and chocolate taste.
What’s the best way to cut the bars into neat shapes?
A sharp knife or a rectangular cookie cutter works best. Warm the blade briefly by wiping it with a warm towel before slicing—this reduces resistance. If you find the batch is too soft to cut cleanly, pop it back into the fridge for an extra 10 minutes before attempting to divide it.
Can I keep the bars for a longer party or event?
Yes! Pre‑make a double batch, divide into portions, and store them chilled. For a party, set up a “s’mores bar” station—add extra mini marshmallows or chocolate chips at the table for guests to customize. Keep the bars in a cool bag until the event starts so they stay freshly set.
What makes these bars different from store-bought s’mores cups?
These bars bring a homemade touch and a deeply gooey texture that store‑bought versions can’t match. The mini marshmallows and extra marshmallow fold create an airy bite, while the sweet‑spicy spice blend keeps the bars from becoming overly sweet. The result is a nostalgic flavor that feels more artisanal and perfectly portable for any gathering.
Share Your Version!
I’d love to see how you tweak these bars for your family—perhaps add a pinch of smoked paprika for a Moroccan twist, or a dash of espresso for a Parisian coffee touch. Leave a five‑star rating and drop a comment below to tell me how they turned out for you.
Snap a photo and post it on Instagram or Pinterest, tagging @mykitchenstorie. I’m always eager to see the creative spins in your kitchen and share them on my own feed. If you end up swapping out the mini marshmallows for white chocolate, that’s a question I can’t wait to read about in the comments!
From my NYC kitchen to yours — I hope this recipe brings as much warmth to your table as it does to mine. — Samantha 🧡
Love This Recipe? Save It to Pinterest!
If you enjoyed this Golden Grahams S’mores Bars recipe, don’t let it get lost in your browser tabs! 😄 Pin it now so you can find it again anytime — and explore hundreds more tried-and-tested recipes waiting for you on my Pinterest boards.
👉 Follow Samantha on Pinterest @exorecipe
📌 Pin this recipe · 🔁 Re-pin your favorites · 💬 Tag me when you make it — I love seeing your creations!
Did you bake these bars? I’d love to hear how your version turned out. Drop a comment or share a snap in the comments below—your feedback fuels the next recipe adventure!
Golden Grahams S’mores Bars
These gooey Golden Grahams s’mores bars are the perfect easy no-bake treat to whip up this summer when you have a hankering for s’mores, but don’t have a campfire handy! They’re loaded. with Golden Grahams cereal, chocolate and mini marshmallow, so you get all that nostalgic s’mores flavor.
Ingredients
- 1/3 cup unsalted butter
- pinch of salt
- 16 ounce bag of marshmallows
- 5 1/2 cups Golden Grahams
- 1/2 cup milk chocolate (we used roughly chopped Hersheys bars)
- 1 1/2 cups mini marshmallows (for folding into the bars)
Instructions
- Grease a 9 x 9 pan with cooking spray and set aside.
- In a large pot over medium heat, melt the butter.
- Add the regular marshmallows and salt and stir with a rubber spatula, scraping down the sides to make sure the marshmallows do not burn. As soon as the marshmallows are melted, remove from the heat immediately.
- In a large bowl, add the Golden Grahams cereal and pour the marshmallow mixture of the cereal, using a rubber spatula to fold everything together.
- Stir in the chocolate and mini marshmallows.
- Spoon the mixture into the prepared pan, pressing down into an even layer.*
- Place in the fridge to set for at least 20 minutes. Once set, use a sharp knife to cut the smores bars into 12 rectangles. Enjoy!
Leave a Reply