Table of Contents
Granny Smith Apple Pie Recipe – Tart, Tangy & Flaky Perfection
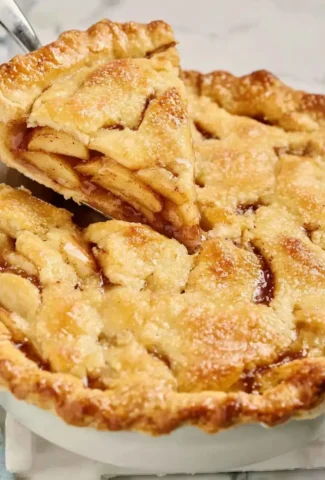
I thought I knew how to make apple pie until I tried my neighbor’s recipe last fall. Mine always turned out with a soggy bottom crust, while hers was perfectly crisp, golden, and bursting with tart apple flavor. The secret? She used nothing but Granny Smith apples and a French technique I’d learned years ago at culinary school in Paris but never applied to a classic American pie. This Granny Smith Apple Pie Recipe is the result of that happy collision — a bright, tangy filling wrapped in a buttery, flaky crust that stays crisp even the next day. It’s become my go-to for Thanksgiving, fall gatherings, and cozy Sunday afternoons here in my New York City kitchen.
The aroma of cinnamon and nutmeg mingling with the sharp sweetness of baked Granny Smiths is pure comfort. Each bite offers a satisfying contrast: the tender, juicy apples against the shatteringly crisp crust, with a hint of lemon zest cutting through the richness. The filling isn’t overly sweet — the natural tartness of the apples shines, balanced by just enough white and brown sugar to create a luscious, syrupy texture. It’s the kind of pie that makes you close your eyes and smile, the kind that reminds you why homemade is always better.
I’ve tested this recipe a dozen times, tweaking the flour-to-sugar ratio and the baking temperature to achieve that elusive perfect bottom crust. My secret weapon? A hot baking sheet placed under the pie dish to give the base a head start. In this post, I’ll walk you through every step — from selecting the best Granny Smiths at your local market to the pastry technique that guarantees a flaky, golden result. Plus, I’ll share one common mistake that leads to a gummy filling, so you can avoid it entirely. Let’s bake!
Why This Granny Smith Apple Pie Recipe Is the Best
The Flavor Secret: Most apple pies use a mix of sweet and tart apples, which can create a muddy flavor profile. This recipe uses only Granny Smith apples — their high acidity and firm texture hold up beautifully during baking, delivering a bright, clean tartness that pairs perfectly with the warm spices. I add a touch of lemon zest and juice to amplify that tang, while the combination of white and brown sugar caramelizes into a rich, amber syrup. It’s a nod to my Moroccan heritage, where bright, bold flavors always take center stage.
Perfected Texture: A soggy bottom is the enemy of a great apple pie. My trick, learned in a Parisian pastry kitchen, is to macerate the sliced apples in sugar and lemon juice for 15 minutes, then drain off the excess liquid before assembling. This step removes the water that would otherwise steam the crust. I also toss the apples in flour — just two tablespoons — to thicken the juices without creating a pasty, gelatinous filling. The result is a filling that’s tender, not mushy, and a bottom crust that stays flaky and crisp.
Foolproof & Fast: This recipe is designed for home bakers of all skill levels. Using store-bought pie shells (I recommend the refrigerated ones from the dairy section) cuts the prep time in half without sacrificing quality. The steps are straightforward: slice, macerate, drain, season, fill, and bake. Even if you’ve never made a pie before, you’ll end up with a beautiful, golden-brown dessert that tastes like it took hours of labor. I’ve made it for busy weeknight dinners and holiday feasts alike — it always delivers.
Granny Smith Apple Pie Recipe Ingredients
On a crisp Saturday morning, I head to the Union Square Greenmarket to pick my apples. There’s nothing like the smell of fresh-picked Granny Smiths — that sharp, green apple scent that promises a perfect pie. For this recipe, you’ll need seven large apples, which will yield about 8 cups of slices. I always buy a few extra, just in case some are bruised or too mealy. The rest of the ingredients are pantry staples, but each one plays a crucial role in creating that unforgettable filling and crust.
Ingredients List
- 2 (9-inch) pie shells (store-bought or homemade)
- 7 large Granny Smith apples, peeled, cored, cut into 1/2-inch slices
- 1/2 cup white sugar
- 1/2 cup lightly packed brown sugar
- 2 tbsp all-purpose flour
- 1 tsp ground cinnamon
- 1/8 tsp ground nutmeg
- 1 tbsp lemon juice
- Zest from 1/2 a lemon
- 1 large egg, beaten (for egg wash)
- 2 tbsp sanding sugar, if desired
Ingredient Spotlight
Granny Smith Apples: These are non-negotiable for this recipe. Their tartness stands up to the sugar and spices, and their firm texture means they won’t turn to mush. Look for apples that are firm to the touch, with smooth, bright green skin and no soft spots. If you can’t find Granny Smiths, use any firm, tart apple like Braeburn or Pink Lady — but expect a slightly sweeter result.
Brown Sugar: I use light brown sugar for its subtle molasses flavor that deepens the caramel notes without overwhelming the apples. Dark brown sugar will work, but it will produce a darker, more robust syrup. Stick with light brown for the best balance.
Lemon Juice and Zest: This is my little secret from Paris — acid brightens the entire pie and keeps the apples from browning. The zest adds a fragrant, citrusy lift that cuts through the richness of the butter crust. Always zest the lemon before juicing; it’s easier that way.
Spices: Cinnamon is the star, but just a pinch of nutmeg adds warmth without dominating. I grind my nutmeg fresh from whole seeds — the difference in flavor is remarkable. Avoid pre-ground nutmeg that’s been sitting in a jar for months; it loses its potency.
Pie Shells: For convenience, I typically use Pillsbury refrigerated pie crusts, which are buttery and flaky. If you have time, a homemade all-butter crust is even better. Just make sure your shells are thawed according to package directions before using.
| Original Ingredient | Best Substitution | Flavor / Texture Impact |
|---|---|---|
| Granny Smith Apples | Braeburn or Pink Lady | Slightly sweeter; still holds shape well |
| White Sugar | Coconut sugar | Darker color; slightly less sweet |
| All-Purpose Flour | Cornstarch (use 1 tbsp) | Clearer, glossier filling; slightly less thickening power |
| Ground Nutmeg | Ground cardamom or allspice | Different warm spice profile; cardamom is more floral |
How to Make Granny Smith Apple Pie — Step-by-Step
This recipe is simpler than you might think. With a few careful steps, you’ll have a pie that looks and tastes like it came from a bakery. Follow along, and let’s get that filling bubbling and that crust golden.
Step 1: Prepare the Apples
Peel, core, and slice the Granny Smith apples into 1/2-inch thick wedges. Place them in a large bowl and toss with the lemon juice and lemon zest. This prevents browning and adds a bright flavor. In a separate small bowl, whisk together the white sugar, brown sugar, flour, cinnamon, and nutmeg. Sprinkle this mixture over the apples and toss gently to coat. Let the apples sit for 15 minutes at room temperature — this maceration step releases some juice, which you’ll drain off later to prevent a soggy crust.
💡 Samantha’s Pro Tip: Use a sharp chef’s knife for even slices. Uneven slices cook at different rates, leading to some mushy and some crunchy bits. I aim for about 1/2-inch thickness — thin enough to cook through, thick enough to hold their shape.
Step 2: Drain and Fill
After 15 minutes, pour the apples into a colander set over a bowl to catch the excess liquid. Don’t rinse — just let the syrup drain away. This is the crucial step that ensures a crisp bottom crust. Return the drained apples to the bowl. Place one pie crust in a 9-inch pie dish, pressing it gently against the sides. Spoon the apple filling into the crust, mounding it slightly in the center. The apples will settle during baking, so don’t worry if it looks piled high.
⚠️ Common Mistake to Avoid: Skipping the draining step! If you don’t drain the apples, the excess juice will pool at the bottom of the crust and steam it, resulting in a soggy, gloppy mess. I’ve learned this the hard way — trust me on this one.
Step 3: Top Crust and Egg Wash
Place the second pie crust on top of the filling. Crimp the edges together with your fingers or a fork to seal. Cut 4–5 slits in the top crust to allow steam to escape — this prevents the filling from bubbling over and helps the crust stay crisp. Brush the top and edges with the beaten egg for a shiny, golden finish. If desired, sprinkle with sanding sugar for a sparkly, crunchy topping.
💡 Samantha’s Pro Tip: For an extra flaky top crust, refrigerate the assembled pie for 10 minutes before baking. This chills the butter in the crust, which creates steam pockets as it bakes, resulting in more layers. It’s a classic French pastry trick.
Step 4: Bake
Preheat your oven to 400°F (200°C). Place a baking sheet on the lower rack to preheat as well — this is my secret for a crispy bottom crust. Carefully place the pie on the hot baking sheet. Bake for 20 minutes at 400°F, then reduce the oven temperature to 375°F (190°C) and bake for another 30–35 minutes, until the crust is deep golden brown and the filling is bubbling through the slits. If the edges start browning too quickly, cover them with a pie shield or strips of aluminum foil after the first 15 minutes.
⚠️ Common Mistake to Avoid: Underbaking! The pie is done when you see thick, syrupy bubbles coming through the vents. If the crust is golden but no bubbles appear, give it another 5–10 minutes. A fully baked filling is what sets properly — not a watery syrup.
Step 5: Cool and Serve
Remove the pie from the oven and let it cool on a wire rack for at least 2 hours before slicing. This allows the filling to set; cutting too early will result in a runny mess. The pie is best served warm, but it’s also delicious at room temperature. If you’re making it ahead, let it cool completely, then cover loosely with foil.
💡 Samantha’s Pro Tip: For the cleanest slices, use a sharp chef’s knife and wipe it clean between cuts. A warm knife (run it under hot water and dry it) glides through the crust and filling like butter.
| Step | Action | Duration | Key Visual Cue |
|---|---|---|---|
| 1 | Peel, core, slice apples; toss with sugar mixture | 10 min + 15 min maceration | Apples release liquid in bowl |
| 2 | Drain apples; fill bottom crust | 2 min | Liquid drains off; apples mounded in crust |
| 3 | Place top crust, crimp, cut slits, brush egg wash | 5 min | Crust sealed; slits visible |
| 4 | Bake on preheated sheet | 50–55 min total | Deep golden crust; thick bubbles through vents |
| 5 | Cool on wire rack | At least 2 hours | Filling sets; pie is warm but not hot |
Serving & Presentation
This Granny Smith Apple Pie is a showstopper on any dessert table. I love serving it warm with a generous scoop of vanilla bean ice cream — the contrast between the warm, spiced apples and the cold, creamy ice cream is pure bliss. For an extra touch, drizzle a little caramel sauce over the top and sprinkle with a pinch of flaky sea salt. It’s the kind of dessert that makes people close their eyes and sigh.
When I was growing up in Morocco, my mother would serve a honey-drenched pastry called m’hancha with mint tea after dinner. The warm spices and syrup remind me of that tradition, but with a French pastry elegance. In Paris, I learned to plate desserts simply — let the pie be the star. A dusting of powdered sugar over the lattice top adds a snowy, festive look, especially for holidays. For a cozy fall gathering, I slice the pie into generous wedges and serve them on warmed plates alongside a cinnamon-laced whipped cream.
| Pairing Type | Suggestions | Why It Works |
|---|---|---|
| Side Dish | Vanilla bean ice cream, whipped cream, crème fraîche | Creamy richness balances tartness; crème fraîche adds tang |
| Sauce / Dip | Caramel sauce, salted caramel, bourbon cream sauce | Enhances caramel notes of the filling; bourbon adds warmth |
| Beverage | Hot apple cider, black coffee, chai tea, Belgian ale | Spices complement; coffee cuts sweetness; ale echoes malt |
| Garnish | Powdered sugar, cinnamon stick, fresh mint, flaky sea salt | Visual appeal and flavor contrast; salt enhances apples |
Make-Ahead, Storage & Reheating
Leave a Reply