Table of Contents
Lattice Apple Pie Recipe – Foolproof, Never-Runny Filling & Golden Crust
I still remember the first time my mother taught me to make an apple pie in her small kitchen in Morocco. She used the most fragrant apples from the souk and a lattice top that felt like edible art. Now, living in New York City, I bring that same love to my lattice apple pie—the one I make every Thanksgiving, the one that never leaves leftovers. This lattice apple pie recipe is 100% foolproof, so you can serve it with absolute confidence. The secret is in the technique: pre-cooking the filling on the stovetop to concentrate the flavors and eliminate any risk of a runny pie.
When you take a bite, you get a mountain of perfectly tender apples—Honeycrisp for sweetness, Granny Smith for tartness—enveloped in a rich, caramel-like sauce. The aroma of cinnamon, ginger, and nutmeg fills your kitchen, and the golden lattice crust shatters gently with each forkful. No soggy bottoms, no watery filling. Just pure, comforting apple pie perfection. I learned this technique while training in pastry in Paris, and I’ve perfected it over years of holiday baking.
I’m sharing every trick I know to ensure your success: from the proper way to chill your lattice strips to the essential step of cooling the pie for a full four hours before slicing. Skip any of those steps, and you risk disappointment. Follow them, and you’ll have the best apple pie of your life. This version is my most-requested recipe on mykitchenstorie.com, and I can’t wait for you to make it your own. So grab your rolling pin and let’s get started—your Thanksgiving table is about to get a whole lot sweeter.
Why This Lattice Apple Pie Recipe Is the Best
The flavor secret here is the stovetop pre-cooking. By cooking the apples with the sugars, flour, and spices before they hit the oven, I create a concentrated, caramel-like sauce that clings to every slice. No raw flour taste, no watery separation. This is the technique I learned at Le Cordon Bleu in Paris, and it transforms a good pie into a great one. The blend of Honeycrisp and Granny Smith apples gives you the perfect sweet-tart balance that just works.
The texture is everything. After pre-cooking the apples until fork-tender but still holding their shape, they will never turn mushy in the oven. The science is simple: the stovetop cooking breaks down the pectin enough so the apples don’t release more liquid during baking. I also roll and freeze my lattice strips twice—once before cutting and again after—to make weaving them a breeze. This double-chill method is a game-changer for anyone intimidated by lattice tops.
This recipe is foolproof because it removes the guesswork. The visual cue to wait for bubbling filling around the edges ensures your cornstarch is activated and your pie is fully baked. And by chilling the assembled pie for 30 minutes before baking, you prevent the dreaded crust shrinkage. Even if you’re a first-time pie baker, my detailed step-by-step with photos will guide you to a stunning result. It’s the only lattice apple pie recipe you’ll ever need.
Lattice Apple Pie Ingredients
Every ingredient in this lattice apple pie recipe is chosen for its specific role in creating that flawless pie. I source my Honeycrisp apples from the Union Square Greenmarket in NYC—they’re always crisp and juicy. The spices come from a little spice shop in the East Village, and the vanilla extract is pure Madagascar vanilla, which I bring back from trips to Paris. Let’s break down what you’ll need and why each one matters.
Ingredients List
- 2 recipes Homemade Pie Crust ((1 for bottom crust and 1 for lattice top))
- Egg wash: 1 egg beaten with 1 TB heavy cream ((may sub milk))
- Optional: Coarse raw sugar for sprinkling on lattice topping
- 3 1/2 pounds Honeycrisp apples
- 1 1/2 pounds Granny Smith apples
- 2/3 cup packed light brown sugar
- 1/2 cup granulated sugar
- 1/3 cup + 1 TB all-purpose flour
- 2 tablespoons lemon juice, (divided)
- 1 1/2 teaspoons ground cinnamon
- 1/2 tsp EACH ground ginger, ground nutmeg, allspice
- 1/8 teaspoon salt
- 1 teaspoon vanilla extract
Ingredient Spotlight
Honeycrisp apples are my top choice for their sweet, juicy, and crisp texture—they hold up beautifully during cooking. Granny Smith apples add the necessary tartness to balance the sugars, and their firm flesh won’t break down into mush. When picking apples in the grocery store, look for ones that feel heavy for their size and have no soft spots. A good substitution for Honeycrisp is Fuji or Braeburn, but you’ll lose a little of the signature sweetness.
| Original Ingredient | Best Substitution | Flavor / Texture Impact |
|---|---|---|
| Honeycrisp apples | Fuji or Braeburn | Slightly less sweet, still crisp |
| Granny Smith apples | Pink Lady or Cortland | Milder tartness, softer texture |
| All-purpose flour | Cornstarch (use 2 TB less) | Glossier filling, slightly less thick |
| Light brown sugar | Dark brown sugar | Deeper molasses flavor |
How to Make Lattice Apple Pie — Step-by-Step
Ready to create your masterpiece? Follow these detailed steps, and you’ll end up with a lattice apple pie that looks like it came from a bakery—and tastes even better. I’ve included timing and visual cues to guide you through every stage.
Step 1: Prepare the Pie Dough
Make two recipes of my homemade pie crust. Prepare the first through step 6 of the dough recipe, then roll out the second through step 2 of the rolling instructions. You need one disc for the bottom crust and one for the lattice top. Keep both chilled.
💡 Samantha’s Pro Tip: I always make my pie crust a day ahead and let it rest in the fridge overnight. This relaxes the gluten and makes the dough easier to roll without shrinking.
Step 2: Make the Bottom Pie Crust
Lightly brush the bottom and sides of the crust in the pan (not the edges that will be fluted) with the egg wash. Reserve the rest in the fridge. I find this step much easier after the pie dough has firmed up, so I freeze the pie for 20 minutes first. Then immediately cover and refrigerate for at least 45 minutes or up to 5 days.
⚠️ Common Mistake to Avoid: Don’t skip the egg wash on the bottom crust. It creates a barrier that prevents the filling from seeping in and making the crust soggy.
Step 3: Roll Out the Dough for the Lattice Top
Place a large piece of parchment paper on a baking sheet and dust generously with flour. Roll the second disc into a rough 11×11-inch rectangle on the parchment. I then cover and freeze the dough on the baking sheet for 20-30 minutes. This makes slicing the strips much cleaner.
Step 4: Slice the Apples
Peel the apples and make 4 slices around the core to remove it. Lay the four segments cut-side down and slice into ⅛-inch slices. Transfer to a large Dutch oven as you work. This thin, uniform slice cooks evenly and creates a tender but structured filling.
💡 Samantha’s Pro Tip: Don’t toss the peels! I like to simmer them in a little water with a cinnamon stick for 10 minutes for a quick apple tea.
Step 5: Cook the Filling
Add the sugars, flour, 1 tablespoon lemon juice, and spices to the apples in the Dutch oven. Set over medium heat, stirring until evenly coated. Cover and cook for 15-20 minutes, stirring every couple minutes. The apples are done when they are fork-tender but still hold their shape—they won’t become more tender in the oven. Stir in the remaining tablespoon of lemon juice and vanilla.
⚠️ Common Mistake to Avoid: Overcooking the apples on the stovetop will make them mushy. Test them with a fork at 15 minutes—they should give slightly but not fall apart. Remember, the oven will soften them just a bit more.
Step 6: Cool the Filling
Line a rimmed baking sheet with parchment or a silicone mat. Transfer the apples and their caramel juices to the sheet. Pop the pan in the fridge or freezer for about 25 minutes, until the filling cools to room temperature. This is crucial—a hot filling will melt your crust and turn the bottom soggy.
Step 7: Assemble the Pie
Once the apples are cool, transfer them and all the caramel sauce to the chilled pie shell. Rearrange and layer the apples horizontally to compact them tightly. Every gap will shrink during baking, so pack it well.
Step 8: Weave the Lattice Top
If your strips are too stiff, let them rest at room temperature for 10 minutes. Lay five horizontal strips evenly spaced over the pie, centering the middle one. Fold back every other strip (first, third, fifth) and place a vertical strip on the left. Unfold the folded strips, then fold back the opposite ones (second, fourth) and add the next vertical strip. Repeat until you have ten strips total—five horizontal and five vertical. Press the edges to seal.
💡 Samantha’s Pro Tip: Use a ruler and a pizza cutter for perfectly straight strips. And don’t stress about perfection—a slightly rustic lattice looks beautiful and homemade.
Step 9: Finish and Chill
Flute or crimp the edges as you prefer. Brush the edges and the lattice top with the egg wash. Sprinkle the lattice top (not the edges) with coarse raw sugar. Chill the unbaked pie for 30 minutes—this prevents the crust from shrinking and ensures clean slices.
Step 10: Bake
Immediately place a baking sheet on the bottom rack of your oven and preheat to 425°F. Transfer the chilled pie to the hot baking sheet. Bake for 25 minutes at 425°F, then reduce heat to 375°F and bake for another 35-45 minutes. The pie is done when the filling is bubbling around the edges—if you don’t see bubbles, your filling will be runny. Cover the edges with a pie shield if they brown too quickly.
⚠️ Common Mistake to Avoid: Never skip the 4-hour cooling period after baking. I know it’s tempting to slice into that steaming pie, but the filling needs time to set. If you cut early, you’ll get a soupy mess.
Step 11: Cool and Reheat (Optional)
Transfer the pie to a cooling rack and let it rest for 4 hours to reach room temperature. You can speed this up in the fridge or freezer. The pie can rest at room temperature for up to 2 days or be refrigerated for up to 5. To reheat, tent with foil and place in a cold oven. Set to 375°F, and when the bell dings, leave it for another 10-15 minutes until warmed through.
| Step | Action | Duration | Key Visual Cue |
|---|---|---|---|
| 1 | Prepare crust | Overnight or 1 hour | Smooth, firm dough |
| 2 | Cook filling | 15-20 min | Fork-tender, not mushy |
| 3 | Cool filling | 25 min in freezer | Room temperature |
| 4 | Weave lattice | 10-15 min | Evenly spaced strips |
| 5 | Chill pie | 30 min | Firm crust |
| 6 | Bake | 60-70 min | Bubbling filling, golden crust |
| 7 | Cool | 4 hours | Room temperature, set |
Serving & Presentation
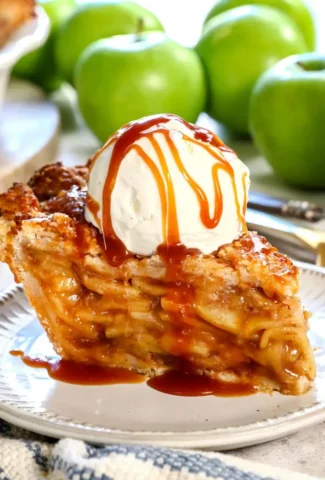
This lattice apple pie is a showstopper on its own, but a few thoughtful touches can take it over the top. I love serving it warm, with a generous spoonful of vanilla bean ice cream melting into the crevices of the lattice. A drizzle of salted caramel sauce is my NYC diner-inspired addition—it adds just the right salty-sweet contrast. For gatherings, I sometimes dust the finished pie with a little cinnamon sugar for extra sparkle.
When I was growing up in Morocco, we’d often serve fruit pies with a dollop of crème fraîche, which cuts the sweetness beautifully. In Paris, I learned to pair tarts with a drizzle of honey and a sprinkle of flaky sea salt. For a modern twist, try a scoop of apple cider sorbet or a slice of sharp cheddar cheese—a classic New England pairing that my grandmother adored. However you serve it, let it sit for at least 45 minutes after reheating to avoid lava-hot filling.
| Pairing Type | Suggestions |
Reader Interactions |
|---|
Leave a Reply