Table of Contents
Muddy Buddy Cookies Melt‑then‑Smash Technique – A Sweet, Chewy Surprise
I remember snuggling beside my mother in Morocco’s warm kitchen, watching her stir a pot of sweet almond milk while humming a lullaby. That scent of butter and peanut butter has followed me all the way to my tiny New York City apartment where I first experimented with the Muddy Buddy Cookies using what I called the “Melt‑then‑Smash Technique.” The result? A cookie that’s as soft as a cloud yet packed with a chocolate‑peanut butter heart that sets perfectly around the center. The technique keeps the cookie chewy while giving the crisp edges its signature crack.
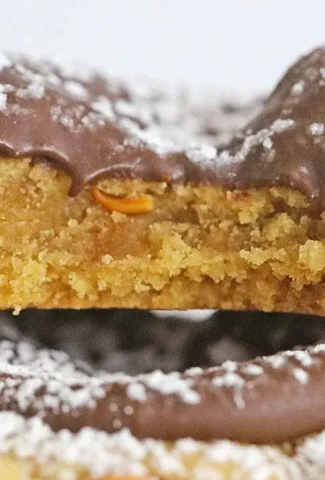
When you bite into the first cookie, you’re greeted by the buttery, nutty aroma of fresh peanut butter balanced by a hint of vanilla. The texture is a comforting contrast: the soft crumb holds a rich, molten chocolate center, while the thin golden edge offers a slight crunch that snaps in your mouth. A subtle dusting of powdered sugar gives a delicate snowy finish, reminiscent of a Moroccan winter street market. I often stir in a pinch of ras‑el‑hanout after the bake to bring in an earthy spice that ties my Moroccan roots to the sugary American bite.
I’ve polished this recipe through countless New York brunch gatherings, where friends and coworkers marvel at how simple yet elegant these cookies are. The Melt‑then‑Smash Technique turns a basic peanut‑butter dough into a show‑stopping dessert in five minutes. I’ll share a quick pro tip below: add an extra splash of milk to the butter before creaming to keep the dough silky. The common mistake? Forgetting to crush the cookie just as it comes out of the oven; it must be smashed immediately or your chocolate remains liquid inside.
Why This Muddy Buddy Cookies Recipe Is the Best
The flavor secret is all in the dual layers. The mellow peanut butter base grounds the cookie, while the chocolate‑filled center delivers a decadent surprise that’s both nostalgic and novel. Rooted in Parisian patisserie precision and Moroccan spice harmony, this recipe balances sweet, buttery, and nutty notes with a sophisticated finish.
Perfected texture comes from my signature “Melt‑then‑Smash” technique, borrowed from an old French press trick that keeps the dough airy while ensuring the chocolate doesn’t leak. The instant smashing traps air, creating a subtle hollow that lets the molten chocolate pool to the edges when cooling, giving each cookie a mesmerizing swirl.
It’s foolproof and fast—no advanced equipment, no fancy gadgets, just a stand mixer, an oven, and a glass. Even a beginner can master the technique by following my step‑by‑step guide, and the 20‑minute turnaround fits seamlessly into a hectic NYC lunch break.
Muddy Buddy Cookies Ingredients
I get most of the ingredients at the last‑minute farmers market on 14th Street, where the almond butter smells fresh from local roasters and the dark chocolate chips are imported from Belgium. If you’re craving the same flavors at home, look for the listed items locally; you’ll have a bakery‑quality outcome.
Ingredients List
- ½ cup Butter (softened)
- ½ cup Peanut Butter (creamy or crunchy)
- ½ cup Granulated Sugar (plus extra to roll cookie balls in)
- ½ cup Brown Sugar
- 1 teaspoon Vanilla extract
- 1 Egg
- ¼ teaspoon Salt
- 1 teaspoon Baking Soda
- 2 cups All‑Purpose Flour
- 1 cup Milk Chocolate Chips
- ¼ cup Powdered Sugar (to sprinkle on tops)
Ingredient Spotlight
Peanut Butter: The backbone of our cookies, providing a nutty umami that balances the sweet chocolate. Look for natural, unsweetened peanut butter for a cleaner taste; I swap in almond butter if you’re allergic—just add a splash of vanilla to keep the depth.
Milk Chocolate Chips: They’re crucial for that glossy center. If you prefer dark chocolate, 70% cacao chips give a bittersweet finish that meshes with the peanut butter but make the cookie feel truer to a Parisian éclair.
All‑Purpose Flour: It gives the cookie structure. Substitute with whole‑wheat flour for added fiber and a nuttier flavor; the cookie will be denser but still soft. You can also use cake flour, but the texture will feel more tender and less chewy.
| Original Ingredient | Best Substitution | Flavor / Texture Impact |
|---|---|---|
| Peanut Butter | Almond Butter | Slightly sweeter, nutty; softer texture |
| Milk Chocolate Chips | Dark Chocolate Chips (70%) | More bitter, richer, slightly firmer melt |
| All‑Purpose Flour | Whole‑Wheat Flour | Denser, more wholesome; nutty undertone |
How to Make Muddy Buddy Cookies — Step‑by‑Step
Follow my instructions closely, and you’ll get the perfect chewy center and golden edges every time.
Step 1: Cream Butter, Peanut Butter, Sugars
In a stand mixer, combine softened butter, peanut butter, granulated sugar, and brown sugar. Beat on medium speed until the mixture is pale, fluffy, and smooth, about 3 minutes. Add the vanilla and egg, and continue to mix until fully incorporated.
💡 Samantha’s Pro Tip: Add a splash of cold milk before creaming to maintain an airy texture that holds the cookie’s shape during the crushing step.
Step 2: Mix Dry Ingredients
In a separate bowl, whisk together flour, salt, and baking soda. Gradually fold the dry blend into the wet mixture, mixing until just combined. The dough should be thick but still hold its shape.
⚠️ Common Mistake to Avoid: Over‑mixing the dough after adding dry ingredients, which can create a tough cookie.
Step 3: Line & Setup
Line a cookie sheet with parchment paper and preheat the oven to 350°F. This temperature balances a quick bake with even browning.
💡 Samantha’s Pro Tip: Place a second sheet on top to clamp the cookies during smash for a uniform hole.
Step 4: Roll, Bake, Smash
Scoop tablespoon‑sized portions of dough and roll in granulated sugar. Drop them onto the prepared sheet spaced 2 inches apart. Bake for 10 minutes or until edges begin to turn golden brown and cracks appear. As soon as you remove the sheet, use the flat side of a glass to gently press each cookie, pressing the center in slightly. Let them cool on the sheet for 5 minutes before transferring to a rack.
⚠️ Common Mistake to Avoid: Waiting too long to smash; the cookie becomes firm and the chocolate won’t melt into the center.
Step 5: Melt Chocolate
Place chocolate chips in a microwave‑safe bowl. Microwave on 15‑second intervals, stirring until completely melted. Spoon the warm chocolate into the center of each cookie, allowing it to seep into the holes. Let sit until the chocolate slightly thickens, about 30–45 minutes.
💡 Samantha’s Pro Tip: Use a 1:1 ratio with sugar for extra shine—just a light dusting after setting.
Step 6: Sprinkle Powdered Sugar
Once the chocolate has set into small pools, lightly sift powdered sugar over the top for a subtle, snowy finish. Store in an airtight container at room temperature for up to 3 days.
⚠️ Common Mistake to Avoid: Covering the cookies immediately after sprinkling, which removes the delicate dusted look.
| Step | Action | Duration | Key Visual Cue |
|---|---|---|---|
| 1 | Cream butter, peanut butter, sugars, vanilla, egg | 3 min | Pale and fluffy |
| 2 | Fold dry ingredients in | 2‑3 min | Smooth dough, minimal clumps |
| 3 | Line sheet, preheat oven | N/A | Parchment ready for baking |
| 4 | Baking & smashing | 10 min bake, smash immediately | Crack and soft edges |
| 5 | Melt chocolate & fill | 30‑45 min set | Chocolate pools to center |
| 6 | Dust with powdered sugar | Immediately after setting | Snow‑like finish |
Serving & Presentation
Serve the cookies on a rustic wooden board that echoes my mother’s kitchen table or a chic marble platter for a modern NYC look. A drizzle of honey or a light dusting of crushed pistachios adds an extra Moroccan flair. Pair them with a cup of hot tea—perhaps a jasmine tea from a Brooklyn café—or a cold glass of chilled espresso to balance the buttery richness.
If you’re feeling adventurous, garnish a handful with edible gold leaf or a sprinkle of sea salt for a touch of elegance and contrast. The visual contrast of the dark chocolate pools against the golden cookie edges makes for a stunning Instagram moment that I’ve seen my friends rave about.
| Pairing Type | Suggestions | Why It Works |
|---|---|---|
| Side Dish | Fresh cucumber salad with yogurt | Cool, tangy contrast to rich cookies |
| Sauce / Dip | Dark chocolate ganache or almond butter dip | Extends chocolate flavor, creamy texture |
| Beverage | Espresso or iced coffee, or hot chai tea | Robust coffee or spicy tea balances sweetness |
| Garnish | Pistachios, sea salt, edible gold leaf | Textures and metallic shimmer add intrigue |
Make‑Ahead, Storage & Reheating
I love prep‑kitchen the way a chef prep‑sails a ship—everything ready for a quick launch. For a busy NYC day, bake the cookies a day early, stack them in a loaf box, and let them finish setting overnight. The chocolate holds firm, and the powdered sugar remains fluffy.
| Method | Container | Duration | Reheating Tip |
|---|---|---|---|
| Refrigerator | Vacuum‑sealed bag | 3 days | Room temp 15‑20 min before serving |
| Freezer | Foil or parchment box | 1 month | Reheat in 350°F oven 10 min |
| Make‑Ahead | Sheet on parchment | 2 days in advance | Assemble (add chocolate) just before serving |
When reheating, be gentle; an over‑heated cookie will harden and lose its soft interior. A microwave on low, wrapped in paper towel, retains moisture and preserves the chewy bite.
Variations & Easy Swaps
| Variation | Key Change | Best For | Difficulty Impact |
|---|---|---|---|
| Nutty Spice Variation | Add ½ tsp ras‑el‑hanout during dry mix | Challenging palates & spice lovers | Same |
| Gluten‑Free / Dairy‑Free Variation | Use GF flour + oat milk; replace butter with coconut oil | Allergies & health focus | Easy |
| Seasonal Cherry Flavor Twist | Stir in ½ cup fresh cherries at step 5; use dried cherries in step 1 | Summer fruit lovers | Easy |
Nutty Spice Variation
Infuse the dough with a subtle warmth by adding half a teaspoon of ras‑el‑hanout during step 2. This North‑African spice brings earthy cumin, coriander, and cinnamon to the buttery base, creating a harmony that feels both familiar and exotic—like a Parisian mint tea with a Moroccan twist.
Gluten‑Free / Dairy‑Free Variation
If you need a cleaner version, swap the all‑purpose flour for a gluten‑free blend and replace butter with shredded coconut oil. Replace milk with oat milk for a milder taste. The cookies become slightly heavier but remain gooey—perfect for the active New York crowd on a health kick.
Seasonal Cherry Flavor Twist
During the summer months, fold in fresh cherries at step five for bursts of tartness that counter the sweetness. Swap the chocolate chips for white chocolate or marshmallow fluff for a lighter variation that pairs wonderfully with a sunny brunch.
Can I store Muddy Buddy Cookies in the refrigerator and keep them fresh?
Yes, refrigerating the fully baked cookies in an airtight container will keep them crisp on the edges while preserving the soft, chocolate‑filled center for up to 3 days. Just let them come to room temperature before serving so the chocolate remains silky, not hard. If you’re short on time, a quick 10‑minute reheating at 350°F will revive their texture and aroma, restoring that classic melt‑and‑smash experience you love.
What substitutions can I use for chocolate chips?
You can replace milk chocolate chips with dark chocolate chips, white chocolate, or even chocolate bits. Each substitution tweaks flavor: dark adds bitterness and depth; white gives a sweeter, milder taste. Be mindful of melt points—tougher chocolate needs a slightly longer microwave interval. The technique still works; the essential crack‑and‑smash moment stays intact, delivering the hallmark gooey center.
You can replace milk chocolate chips with dark chocolate chips, white chocolate, or even chocolate bits. Each substitution tweaks flavor: dark adds bitterness and depth; white gives a sweeter, milder taste. Be mindful of melt points—tougher chocolate needs a slightly longer microwave interval. The technique still works; the essential crack‑and‑smash moment stays intact, delivering the hallmark gooey center.
What if I run out of peanut butter?
Almond or cashew butter works as a natural alternative, but their distinct flavors will color the cookie subtly. Mix the nut butter with a touch of vanilla extract to keep consistency. For a vegan twist, try a sugar‑free nut butter and a plant‑based milk to reduce dairy content. The cookie will still retain its soft texture and chocolate center—just be prepared for a slightly different nutty finish.
Almond or cashew butter works as a natural alternative, but their distinct flavors will color the cookie subtly. Mix the nut butter with a touch of vanilla extract to keep consistency. For a vegan twist, try a sugar‑free nut butter and a plant‑based milk to reduce dairy content. The cookie will still retain its soft texture and chocolate center—just be prepared for a slightly different nutty finish.
How can I make these cookies gluten‑free?
Use a 1:1 gluten‑free all‑purpose blend in place of the regular flour, and add 1 teaspoon xanthan gum if your blend lacks it. The dough will be slightly thicker, so let it rest for a few minutes before shaping. The baking time remains the same, and the cookies finish with a gentle crack and a chocolate core. Though the crumb is denser, the flavor profile stays authentic, and the Smash technique still delivers that signature chewy bite.
Use a 1:1 gluten‑free all‑purpose blend in place of the regular flour, and add 1 teaspoon xanthan gum if your blend lacks it. The dough will be slightly thicker, so let it rest for a few minutes before shaping. The baking time remains the same, and the cookies finish with a gentle crack and a chocolate core. Though the crumb is denser, the flavor profile stays authentic, and the Smash technique still delivers that signature chewy bite.
Do I need a special trick to keep the chocolate from seeping out?
The secret is the immediate smashing step—press the center while the cookie is still hot, creating a shallow cavity that traps the melted chocolate. It’s like carving a vase to hold wine; the walls hold the liquid at the moment it hardens. If you skip smashing, the chocolate will run out, leaving a flat center. Stick to the technique, and your cookies will stay filled beautifully.
The secret is the immediate smashing step—press the center while the cookie is still hot, creating a shallow cavity that traps the melted chocolate. It’s like carving a vase to hold wine; the walls hold the liquid at the moment it hardens. If you skip smashing, the chocolate will run out, leaving a flat center. Stick to the technique, and your cookies will stay filled beautifully.
Can I add a pinch? of sea salt after dusting powdered sugar?
Absolutely! A light dusting of sea salt on top of the powdered sugar intensifies the chocolate’s sweetness and brings depth to the peanut butter flavor. It’s a simple garnish that elevates the presentation—just sprinkle evenly. Many chefs in Paris use a touch of fleur de sel to round off desserts, and it’s no different for your Muddy Buddy Cookies. The contrast adds a savory lift that makes each bite more memorable.
Absolutely! A light dusting of sea salt on top of the powdered sugar intensifies the chocolate’s sweetness and brings depth to the peanut butter flavor. It’s a simple garnish that elevates the presentation—just sprinkle evenly. Many chefs in Paris use a touch of fleur de sel to round off desserts, and it’s no different for your Muddy Buddy Cookies. The contrast adds a savory lift that makes each bite more memorable.
Is the melt‑then‑smash technique safe for all oven temperatures?
It works best at a moderate temperature (350°F or 175°C). Higher heat may over‑brown the edge before the chocolate sets, while a lower heat will prolong the baking time and could cause the inner cavity to fill prematurely. Adjust only if you’re using a convection oven—lower the temperature by 25°F and keep an eye on the chocolate’s consistency. Precision keeps each cookie as tender as a Parisian éclair.
It works best at a moderate temperature (350°F or 175°C). Higher heat may over‑brown the edge before the chocolate sets, while a lower heat will prolong the baking time and could cause the inner cavity to fill prematurely. Adjust only if you’re using a convection oven—lower the temperature by 25°F and keep an eye on the chocolate’s consistency. Precision keeps each cookie as tender as a Parisian éclair.
Can I freeze the dough instead of baking?
Yes, shape the dough into dough balls, wrap individually, and freeze. When ready, bake directly from the freezer at 350°F for 12–15 minutes. The cookies will turn out slightly larger and softer, but the chocolate center will remain intact. Freezing the dough allows you to have emergency snack on hand for that busy subway commute or last‑minute dinner party.
Yes, shape the dough into dough balls, wrap individually, and freeze. When ready, bake directly from the freezer at 350°F for 12–15 minutes. The cookies will turn out slightly larger and softer, but the chocolate center will remain intact. Freezing the dough allows you to have emergency snack on hand for that busy subway commute or last‑minute dinner party.
Why do I need to roll the dough in sugar before baking?
Coating the dough balls in granulated sugar creates a subtle crunch around the cookie’s outer shell, enhancing mouthfeel. The sugar caramelizes during baking, contributing a gentle caramel note that balances the peanut butter and chocolate flavors. Skipping the step can leave the cookies feel more uniform and less textured, which might change the perceived quality for those who love a layered sensory experience.
Coating the dough balls in granulated sugar creates a subtle crunch around the cookie’s outer shell, enhancing mouthfeel. The sugar caramelizes during baking, contributing a gentle caramel note that balances the peanut butter and chocolate flavors. Skipping the step can leave the cookies feel more uniform and less textured, which might change the perceived quality for those who love a layered sensory experience.
What’s the best way to sweeten these cookies if I want a lower sugar version?
Reduce granulated sugar by a third and substitute the same amount with coconut sugar or a 75% sweetener blend. The texture remains soft, but the flavor profile tilts slightly towards a nuttier, less sugary bite. Alternatively, increase brown sugar to keep the caramelization and add a subtle molasses note—this keeps the cookies moist while cutting raw sugar content, giving you a healthier sweet treat suitable for a busy New York lifestyle.
Reduce granulated sugar by a third and substitute the same amount with coconut sugar or a 75% sweetener blend. The texture remains soft, but the flavor profile tilts slightly towards a nuttier, less sugary bite. Alternatively, increase brown sugar to keep the caramelization and add a subtle molasses note—this keeps the cookies moist while cutting raw sugar content, giving you a healthier sweet treat suitable for a busy New York lifestyle.
Share Your Version!
I’d love to hear how you tweak my Muddy Buddy Cookies—maybe you added a Moroccan spice or turned them vegan. Drop a star rating and comment below so fellow cooks can learn from your experience. If you snap a pic, share it on Instagram or Pinterest and tag @mykitchenstorie. Tell me: what ingredient swap surprised you the most in this recipe’s unique angle?
From my NYC kitchen to yours — I hope this recipe brings as much warmth to your table as it does to mine. — Samantha 🧡
Love This Recipe? Save It to Pinterest!
If you enjoyed this Muddy Buddy Cookies recipe, don’t let it get lost in your browser tabs! 😄 Pin it now so you can find it again anytime — and explore hundreds more tried-and-tested recipes waiting for you on my Pinterest boards.
👉 Follow Samantha on Pinterest @exorecipe
📌 Pin this recipe · 🔁 Re-pin your favorites · 💬 Tag me when you make it — I love seeing your creations!
Muddy Buddy Cookies
Muddy Buddy Cookies are the perfect blend of chocolate and peanut butter flavor in every bite. These cookies are made with rich peanut butter cookie dough and topped with chocolate and powdered sugar.
Ingredients
- 1/2 cup Butter (softened)
- 1/2 cup Peanut Butter
- 1/2 cup Granulated Sugar (plus to roll cookie balls in)
- 1/2 cup Brown Sugar
- 1 teaspoon Vanilla extract
- 1 Egg
- 1/4 teaspoon Salt
- 1 teaspoon Baking Soda
- 2 cups all-purpose Flour
- 1 cup Milk Chocolate Chips
- 1/4 cup Powdered Sugar (to Sprinkle tops of Cookies)
Instructions
- In the mixing bowl of a stand mixer, mix the Butter, Peanut Butter, Sugar, and Brown Sugar, until creamy and smooth. Add the Vanilla, and Egg, and blend well.
- In a separate bowl, mix the flour, salt, and baking soda until well combined. Add the mixing bowl, and blend between additions. Mix until smooth dough forms.
- Line a Cookie Sheet with Parchment paper, and set the oven to 350 degrees.
- Roll the dough into Tablespoon size balls, and roll in sugar, then place on the Parchment lined cookie sheet. Bake for 10 minutes, or until cookies have turned golden brown, and have begun to crack . Remove the cookie sheet from the oven, and gently smash the cookies, with the bottom of a flat glass, pushing the center in slightly. Leave cookies on cookie sheet for about 5 minutes, then remove to a wire rack to cool completely.
- When all cookies have been baked, place the Chocolate chips in a microwave safe bowl, and melt the chocolate chips at 15 second intervals, stirring between, until chocolate chips are melted. Spoon melted chocolate into the center of each cookie, and let cookies sit for about an hour, until chocolate begins to set.
- Once chocolate is set in the center of the cookies, sprinkle the powdered Sugar over the cookies. Serve, and Enjoy!
Leave a Reply