Table of Contents
Pesto Chicken Pull Apart Sliders with a Moroccan Touch – Quick & Easy Dinner
Growing up in Morocco, I learned from my mother that the best meals often come together with the simplest ingredients—fresh herbs, good olive oil, and a little patience. But when I moved to New York City and trained in Paris, I discovered how a great pesto can transform a dish into something truly special. These Pesto Chicken Pull Apart Sliders are my love letter to that journey: they’re the perfect quick and easy dinner when you’re short on time but still craving big flavor.
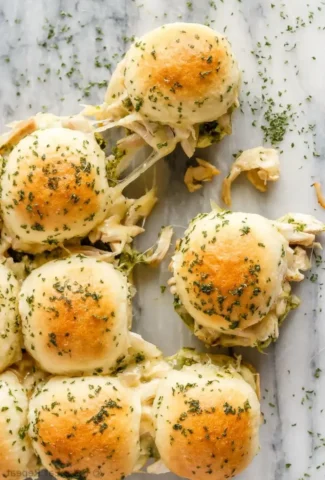
Imagine pulling apart a soft, buttery slider bun to reveal a generous layer of basil pesto, tender shredded chicken, and gooey melted mozzarella cheese. The aroma of garlic salt and dried parsley wafting through your kitchen will remind you of your favorite Italian trattoria—or maybe of my mother’s tagine, where fresh herbs always played a starring role. Each bite delivers a perfect balance of herbaceous pesto, savory chicken, and rich cheese, all hugged by a golden, buttery top that’s brushed with a simple garlic-parsley butter.
As a trained chef who has worked in NYC’s most demanding kitchens, I’ve perfected this recipe to be both foolproof and fast. The secret? A quick trick I picked up in Paris: brushing the tops with melted butter mixed with garlic salt and dried parsley before baking ensures a golden, fragrant crust. And remember—don’t skip covering the dish with foil for the first 15 minutes; it traps steam and melts the cheese evenly without drying out the buns. These easy sliders are about to become your new weeknight hero.
Why This Pesto Chicken Sliders Recipe Is the Best
The Flavor Secret: Why do these sliders taste so much better than the usual quick dinner? Because I’ve infused them with a touch of my Moroccan heritage. While classic pesto is basil-forward, I like to add a pinch of dried parsley and garlic salt to the butter topping—an idea I borrowed from the herb blends my mother used in her kitchen. This small twist elevates the sliders from simple to spectacular, giving them a depth that keeps you coming back for one more bite.
Perfected Texture: The texture of these sliders is everything—and it’s all thanks to a technique I learned at Le Cordon Bleu. By baking the assembled sliders covered with foil, the steam gently melts the mozzarella cheese while keeping the buns soft and pillowy. Then, a quick final bake uncovered (if you like a crispier top) gives that irresistible buttery crunch. The result is a perfect contrast between a tender, pull-apart interior and a lightly golden crust.
Foolproof & Fast: When I’m running between recipe testing and picking up my daughter from school, I need dinner on the table in 30 minutes flat. These Pesto Chicken Pull Apart Sliders deliver every single time. The recipe uses pre-cooked chicken (rotisserie works great), store-bought pesto, and slider rolls that slice all at once. Even if you’ve never baked before, you can pull these off with zero stress—and your family will think you spent hours in the kitchen.
Pesto Chicken Pull Apart Sliders Ingredients
I love picking up fresh slider rolls from the bakery at my Union Square farmers market, but any good-quality tray buns will work beautifully. The pesto I usually grab from a small Italian specialty shop in Brooklyn, though even a jar from the grocery store is perfectly fine for this recipe. These easy sliders come together with simple, real-food ingredients you can find anywhere.
Ingredients List
- 9 Slider Rolls, or tray buns
- 1/4 cup Pesto
- 2 cups Cooked Shredded Chicken
- 1 cup Shredded Mozzarella Cheese
- 2 tablespoons Butter, melted
- 1/2 teaspoon Garlic Salt
- 1 teaspoon Dried Parsley
Ingredient Spotlight
Pesto: The heart of these sliders. I prefer a basil pesto made with extra-virgin olive oil, pine nuts, and Parmigiano-Reggiano. At the store, look for one with bright green color and visible oil separation. If you’re feeling ambitious, make your own in 5 minutes. A mild pesto works best—avoid ones with added sun-dried tomatoes unless you want a different flavor profile.
Cooked Shredded Chicken: This is your time-saver. I often use leftover roasted chicken from Sunday dinner, or a store-bought rotisserie chicken. For the best texture, shred the chicken while it’s still warm—it pulls apart more easily and stays moist. Dark meat adds richness, but breast meat is leaner and still delicious.
Slider Rolls / Tray Buns: The foundation of your sliders. Look for soft, pillowy rolls that are connected in a tray (like King’s Hawaiian or similar). They should be sturdy enough to hold the filling but tender enough to pull apart. Avoid crusty rolls, as they won’t soften properly during baking.
Mozzarella Cheese: For that irresistible stretch. I recommend whole-milk, low-moisture mozzarella—it melts beautifully without making the sliders soggy. Fresh mozzarella can be used but will release more water, so drain it well first. For a sharper flavor, mix in some provolone or cheddar.
| Original Ingredient | Best Substitution | Flavor / Texture Impact |
|---|---|---|
| Pesto | Sun-dried tomato pesto or spinach pesto | Sweeter, less herbaceous; still works wonderfully |
| Cooked Shredded Chicken | Shredded turkey or canned chicken (drained) | Slightly drier with canned; turkey is a perfect swap |
| Mozzarella Cheese | Provolone or shredded white cheddar | Provolone melts similarly; cheddar adds sharpness |
| Slider Rolls | Brioche buns or Hawaiian rolls | Sweeter, richer flavor; slightly denser texture |
How to Make Pesto Chicken Pull Apart Sliders — Step-by-Step
Trust me, if you can assemble a sandwich, you can make these sliders. The whole process takes just 30 minutes, and I’ll walk you through every step so they turn out perfect the first time.
Step 1: Prepare the Oven and Dish
Preheat your oven to 375°F. Lightly spray an 8×8-inch baking dish with cooking spray. This ensures the sliders won’t stick and makes cleanup a breeze.
💡 Samantha’s Pro Tip: For extra non-stick insurance, you can also line the dish with parchment paper, leaving a little overhang. This makes lifting the whole batch out super easy for serving.
Step 2: Slice the Rolls
Slice the dinner rolls in half horizontally. If they are pull-apart rolls, leave them stuck together and slice them all at the same time with a serrated bread knife. This keeps the sliders neatly connected.
⚠️ Common Mistake to Avoid: Don’t separate the rolls before slicing—it makes reassembly messy and can cause uneven baking. Keep them connected in a single slab.
Step 3: Assemble the Bottom Layer
Place the bottom halves of the rolls into the prepared baking dish, fitting them snugly. Spread the pesto sauce evenly over the bottom halves using a spoon or offset spatula. Make sure every roll gets a generous smear of pesto.
💡 Samantha’s Pro Tip: If your pesto is thick, warm it for a few seconds in the microwave to make it spreadable. This ensures an even layer without tearing the delicate rolls.
Step 4: Add Chicken and Cheese
Spread the cooked shredded chicken over the pesto layer, distributing it evenly. Sprinkle the shredded mozzarella cheese generously over the chicken, covering every bit of the surface.
⚠️ Common Mistake to Avoid: Don’t overload the cheese too thickly in one spot; it can create a gluey layer. Aim for a uniform even sprinkling so every bite gets gooey goodness.
Step 5: Top the Sliders
Carefully place the top halves of the dinner rolls over the chicken and cheese, aligning them with the bottoms. Gently press down to secure the layers.
💡 Samantha’s Pro Tip: If you’re making these ahead, you can stop here and refrigerate the assembled sliders (unbaked) for up to 24 hours. Just add 5 extra minutes to the baking time.
Step 6: Make the Butter Topping
In a small bowl, whisk together the melted butter, garlic salt, and dried parsley until well combined. The garlic salt is crucial—it seasons the tops beautifully and balances the richness.
⚠️ Common Mistake to Avoid: Don’t use salted butter plus extra salt—it can become too salty. Stick with unsalted butter and rely on the garlic salt for the perfect seasoning level.
Step 7: Brush and Cover
Brush the butter mixture generously over the top halves of the sliders. Cover the whole dish tightly with aluminum foil. This traps steam and ensures the cheese melts evenly without burning the tops.
💡 Samantha’s Pro Tip: For an even more golden, crispy top, after baking covered for 15 minutes, remove the foil and bake for an additional 2-3 minutes. Watch closely to avoid over-browning.
Step 8: Bake and Serve
Bake for 15-20 minutes, or until the cheese is completely melted and the sliders are heated through. The tops should be golden and the aroma irresistible. Serve warm, pulling apart the sliders right at the table.
⚠️ Common Mistake to Avoid: Don’t overbake! The cheese can become rubbery if left in too long. Start checking at 15 minutes—when you see the cheese bubbling around the edges, they’re ready.
| Step | Action | Duration | Key Visual Cue |
|---|---|---|---|
| 1 | Preheat oven & spray dish | 2 mins | Oven reaches 375°F |
| 2 | Slice rolls horizontally | 2 mins | Clean, even cut |
| 3 | Spread pesto on bottom | 2 mins | Even green layer |
| 4 | Add chicken & cheese | 3 mins | Even coverage |
| 5 | Top with roll tops | 1 min | Rolls aligned |
| 6 | Mix butter topping | 2 mins | Smooth, fragrant mixture |
| 7 | Brush tops & cover | 2 mins | Glossy, even coating |
| 8 | Bake covered | 15-20 mins | Cheese melted, tops golden |
Serving & Presentation
These sliders are made for sharing, and I love watching them disappear from the platter. To serve, pull the whole slab out of the baking dish using a spatula, or serve directly from the dish. The pull-apart nature means everyone can grab their own slider—perfect for weeknight dinners or game-day gatherings.
For a touch of color and freshness, I like to sprinkle a few fresh basil leaves (or parsley) over the top right before serving. A light dusting of red pepper flakes adds a subtle kick that echoes the warmth I grew up with in Moroccan cooking. Pair these sliders with a simple green salad dressed with lemon vinaigrette, or crispy oven fries.
Thinking back to Paris, I often served similar sliders with a side of roasted tomatoes or a light vegetable soup. In New York, I sometimes add a dollop of pesto aioli on the side for dipping—just mix equal parts mayonnaise and pesto with a squeeze of lemon. It’s an indulgent touch that takes these over the top.
| Pairing Type | Suggestions | Why It Works |
|---|---|---|
| Side Dish | Mixed green salad, roasted broccoli, or sweet potato fries | Freshness cuts through richness; fries add crunch |
| Sauce / Dip | Pesto aioli, marinara sauce, or balsamic glaze | Enhances pesto flavor; adds acidity & sweetness |
| Beverage | Iced tea, lemon sparkling water, or Pinot Grigio |
Reader Interactions |
Leave a Reply