Table of Contents
4-Ingredient Peanut Butter Banana Bars Recipe – Quick, Healthy & Delicious
Growing up in Morocco, my mother’s kitchen was always filled with the scent of ripe bananas and warm spices — a fragrance I now associate with comfort and home. But this 4-Ingredient Peanut Butter Banana Bars recipe is a crossroad of my heritage and my training. After studying at Le Cordon Bleu in Paris, I learned that simplicity, when done right, is the ultimate sophistication. These bars are proof: just a few pantry staples come together to create something that’s both nourishing and indulgent. The unique angle? Using extra-ripe bananas as the sole sweetener, so you get all the flavor without refined sugar.
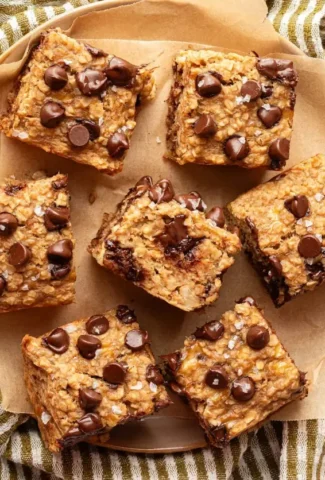
When these bars emerge from the oven, the aroma is intoxicating — a buttery, toasted oat fragrance mingling with the deep richness of peanut butter. The top is speckled with melted chocolate chips that create little pockets of gooey sweetness, while the edges turn a beautiful golden brown. One bite and you experience the contrast: a soft, tender crumb on the inside and a slightly chewy crust on the outside. It’s the kind of snack that feels like a warm hug, and it reminds me of the simple pastries I’d pick up from a corner boulangerie in Paris, but with a distinctly American, wholesome twist.
What sets my version apart is a technique I picked up in Paris: mashing the bananas to just the right consistency so the bars stay moist without becoming gummy. Plus, I’ll share a pro tip for adding chocolate chips that ensures they stay suspended in the batter rather than sinking to the bottom. Many home cooks make the mistake of overmixing, which activates gluten and yields dense, tough bars — but I’ll guide you through exactly how to avoid that. Whether you’re a busy parent in need of a quick breakfast or a baker looking for a no-fuss dessert, this recipe delivers every time.
Why This 4-Ingredient Peanut Butter Banana Bars Recipe Is the Best
The flavor secret lies in the ripe bananas. In Morocco, we always saved the spotty, almost-black bananas for baking because that’s when the natural sugars are at their peak. Here, I follow the same rule: the riper the banana, the sweeter and more complex the flavor. Combined with a good quality natural peanut butter — no added sugar or hydrogenated oils — these bars achieve a perfect balance of savory and sweet. My Parisian training taught me to let quality ingredients speak for themselves, and this recipe does exactly that.
Perfected texture is the hallmark of a good baker. After years of testing, I’ve found that using instant or quick-cooking oats (not rolled oats) gives these bars a softer, more cake-like texture. The oats absorb moisture from the bananas and peanut butter, creating a tender crumb that stays moist for days. I also incorporate a small amount of baking powder — a trick I learned from making French financiers — to give the bars a gentle lift without losing their dense, satisfying chew.
This recipe is foolproof and fast. With just 10 minutes of prep and a single bowl, it’s perfect for beginners and busy weeknights. There’s no need for a mixer, and you don’t have to worry about cream butter and sugar. The ingredients are forgiving: you can swap the chocolate chips for dried fruit, or use almond butter instead of peanut butter. I’ve tested it all, and it always works. It’s the kind of recipe that builds confidence in the kitchen.
4-Ingredient Peanut Butter Banana Bars Ingredients
I love sourcing my ingredients from the Union Square Greenmarket in NYC, where the bananas are often from local farms and the oats are stone-ground. But truthfully, everything you need is likely already in your pantry. This recipe reminds me of my mom’s approach: use what you have, and make it beautiful.
Ingredients List
- 3 very ripe bananas (spotty brown skin is ideal)
- 1/4 cup smooth natural peanut butter
- 1 teaspoon vanilla extract
- 1 1/4 cups instant or quick-cooking oats
- 1/4 teaspoon salt
- 1/2 teaspoon baking powder
- 1/2 cup chocolate chips (plus extra for topping)
Ingredient Spotlight
Bananas (3 very ripe): The backbone of this recipe. They provide sweetness, moisture, and structure. Look for bananas with dark spots all over the skin — that’s when they’re at peak sweetness. If yours aren’t ripe enough, bake them in a 300°F oven for 15 minutes to soften and concentrate the sugars.
Natural Peanut Butter (1/4 cup): Use a brand that’s just peanuts and salt. The oil separation is normal — stir it well before measuring. If you use a sweetened or hydrogenated peanut butter, the texture may become gummy. Almond or cashew butter work equally well.
Instant or Quick-Cooking Oats (1 1/4 cups): These are the secret to the soft, tender texture. Rolled oats can be used but will result in a chewier, more textured bar. Do not use steel-cut oats — they won’t soften enough during the short bake time.
Chocolate Chips (1/2 cup): Dark, milk, or semi-sweet all work. I prefer 60% cacao for a balanced sweetness. You can omit them altogether or swap for chopped nuts, dried cherries, or even a sprinkle of flaky sea salt.
| Original Ingredient | Best Substitution | Flavor / Texture Impact |
|---|---|---|
| Ripe Bananas | 1/2 cup unsweetened applesauce | Less sweet, slightly more cake-like texture; add 1 extra tablespoon of peanut butter |
| Natural Peanut Butter | Almond butter or sunflower seed butter | Milder nutty flavor; Sunflower butter may turn the bars slightly green due to a reaction with baking powder (still safe to eat) |
| Quick-Cooking Oats | Certified gluten-free quick oats | Same texture; essential for gluten-sensitive bakers |
| Chocolate Chips | Chopped dried dates or raisins | Chewier, less sweet, more fruity; add a pinch of cinnamon for warmth |
How to Make 4-Ingredient Peanut Butter Banana Bars — Step-by-Step
Let me walk you through this process like we’re cooking together in my tiny NYC kitchen. It’s so simple, you’ll memorize it after one try.
Step 1: Mash the Bananas
Preheat the oven to 350°F. Grease a 9×5-inch loaf pan or line it with parchment paper for easy removal. Add the bananas to a large bowl. Mash them with a fork until almost smooth — a few small lumps are fine, they add texture. The key is to get a uniform purée without overworking.
💡 Samantha’s Pro Tip: Use a potato masher for faster results! And don’t drain any liquid from the bananas — that’s pure sweet flavor.
Step 2: Mix the Wet Ingredients
Add the natural peanut butter and vanilla extract to the mashed bananas. Stir until smooth and fully combined. The mixture will look like a thick, glossy paste. If your peanut butter is very stiff, microwave it for 10 seconds to make it easier to stir.
⚠️ Common Mistake to Avoid: Don’t overmix at this stage — just stir until combined. Overworking can create a dense texture.
Step 3: Add Dry Ingredients
Sprinkle the oats, salt, and baking powder over the wet mixture. Fold gently with a spatula until no dry streaks remain. Fold in 1/3 cup of the chocolate chips, reserving the rest for the top. The batter will be very thick — that’s exactly what you want.
💡 Samantha’s Pro Tip: Toss the chocolate chips in a tablespoon of oats before adding. This coats them lightly and prevents them from sinking to the bottom of the bars.
Step 4: Bake
Pour the mixture into the prepared loaf pan. Use a spoon or spatula to smooth the top evenly. Press the remaining chocolate chips into the surface. Bake for 25–30 minutes, until a knife inserted in the center comes out clean and the edges are golden brown. Let cool in the pan for 10 minutes, then transfer to a rack.
⚠️ Common Mistake to Avoid: Opening the oven too early. Let them bake undisturbed for at least 20 minutes to ensure they rise properly and develop a golden crust.
Step 5: Cool and Slice
Let the bars cool completely in the pan for better structure. Once cool, use the parchment paper to lift them out. Cut into 6–8 pieces. For clean slices, use a sharp serrated knife and wipe it clean between cuts.
💡 Samantha’s Pro Tip: For extra gooey chocolate, place the cut bars on a baking sheet and broil for 30 seconds. Watch closely so they don’t burn!
| Step | Action | Duration | Key Visual Cue |
|---|---|---|---|
| 1 | Mash bananas | 2 minutes | Almost smooth with tiny lumps |
| 2 | Mix wet ingredients | 1 minute | Glossy, uniform paste |
| 3 | Fold in dry ingredients | 2 minutes | Thick batter, no dry streaks |
| 4 | Bake | 25–30 minutes | Golden edges, clean knife test |
| 5 | Cool and slice | 30 minutes cooling | Fully set, no wobble |
Serving & Presentation
These bars are incredibly versatile. I love serving them warm from the oven with a dollop of Greek yogurt and a drizzle of honey — a nod to the Moroccan breakfast table where we often pair sweet pastries with creamy labneh. In my NYC kitchen, I sometimes dust them with powdered sugar and serve with a cup of black coffee for an afternoon pick-me-up.
For a more indulgent dessert, heat a bar for 10 seconds in the microwave and top with a scoop of vanilla ice cream. The contrast between the warm, fudgy bar and the cold ice cream is pure bliss. These also make excellent lunchbox treats — just wrap individually in parchment paper for a grab-and-go snack. I often double the batch and keep them in the freezer for last-minute visitors.
| Pairing Type | Suggestions | Why It Works |
|---|---|---|
| Side Dish | Fresh fruit salad, yogurt parfait | Adds brightness and acidity to balance sweetness |
| Sauce / Dip | Warm caramel sauce, chocolate ganache | Enhances indulgence while keeping the base simple |
| Beverage | Black coffee, cold brew, chai latte | Coffee’s bitterness cuts through richness for balance |
| Garnish | Flaky sea salt, toasted coconut flakes | Adds texture and a savory-sweet contrast |
Make-Ahead, Storage & Reheating
Between teaching cooking classes, writing this blog, and exploring the latest food spots in Brooklyn, I rely heavily on make-ahead recipes. These bars are perfect for meal prep. I usually bake a batch on Sunday and rely on them for quick breakfasts or snacks throughout the week.
| Method | Container | Duration | Reheating Tip |
|---|---|---|---|
| Refrigerator | Airtight container | Up to 5 days | Microwave for 15 seconds or reheat in a 350°F oven for 5 minutes |
| Freezer | Zip-top bag or freezer-safe container | Up to 3 months | Thaw overnight in fridge or warm directly from frozen in microwave for 20–30 seconds |
| Make-Ahead |
Reader Interactions |
Leave a Reply