Table of Contents
Homemade Nutter Butters – Soft Baked Peanut Butter Cookies with Creamy Filling
I still remember the first time I bit into a Nutter Butter as a kid here in New York City—it was love at first bite. That perfect crunch giving way to that impossibly creamy, salty-sweet peanut butter filling? Pure magic. But when I trained at Le Cordon Bleu in Paris, I learned that the best recipes are the ones you make from scratch, with love and a few chef’s secrets. That’s exactly what I’ve captured in these Homemade Nutter Butters. They’re soft baked peanut butter cookies sandwiched around a luscious, creamy peanut butter filling—and they’re even better than the original. The key difference? Real butter, a touch of brown sugar for depth, and a technique I picked up from my mother’s kitchen in Morocco: rolling the dough logs in sugar before baking for that signature crackly crust.
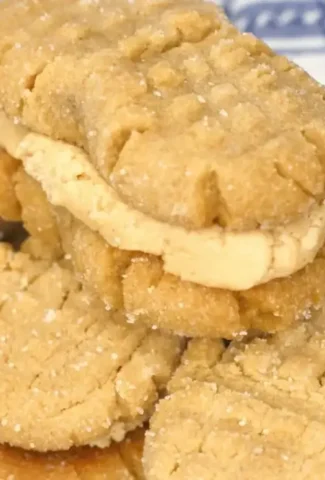
Imagine this: you pull a tray from the oven and the smell of toasted peanut butter and caramelized brown sugar fills your kitchen. The cookies are slightly puffed, golden on the edges, and still tender in the center. You let them cool, then spoon a generous dollop of that silky filling onto one, press another on top, and take a bite. The cookie gives way with a soft snap, then the filling melts over your tongue—creamy, slightly salty, and utterly satisfying. It’s a textural dream that I’ve perfected through years of testing, inspired by the bold flavors of NYC’s best bakeries and the precision I learned in Paris.
What makes my version stand out is its balance. I use a combination of light brown sugar and creamy peanut butter in the dough for a richer flavor, plus a pinch of kosher salt to brighten every note. The filling is where I really lean on my training: whipped butter and peanut butter, beaten until fluffy, then sweetened with powdered sugar and a splash of milk to keep it spreadable but stable. No artificial anything. In this post, I’ll share my foolproof method for shaping the cookies into those adorable peanut shapes, a pro tip for getting the perfect criss-cross pattern, and the most common mistake to avoid when making the filling. Let’s get baking, my friend!
Why This Homemade Nutter Butters Recipe Is the Best
The Flavor Secret: The magic starts with browning the butter? No—this recipe uses softened butter creamed with brown sugar and peanut butter, which creates a deep, caramel-like flavor without any extra steps. My Moroccan mother taught me that toasting nuts or seeds brings out their soul, and here, the peanut butter does the heavy lifting. The combination of creamy peanut butter in both the cookie and the filling ensures a double dose of nutty richness that’s layered and complex, never one-note.
Perfected Texture: In Paris, I learned that texture is king in pastry. These cookies are soft-baked, meaning they’re tender and slightly chewy, not crunchy. The trick is to bake them just until the edges are set but the centers still look soft—then let them finish setting on the baking sheet. The filling is whipped to a silky smoothness that contrasts beautifully with the cookie’s slight crumb. Rolling the dough in sugar before baking creates a delicate, crackly crust that adds another layer of texture.
Foolproof & Fast: This recipe is designed for home cooks, not just pastry chefs. I’ve streamlined it so you don’t need any special equipment—just a mixer, a baking sheet, and a fork for the criss-cross pattern. The dough comes together in under 15 minutes, and the filling takes just 5. Whether you’re a beginner or a seasoned baker, you’ll get perfect results every time because I’ve tested every variable. Plus, it’s a crowd-pleaser: the kids will love them, and adults will appreciate the sophisticated balance of sweet and salty.
Homemade Nutter Butters Ingredients
I source my ingredients from the Union Square Greenmarket when I can—local butter, farm-fresh eggs—and the rest from my favorite bodega down the street. For the peanut butter, I always use creamy, no-stir brands like Jif or Skippy for the cookie dough, but for the filling, I’ve found that a natural peanut butter works beautifully too. The key is to use what you love and adjust the salt accordingly.
Ingredients List
- 1 1/2 cups all purpose flour
- 1 teaspoon baking soda
- 1/4 teaspoon kosher salt
- 1/2 cup unsalted butter (softened)
- 1 cup light brown sugar
- 1 cup creamy peanut butter
- 1 large egg
- 1/2 teaspoon pure vanilla extract
- 1/2 cup sugar to roll the cookie dough in
- 1/4 cup unsalted butter (softened) – for filling
- 1/2 cup creamy peanut butter – for filling
- 1 1/2 cups powdered sugar
- 2 Tablespoons milk
- 1/4 teaspoon vanilla extract – for filling
Ingredient Spotlight
Peanut Butter (Cookie Dough & Filling): This is the star. For the dough, I recommend a commercial creamy peanut butter like Jif or Skippy because they have a higher sugar and stabilizer content, which helps the cookies spread evenly and stay soft. For the filling, you can use natural peanut butter (just stir it well) for a more pronounced peanut flavor, though it may make the filling slightly less stable at room temperature. Always check the label: avoid “natural” brands with oil on top unless you stir them thoroughly—otherwise the filling might separate.
Light Brown Sugar: Brown sugar brings moisture and a hint of molasses that deepens the peanut flavor. I tested this with granulated sugar once, and the cookies were flatter and less flavorful. Light brown sugar is my go-to because it’s not as intense as dark brown, which can overpower the peanut butter. If you only have dark brown, use 3/4 cup and add 2 tablespoons of granulated sugar.
Butter (Both Parts): Unsalted butter gives you control over the salt level. In the dough, it’s creamed with brown sugar to create a light, tender crumb. In the filling, it’s beaten with peanut butter until fluffy—this is critical for that airy, melt-in-your-mouth texture. European-style butter (like Plugrà or Kerrygold) has a higher fat content and will make the cookies even more tender, but regular American butter works perfectly too.
| Original Ingredient | Best Substitution | Flavor / Texture Impact |
|---|---|---|
| Creamy Peanut Butter (dough) | Crunchy Peanut Butter | Adds texture; cookies may spread slightly less |
| All Purpose Flour | Whole Wheat Pastry Flour | More nutty flavor, denser cookie |
| Unsalted Butter (dough) | Coconut Oil (solid, room temp) | Slight coconut flavor, more fragile cookie |
How to Make Homemade Nutter Butters – Step-by-Step
Let’s walk through this together. I’ve broken it down into simple steps, and I promise—if you follow these instructions, you’ll have a tray of perfect peanut butter sandwich cookies in no time.
Step 1: Prepare the Oven and Dough
Preheat your oven to 350°F and line a cookie sheet with parchment paper or a silicone baking mat. Pour 1/2 cup of sugar into a small bowl and set aside—this is for rolling the dough logs. In a separate mixing bowl, whisk together 1 1/2 cups all purpose flour, 1 teaspoon baking soda, and 1/4 teaspoon kosher salt. Set that aside too.
💡 Samantha’s Pro Tip: Always whisk your dry ingredients together to evenly distribute the baking soda and salt. This ensures every cookie rises uniformly and isn’t salty in just one bite.
Step 2: Cream Butter, Sugars, and Peanut Butter
Using a standing mixer with the paddle attachment or an electric hand mixer, cream together 1/2 cup softened unsalted butter, 1 cup light brown sugar, and 1 cup creamy peanut butter. Beat on medium speed for about 2-3 minutes until the mixture is light, fluffy, and pale in color. Scrape down the sides of the bowl at least once.
⚠️ Common Mistake to Avoid: Don’t over-cream! If you beat too long, the butter will start to melt from the friction, making the cookies spread too thin. Stop when the mixture looks airy and uniform.
Step 3: Add Egg and Vanilla
Add 1 large egg and 1/2 teaspoon pure vanilla extract to the creamed mixture. Mix on low speed until just combined. The batter will look a bit curdled at this point—that’s totally normal. Don’t worry, it will come together once you add the dry ingredients.
Step 4: Combine Wet and Dry Ingredients
Gradually pour the bowl of dry ingredients into the wet mixture while mixing on low speed. Mix only until the flour disappears—no more than 30 seconds. Over-mixing here will develop gluten and make your cookies tough.
💡 Samantha’s Pro Tip: Use a rubber spatula to fold in the last bit of flour if needed. This prevents over-mixing and gives you more control.
Step 5: Shape and Roll the Dough
Divide the dough into small balls, about 1 1/2 tablespoons each (I use a cookie scoop for consistency). Form each ball into a log shape about 2 inches long—this creates the classic peanut shape. Roll each log in the small bowl of sugar you set aside earlier, coating it evenly.
⚠️ Common Mistake to Avoid: Don’t skip the sugar rolling! That sugar layer is what gives the cookies their signature crackly, slightly crispy exterior that contrasts with the soft interior. Without it, the cookies will be pale and plain.
Step 6: Create the Peanut Shape and Criss-Cross
Place the dough logs on the prepared cookie sheet, about 2 inches apart. Using the tines of a fork, gently press a criss-cross pattern into each log—first lengthwise, then crosswise. Then, pinch each end of the log slightly to create the pointed peanut shape. This step gives them that iconic look.
Step 7: Bake to Perfection
Bake for 10-12 minutes, until the edges are lightly browned but the centers still look soft and slightly puffed. The cookies will continue to set as they cool on the baking sheet. Remove from the oven and let them cool on the sheet for 5 minutes before transferring to a wire rack to cool completely.
💡 Samantha’s Pro Tip: Resist the urge to over-bake! The cookies will look underdone in the center, but that’s exactly what you want. They’ll firm up as they cool, giving you a soft, chewy texture. Over-baked cookies become dry and crumbly.
Step 8: Make the Creamy Filling
While the cookies cool, prepare the filling. In a clean mixing bowl (or the same one, washed), beat 1/4 cup softened unsalted butter and 1/2 cup creamy peanut butter on medium speed until light and fluffy—about 2 minutes. Add 1 1/2 cups powdered sugar, 2 tablespoons milk, and 1/4 teaspoon vanilla extract. Beat on low speed to combine, then increase to medium and beat for another 1-2 minutes until smooth and spreadable.
Step 9: Assemble the Sandwiches
Group your cooled baked cookies into pairs of similar size and shape. Spoon about 1 tablespoon of filling onto the flat side of one cookie from each pair. Top with the second cookie, flat side down, and gently press to spread the filling to the edges. Repeat with all pairs.
⚠️ Common Mistake to Avoid: Don’t overfill! Too much filling will squish out the sides when you press the cookies together. One tablespoon per sandwich is the perfect amount—enough to taste but not so much that it makes a mess.
| Step | Action | Duration | Key Visual Cue |
|---|---|---|---|
| 1 | Prep oven & dry ingredients | 5 mins | Fluffy dry blend |
| 2 | Cream butter, sugar, peanut butter | 2-3 mins | Pale, fluffy mixture |
| 3 | Add egg & vanilla | 30 secs | Slightly curdled |
| 4 | Mix in dry ingredients | 30 secs | No flour streaks |
| 5 | Shape & roll in sugar | 5 mins | Log shapes coated in sugar |
| 6 | Make peanut shape & criss-cross | 3 mins | Visible fork marks |
| 7 | Bake | 10-12 mins | Light brown edges, soft centers |
| 8 | Make filling | 3 mins | Smooth, spreadable |
| 9 | Assemble sandwiches | 5 mins |
Reader Interactions |
Leave a Reply